Title: TX-EcoDragon's 3D Foamy Raven Build Thread
Post by: TX-EcoDragon on January 28, 2005, 11:38:56 pm
Well,
Through the wonders of modern debt technology, ie. a Credit Card, I should soon be in posession of the Raven from www.3dfoamy.com I am building one of these as a gift for a nephew, and one for me pretty soon.
My specs are
Plane: 3D Foamy Raven "Pro" package with Depron and G-Force wing, and Carbon Fiber Landing Gear kit.
Powerplant: AXI 2212/34
Prop: APC 11x4.7
Receiver: Berg 6*G III
Electronic speed control: Castle Creations Phoenix 10
Servos: (4) Hitec Hs-55 sub micros
two 6 inch servo extensions
Testors Spray Enamel in Dark Red 1207 , Black 1247, Gold 1244, Dark Blue 1211, Silver 1246 (mist over blue canopy), and a Testors Gold Paint Marker (I wish I bought this sooner, it works great!)
Batteries: Apogee High Discharge 830 mAh 3cell Lithium Polymer packs
Apache 2500 LiPo Safe Charger (LiPo packs are known to blow up, like. . . for real!)
All up ready to fly weight with Apogee 830 3 cell, and after a few rebuilds, and a top creations AXI stick mount is now 12.9 oz.
Some of the needed gear has already arrived, but I am still waiting on the Kit, motor, Batteries, Charger.
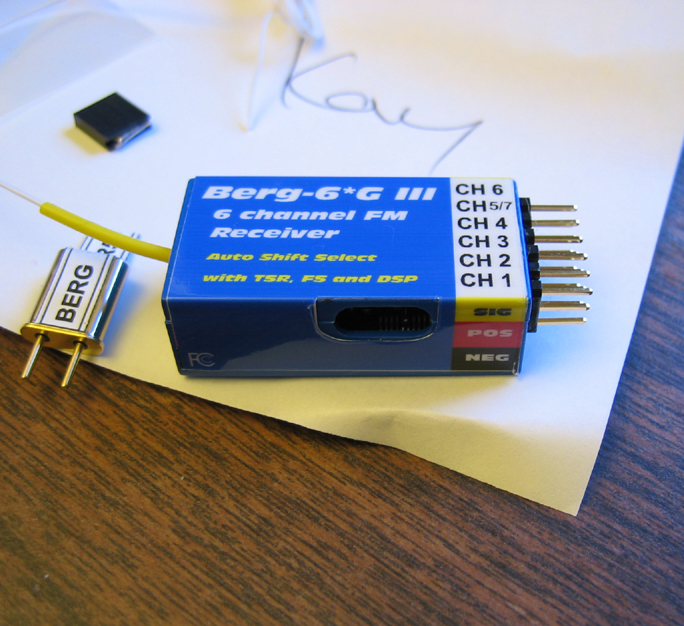
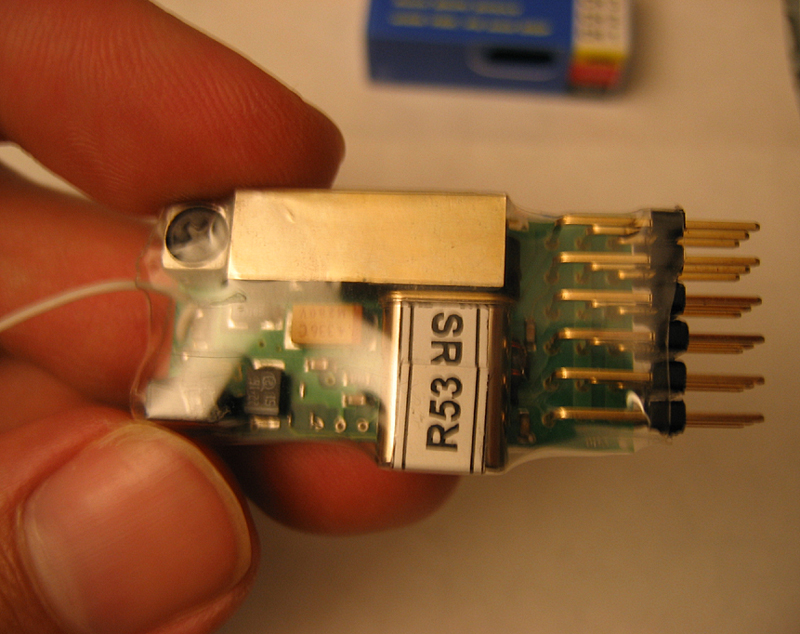
Here is the Berg 6* G III Receiver as it came out of the package today. These are very small, light, and jam packed with awesome features, see the link below if interested.
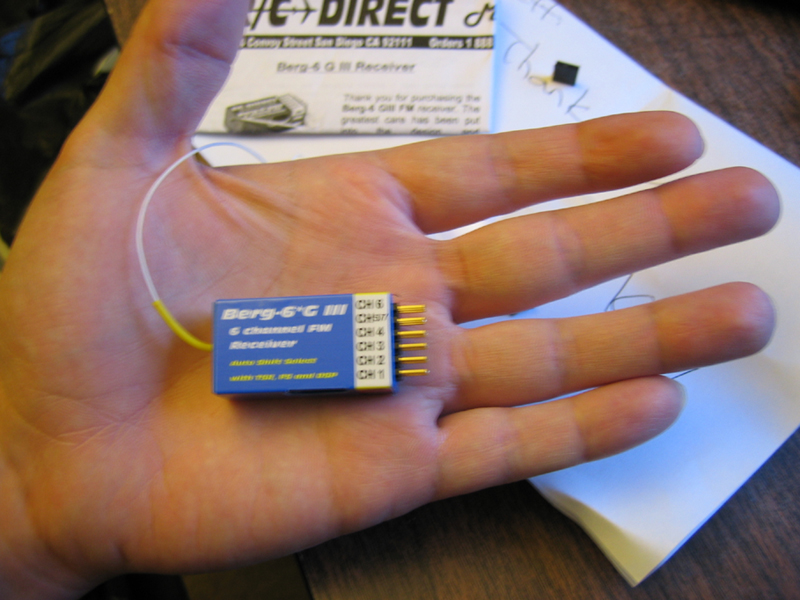
See, it's pretty small. . . and as I said pretty light at 13 grams. . .but. . .
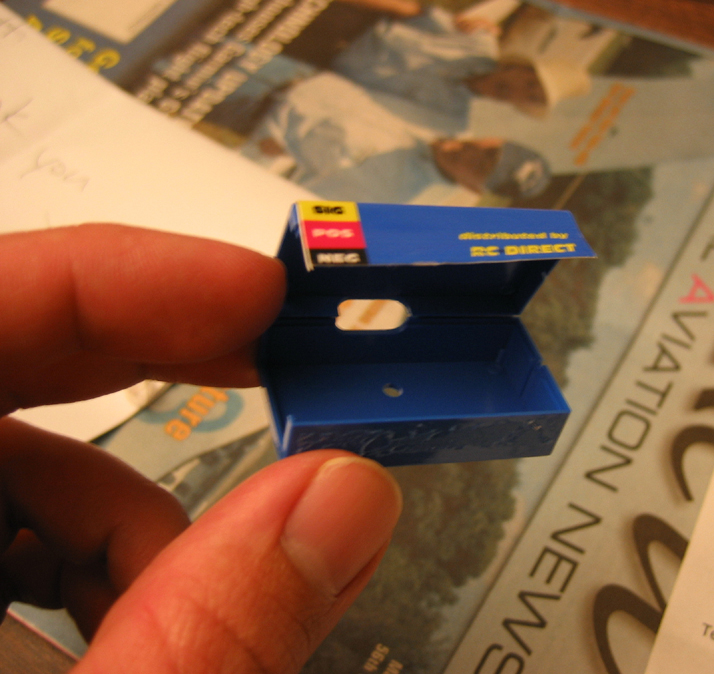
Slide a notecard under the adhesive opposite the Crystal and gently lift it off and you can open the case as seen here.
Which gives you this and saves you 3.5 grams off the total weight!
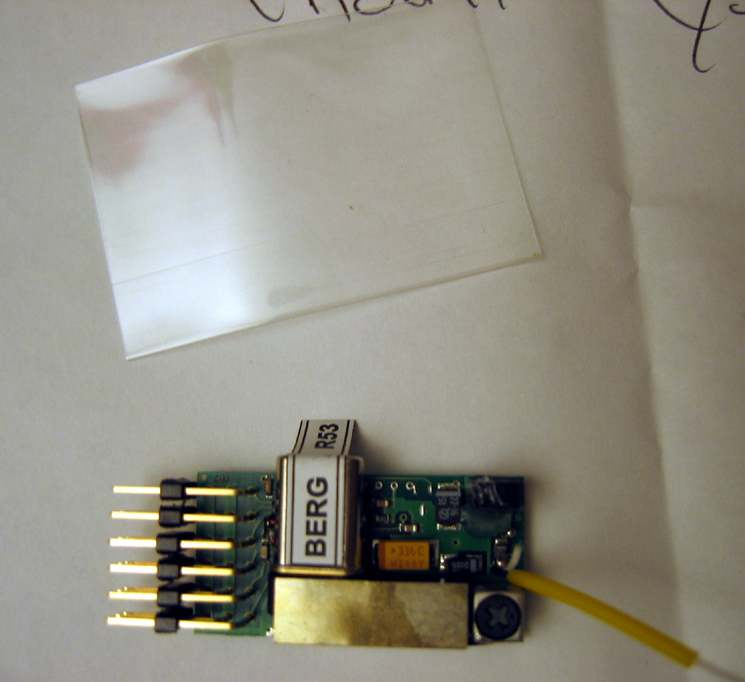
Berg is nice enough to provide some pre-cut shrink wrap along with the Receiver
Install the Crystal, then place the bare receiver inside the shrink wrap tube and gently heat with heat gun (blow dryer) or as I did you can use a Iron-on covering iron *near* but not touching it. to shrink the tubing tight around the board. I also trimmed the extra wrap off the ends a bit, mine won't need much protection from the elements anyway.

Here is a side view once it's wrapped.
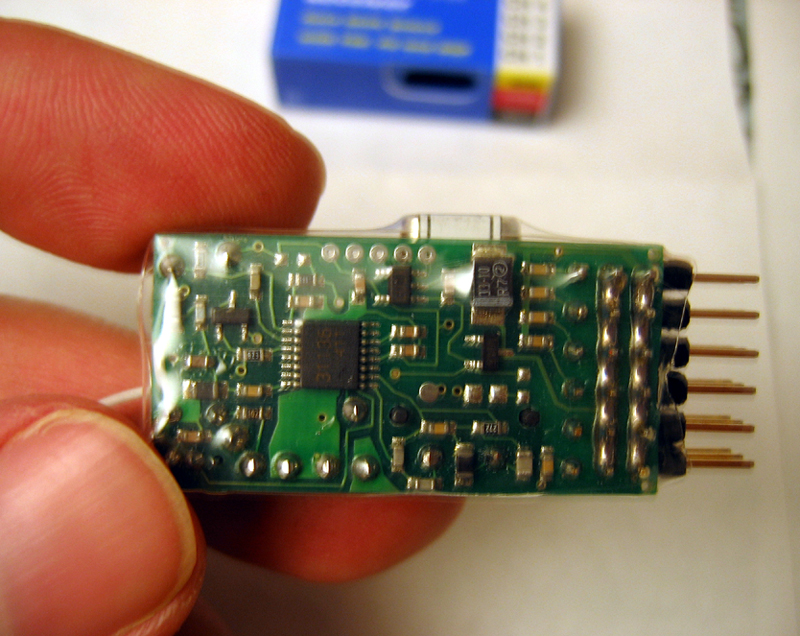
And just to be complete about it, here is the bottom of the receiver.
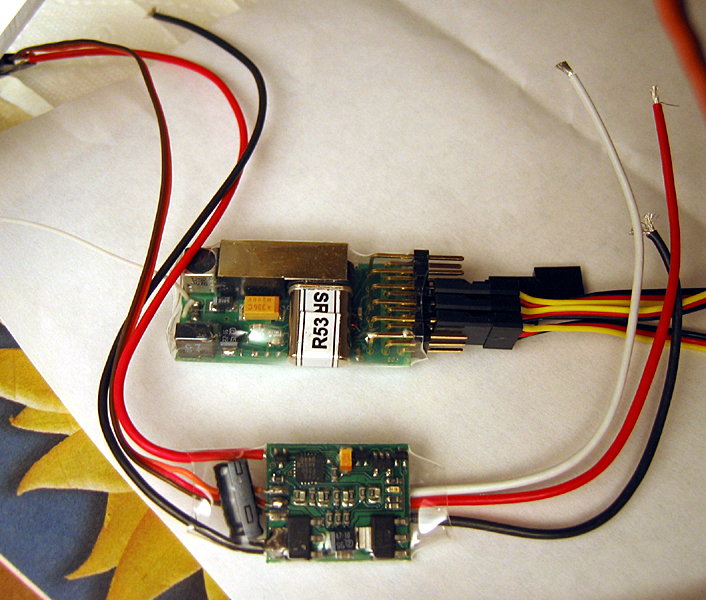
Here is the Castle Creations Phoenix 10 ESC next to the receiver. . . this little wonder is dwarfed even by the Berg Receiver. This is also shrink wrapped but that is how it comes from the manufacturer. Most of the weight of this is the wires.
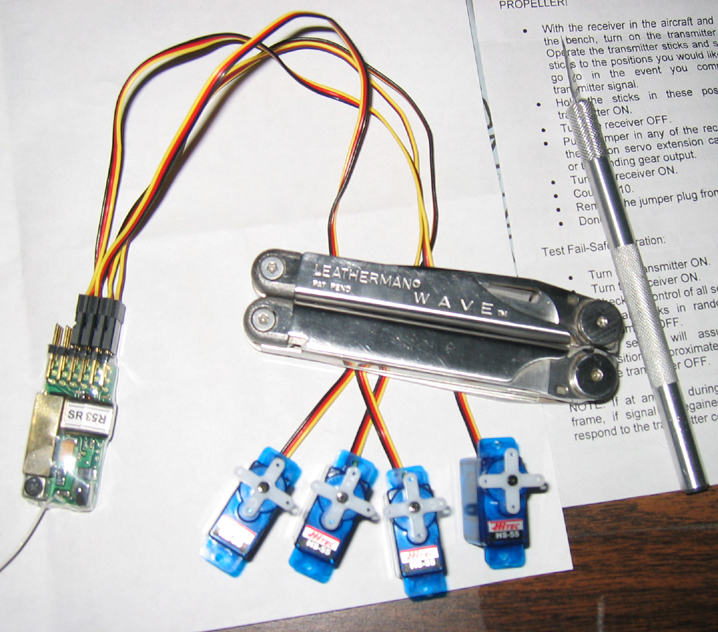
And while we are on the subject of small, here I am getting ready to test the servos and receiver. These little servos are interesting in their transparent blue cases, and they sure are tiny and cute!! :-p
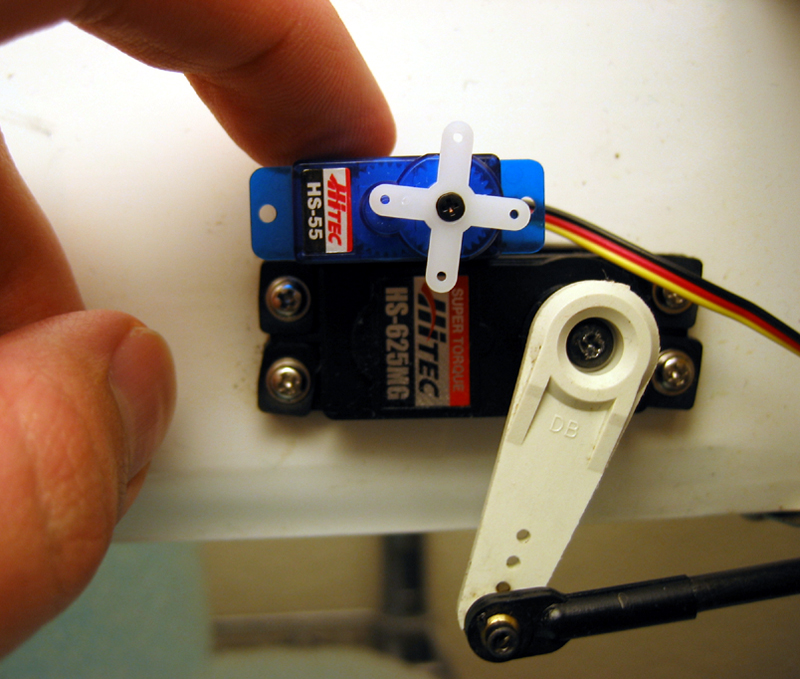
For a size comparison, here is one of the micro servos next to the HS-625MG rudder servo on my Funtana.
Berg Rx: http://www.aeromicro.com/berg6g3.htm
Phoenix 10 ESC: http://www.castlecreations.com/products/airplane/brushless/phoenix-10.html
But I got mine, as well as the the servos, from towehobbies with 20.00 off my order :-D
Through the wonders of modern debt technology, ie. a Credit Card, I should soon be in posession of the Raven from www.3dfoamy.com I am building one of these as a gift for a nephew, and one for me pretty soon.
My specs are
Plane: 3D Foamy Raven "Pro" package with Depron and G-Force wing, and Carbon Fiber Landing Gear kit.
Powerplant: AXI 2212/34
Prop: APC 11x4.7
Receiver: Berg 6*G III
Electronic speed control: Castle Creations Phoenix 10
Servos: (4) Hitec Hs-55 sub micros
two 6 inch servo extensions
Testors Spray Enamel in Dark Red 1207 , Black 1247, Gold 1244, Dark Blue 1211, Silver 1246 (mist over blue canopy), and a Testors Gold Paint Marker (I wish I bought this sooner, it works great!)
Batteries: Apogee High Discharge 830 mAh 3cell Lithium Polymer packs
Apache 2500 LiPo Safe Charger (LiPo packs are known to blow up, like. . . for real!)
All up ready to fly weight with Apogee 830 3 cell, and after a few rebuilds, and a top creations AXI stick mount is now 12.9 oz.
Some of the needed gear has already arrived, but I am still waiting on the Kit, motor, Batteries, Charger.
Here is the Berg 6* G III Receiver as it came out of the package today. These are very small, light, and jam packed with awesome features, see the link below if interested.
See, it's pretty small. . . and as I said pretty light at 13 grams. . .but. . .
Slide a notecard under the adhesive opposite the Crystal and gently lift it off and you can open the case as seen here.
Which gives you this and saves you 3.5 grams off the total weight!
Berg is nice enough to provide some pre-cut shrink wrap along with the Receiver
Install the Crystal, then place the bare receiver inside the shrink wrap tube and gently heat with heat gun (blow dryer) or as I did you can use a Iron-on covering iron *near* but not touching it. to shrink the tubing tight around the board. I also trimmed the extra wrap off the ends a bit, mine won't need much protection from the elements anyway.
Here is a side view once it's wrapped.
And just to be complete about it, here is the bottom of the receiver.
Here is the Castle Creations Phoenix 10 ESC next to the receiver. . . this little wonder is dwarfed even by the Berg Receiver. This is also shrink wrapped but that is how it comes from the manufacturer. Most of the weight of this is the wires.
And while we are on the subject of small, here I am getting ready to test the servos and receiver. These little servos are interesting in their transparent blue cases, and they sure are tiny and cute!! :-p
For a size comparison, here is one of the micro servos next to the HS-625MG rudder servo on my Funtana.
Berg Rx: http://www.aeromicro.com/berg6g3.htm
Phoenix 10 ESC: http://www.castlecreations.com/products/airplane/brushless/phoenix-10.html
But I got mine, as well as the the servos, from towehobbies with 20.00 off my order :-D
Title: Re: TX-EcoDragon's 3D Foamy Raven Build Thread
Post by: TX-Deck on January 29, 2005, 10:01:39 am
Heh, build threads are cool..... heh heh.....Looking great, keep us posted!TX-Deck out.
Title: Re: TX-EcoDragon's 3D Foamy Raven Build Thread
Post by: TX-EcoDragon on January 29, 2005, 03:28:51 pm
Looks like the Raven should ship out on monday, the rest of the gear should be here monday. . .
Title: Re: TX-EcoDragon's 3D Foamy Raven Build Thread
Post by: TX-EcoDragon on February 01, 2005, 03:46:58 am
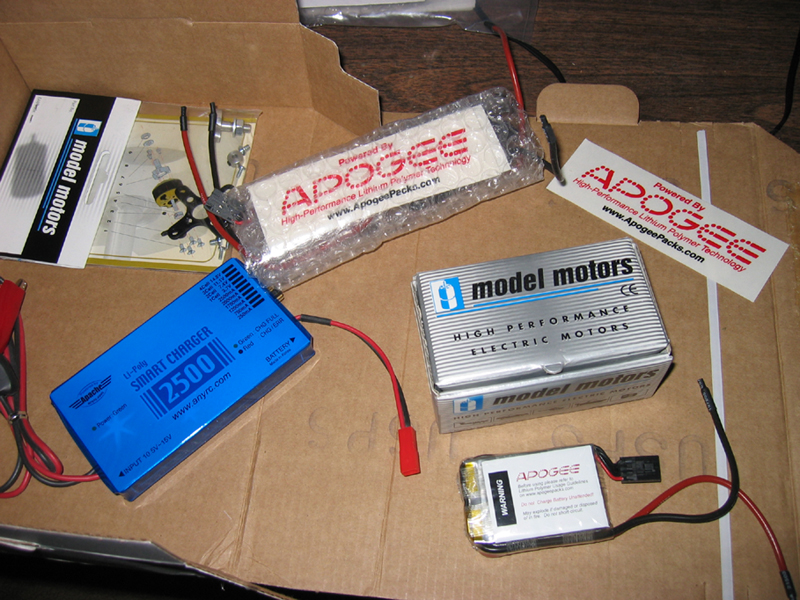 Well, today I received the charger, the three battery packs, the AXI 2212/34 motor and motor mount. . .Now I just need the plane, Dean's Connectors, solder, and other miscellaneous gear to get started.When the box came I thought there must be another box somewhere, the box is tiny, it wouldn't even hold a VHS tape. . . but then sure enough all was there. . . I just can't seem to get used to how small all this stuff is!
Title: Re: TX-EcoDragon's 3D Foamy Raven Build Thread
Post by: TX-Deck on February 01, 2005, 09:10:54 am
If you are really eager to get to work, you could make a plane outta that cardboard box, right?hehehe....TX-Deck out.
Title: Re: TX-EcoDragon's 3D Foamy Raven Build Thread
Post by: TX-CUDA on February 01, 2005, 08:46:40 pm
...Eco, just be thankful that you are still young and have your eyesight! Just looking at those small components for your plane had me looking for my WalMart +2.5 specials!!TX-CudaMinister of Information
Title: Re: TX-EcoDragon's 3D Foamy Raven Build Thread
Post by: TX-EcoDragon on February 02, 2005, 06:37:58 pm
Oh . . .that's probably just my crappy camera!!! ;-)I just picked up my Raven at the front office. The USPS shipping was pretty quick for being sent on monday (today is Wed.). The box did arrive damaged, and there are portions of the depron that are crushed a little on a few of the parts, though that's not Levi's fault. It was well packaged, just not well treated by the USPS. I patched the ailerons where they were crushed and the foam skin was a creased, it's a little less nice looking, but only when you are close. It's mostly just cosmetic and should be fine as far as flying goes. Otherwise the kit looks great. . . the CF gear are pretty snazzy too! Levi did forget to include my AXI motor mount though, or perhaps it fell out of the rather large hole in the box, the carbon fiber elevator joiner rod was also missing, he said he would send them out tomorrow. This is a pretty darn nice kit for the money!EDIT: Because of the box and contents damage as well as the missing joiner rod and motor mount Levi is sending me a replacement kit, even thought I told him that this one was in good enough shape. . . nice guy!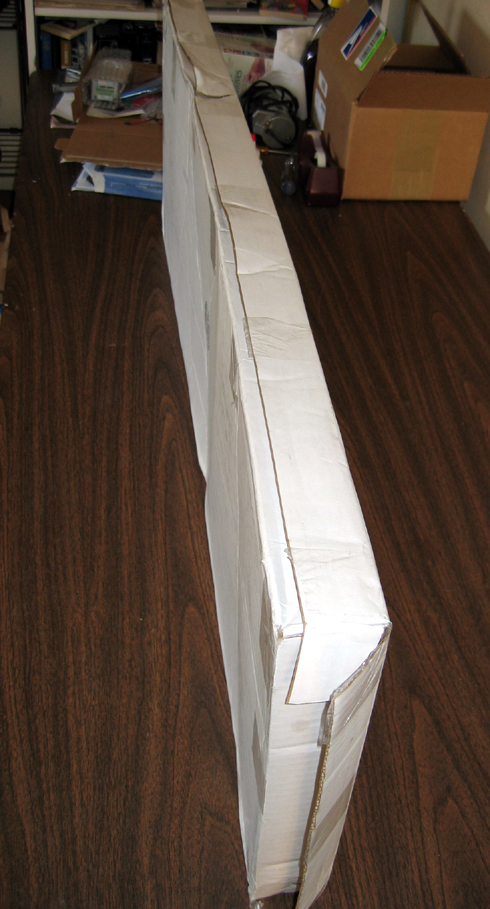 I was a bit worried when I saw the box. . . though the damage was light.
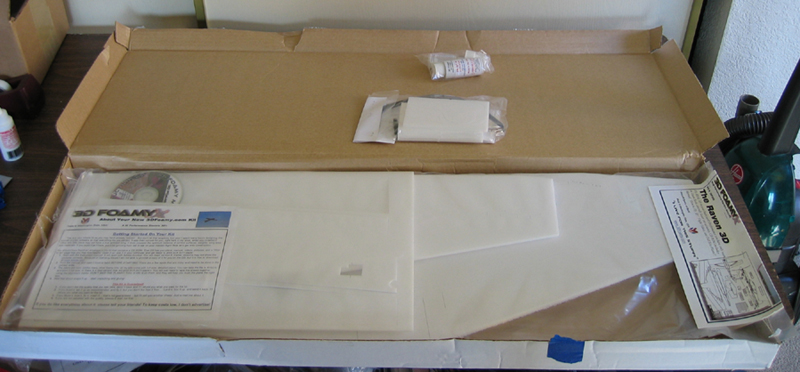 Here is what's inside.
 Here is the Carbon Fiber Landing Gear kit, with the wheel pants and misc. parts.
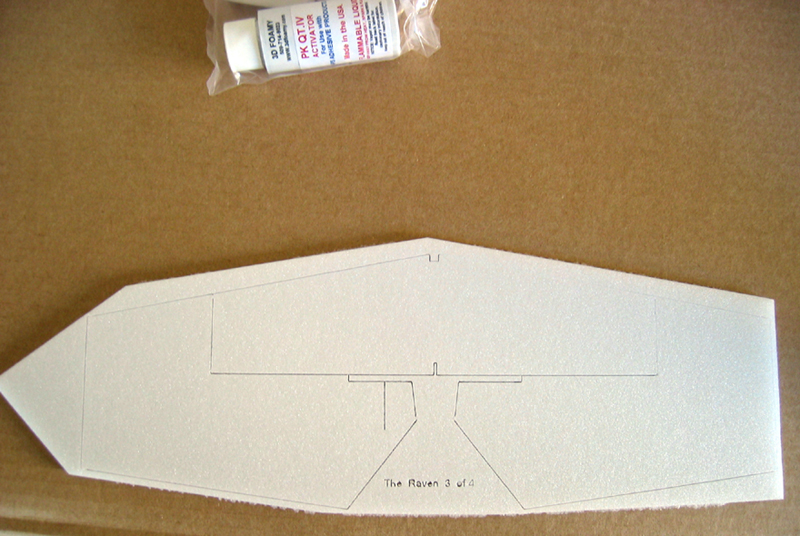 Here you see the CNC Laser cut 6mm depron horizontal stabilizer and elevator halves.
 The Fuselage and Rudder. Jsut below this part you see the wing and fuse sides witha little damage.
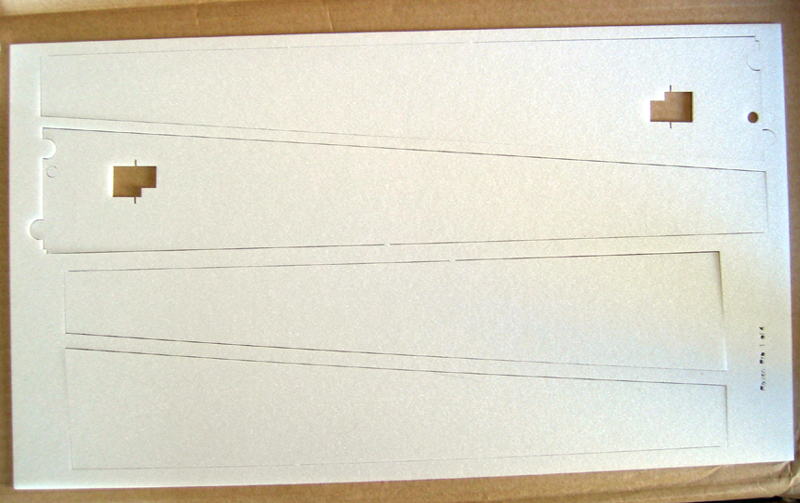 These are the wing skins which will be mounted to the main wing leading edges on top and bottom. . . you can also see the aileron servo cutouts on the bottom skins.
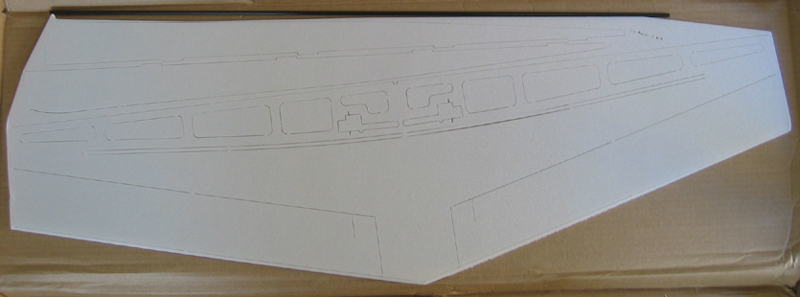 Here is the Wing, and Fuselage sides, on top of them you can see the provided carbon fiber spar tube. You can see that this is not just a flat plate wing, this shot shows the lightening holes in the leading edge under where the skins will go, the servo wire trenches that will conceal the wiring, the large ailerons, and the precut carbon fiber spar slot. There are some compressed/folded over areas on the outboard portions of both of the ailerons from shipping damage but I patched them with some scrap foam, and they are not going to be too obvious unless your looking close.
I was a bit worried when I saw the box. . . though the damage was light.Here is what's inside.Here is the Carbon Fiber Landing Gear kit, with the wheel pants and misc. parts.Here you see the CNC Laser cut 6mm depron horizontal stabilizer and elevator halves.The Fuselage and Rudder. Jsut below this part you see the wing and fuse sides witha little damage.These are the wing skins which will be mounted to the main wing leading edges on top and bottom. . . you can also see the aileron servo cutouts on the bottom skins.Here is the Wing, and Fuselage sides, on top of them you can see the provided carbon fiber spar tube. You can see that this is not just a flat plate wing, this shot shows the lightening holes in the leading edge under where the skins will go, the servo wire trenches that will conceal the wiring, the large ailerons, and the precut carbon fiber spar slot. There are some compressed/folded over areas on the outboard portions of both of the ailerons from shipping damage but I patched them with some scrap foam, and they are not going to be too obvious unless your looking close. Title: Re: TX-EcoDragon's 3D Foamy Raven Build Thread
Post by: TX-CUDA on February 02, 2005, 11:28:09 pm
....looks good Eco. What would one of these kits with the other stuff such as servos and rcvrs/tsrs run if one of us would like to build the same thing? And what would the Helo front end add to the cost? Just curious here as I am still pumping parts into this darn box....TX-CudaMinister of Information
Title: Re: TX-EcoDragon's 3D Foamy Raven Build Thread
Post by: TX-EcoDragon on February 03, 2005, 01:46:34 am
Well, the truth is that the startup cost for the initial purchase is still as high as a more substantial R/C model. Part of this is because the motor, speed control, servos, and receiver are not really much cheaper, in fact compared to an entry level .40 size glow model these are maybe even *more*! A big part of this is the higher tech stuff in use. The powerplants, the Lithium Polymer batteries, the speed controllers, the receiver, and the servos are all very small and light yet still fully featured so this rather cutting edge stuff. Having said that the cost of operation is basically zero, and with these the airplane itself is usually a few dollars for plans built ones, up to $50-60 for the more prefabricated, larger sized models. Keep in mind though that unlike a larger balsa built up model these can be dumb thumbed into teh ground at low speeds without much issue. . . maybe the fuse breaks in half. . well. . you brought your tape and glue with you right? It's that simple. Not to mention that once you have the gear each plane you get after that will only cost you a little cash. Now, to get to the point.Here is a very complete kit sold as a package deal from FancyFoam for $329.00:http://www.fancyfoam.com/extra300l.htmWith this one you could probably stand to get another battery so you can have multiple flights, the charger will run you 45.00-50.00, and the transmitter can be a basic four channel radio which will run you as little as 90.00, though a radio with dual rates and exponential, and maybe some spoileron mixing functions is a wise idea if you want to best setup and this will be about 150.00-170.00 for the cheapest versions of these radios (these prices dont include the onboard gear, but the kit listed above does). You will also need some epoxy, some CA, and some CA kicker so the minimum total cost for the above would be:329.00+89+46+20=484Here is the all up deal for the shockflyer like ben and I have, the price is in the same range:http://www.hobby-lobby.com/shockflyer-edge.htmThe thing about these that makes them worth it for someone into RC is that you can fly everyday, it costs you nothing each time, you dont have to drive to the model airstrip, there is no noise, no cleanup, no club dues, no AMA insurance, if you crash most likely you can just use some glue and fix it. . if not, you just buy another plane for 30 bucks and off you go. Here is the one I bought: http://www.3dfoamy.com/raven.htmOh, I guess I do have two older 4 channel and two 6 channel Airtronics Vangaurd Radios. . . I would pretty much give these away to a TX member for shiping costs, though a new one would probably be a better investment in particualr if you want to do anything fancy. The variable pitch prop (tailrotor) modification is not really gonna be that pricey in itself, though to make it user friendly you will need a more capable transmitter than most 6 channels are. . .a JR 6102 or Futaba 7C would probably work allright. Also, these are custom jobs so you need to make the hollow motor shaft and linkage assembly with a suitable motor, as well as buy the tailrotor, whihc probably is pretty cheap. . and you'll need another servo which may require a greater investment in a higher cpacity speed controller to handle the extra current going to the radio gear. In the thread I posted (or did I??) are the people to ask about that. Here is the link to the RCG thread on the subject: http://www.rcgroups.com/forums/showthread.php?t=270730
Title: Re: TX-EcoDragon's 3D Foamy Raven Build Thread
Post by: TX-EcoDragon on February 03, 2005, 02:06:08 am
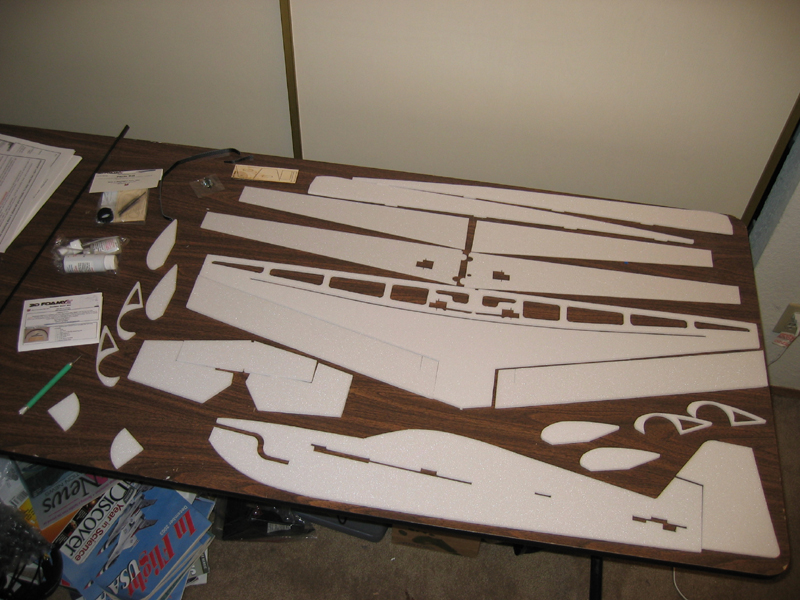 After checking the kit contents (mine was missing the custom motor mount I ordered as well as the elevator joiner rod) you need to liberate the laser cut parts from the Depron sheets using a hobby knife or razor. Here is what you will have afterwords.
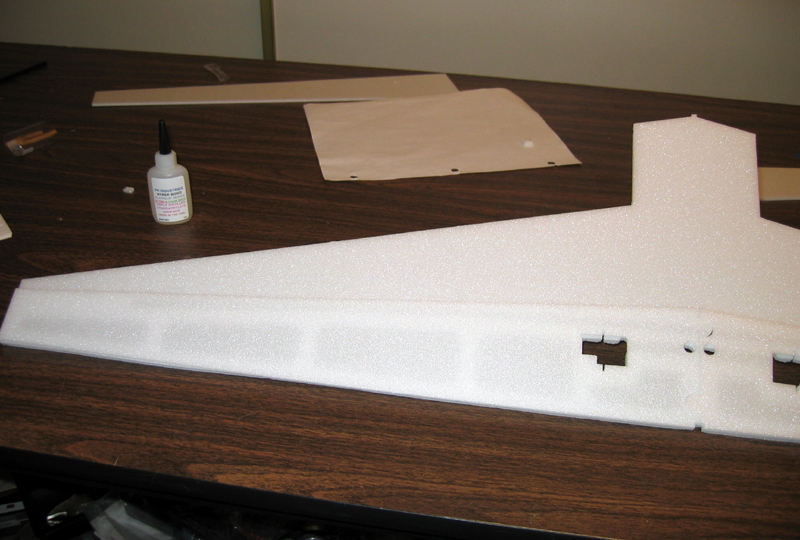 I skipped the next step according to the manual because I don't have the motor mount yet. . .and moved into skinning the wings. Here you see the bottom wing skins each installed on the main wing. This is done by using Foam Safe Odorless Cyanacrylate (CA) on one surface, and a foam safe kicker/accelerator on the other surface, or if you aren't sure you can work as fast as you need to for this combo you can use epoxy at a weight and time penalty. In the first picture you see these sitting just above the main wing. I used CA and kicker and had some trouble with it. The instant curing makes it harder to get everything lined up because of the cutouts in the main wing the foam can displace forward or back, and in my case the spar slot was a tad compressed after I added one of the skins, and with the glue cured there wasn't much I could do. If I was doing it again I would join up the parts without kicker and then flip the wing over to the opposite side and spray the kicker on through th holes in the wing cutouts to secure it, and then let it sit overnight so that the CA that didn't come in contact with kicker has time to cure.
Title: Re: TX-EcoDragon's 3D Foamy Raven Build Thread
Post by: TX-EcoDragon on February 03, 2005, 02:17:23 am
 Once the bottom skins are on you flip the wing over and can now insert the carbon fiber spar. On this kit the spar is kept under tension buy it being flexed forward as you can see. Once you verify the spar will seat correctly in the spar cutout prepare some 5-30 minunte epoxy and use this to secure the spar in the wing slot. Ensure that the spar is pressed flush in the groove, I like to weight the assemply a little to be certain things are where I want them, wipe off any excess with denatured alchohol treated cloth, and let the epoxy cure. Be careful to use the minimal amounts of glue in everything that you do on these, this is a prime example.
 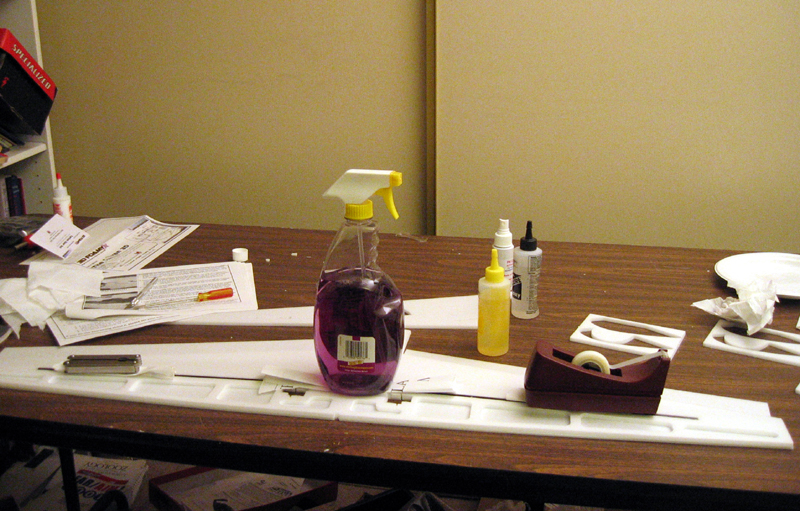 Here is my fancy shmancy method for weighing down the spar while the epoxy cures.
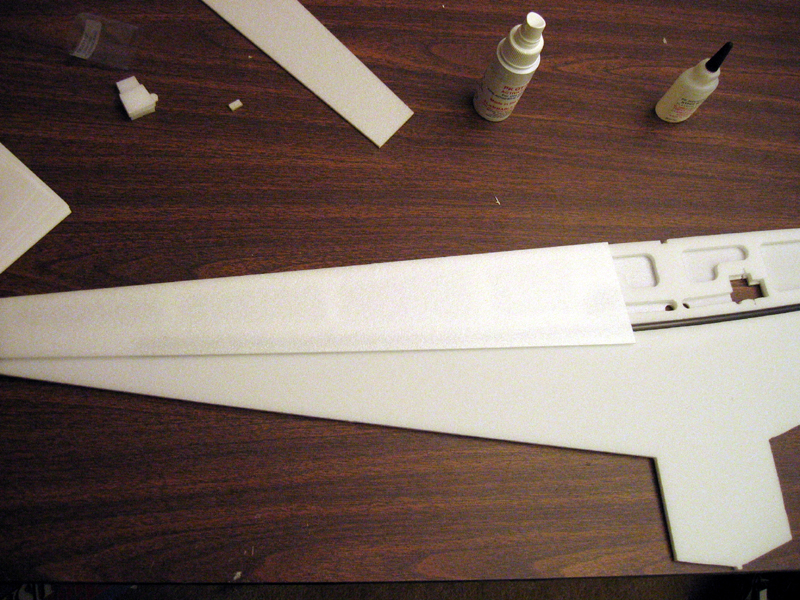 Once the epoxy has cured it is time to use CA and kicker to glue the top surface skins over the wings leading edge, just like was done on the underside of the wing leading edge. The top surface skins don't join in the middle as teh bottom ones did, these should be lined up flush witht eh leading edge and wing tips as seen above.
Title: Re: TX-EcoDragon's 3D Foamy Raven Build Thread
Post by: TX-Deck on February 03, 2005, 08:21:12 am
A Leatherman, some scotch tape, and some funky purple windex.... I love it!TX-Deck out.
Title: Re: TX-EcoDragon's 3D Foamy Raven Build Thread
Post by: TX-EcoDragon on February 06, 2005, 10:06:34 pm
 Here is the fully built main wing before sanding the Leading edge and before sanding the trailing edge of the top and bottom skins.
 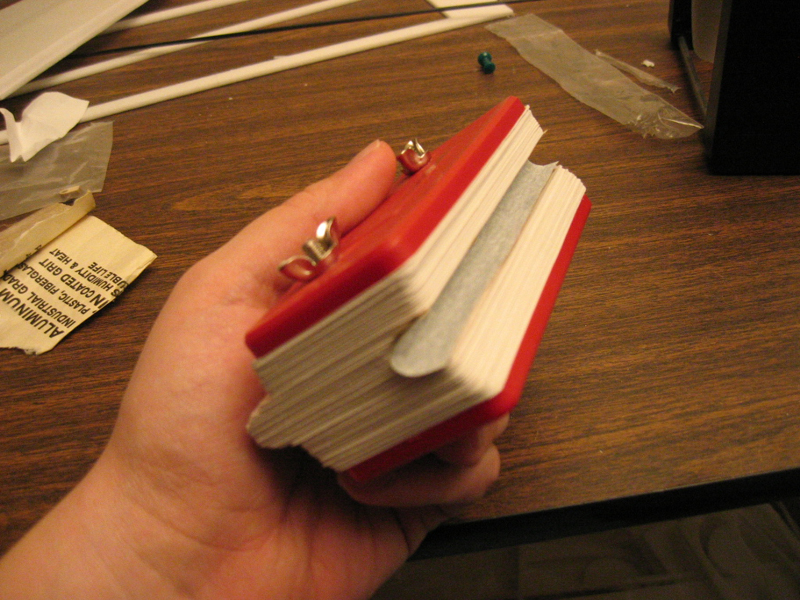 Here is a Great Planes Controur Sander loaded with 80 Grit sticky-backed sandpaper that I shaped as you see here, this will be used to sand the leading edge of the wing into an airfoiled shape.
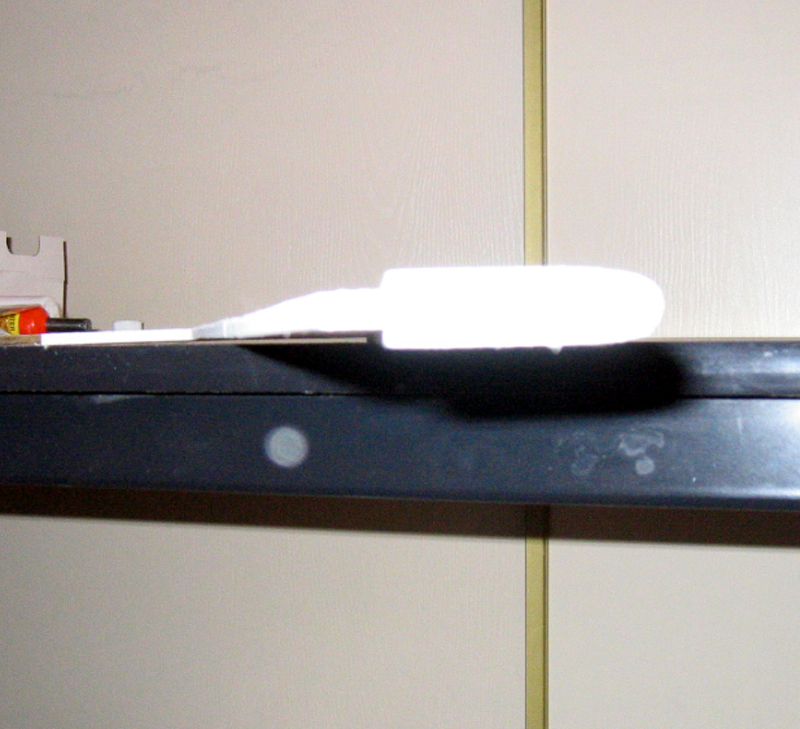 Here is the wing after sanding the LE.Note that I also beveled all leading edges of the control surfaces, and the trailing edges where they meet up.
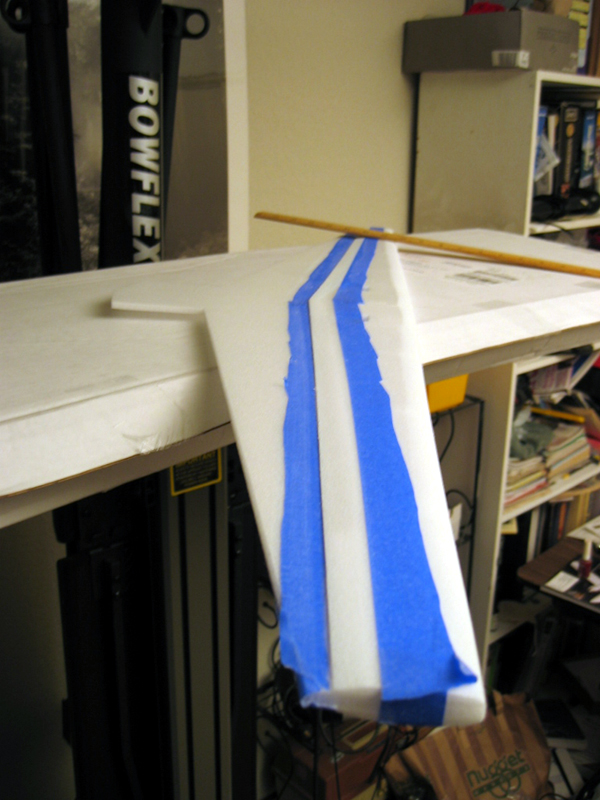 Here is how you prepare the wing to have the wing skin trailing edges blended into the main wing. (optional, and sanding may actually reduce lift and drag somewhat, I did a 50/50 blend, I didn't leave it as it, and I didn't blend it cleanly into the main wing.)Once you have this done use a sanding block with 80 grit sandpaper to smooth the trailing edge a bit. Do this on all four wing skins. The Masking Tape should help protect teh areas of the wing you dont want sanded. Here is a tip: I discovered after the wing was painted that the sanded foam, and the unsanded foam hold paint differently and you can see this in the finished product, though it's not bad, for htose of you who spend weeks building something like a foamy then you might want to consider a light sanding to the wing skins between the bevels at teh LE and TE of the skins to give them a more uniform appearance.
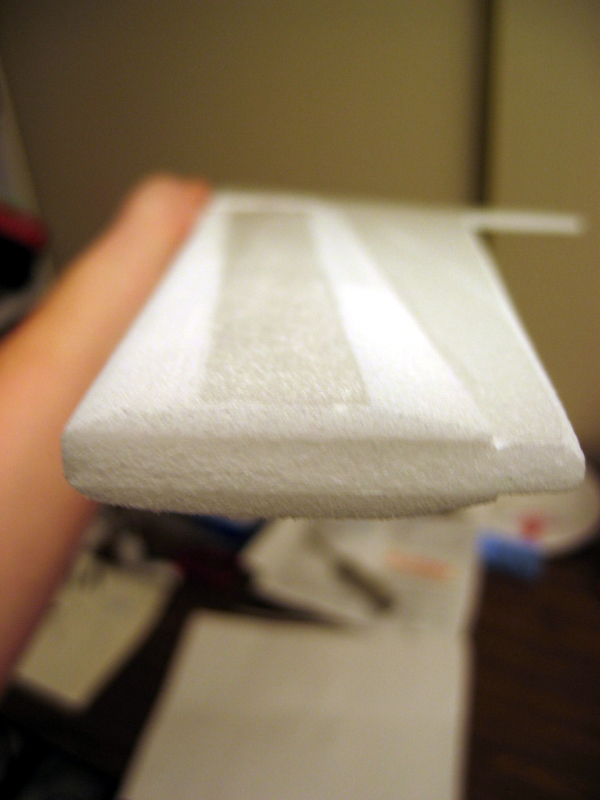 Here is what mine looks like all done.
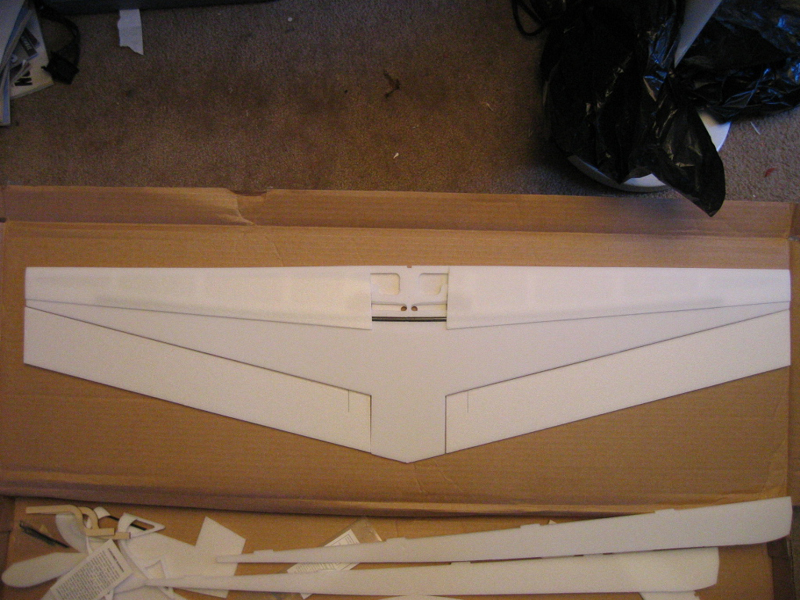 Here is the Wing and Ailerons mated up and ready to be painted. I have been trying ot figure out how to paint th rather tricky Raven Graphic onto the aircraft, I wasn't really sure how I was going to do it, but I think I have found a way!
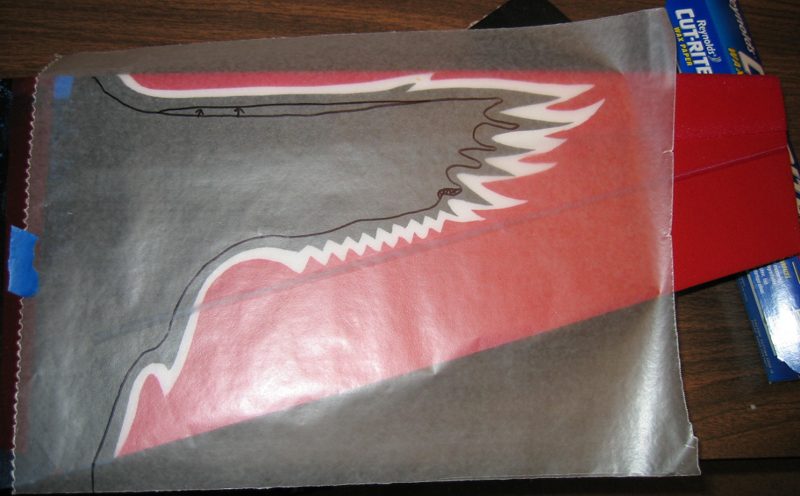
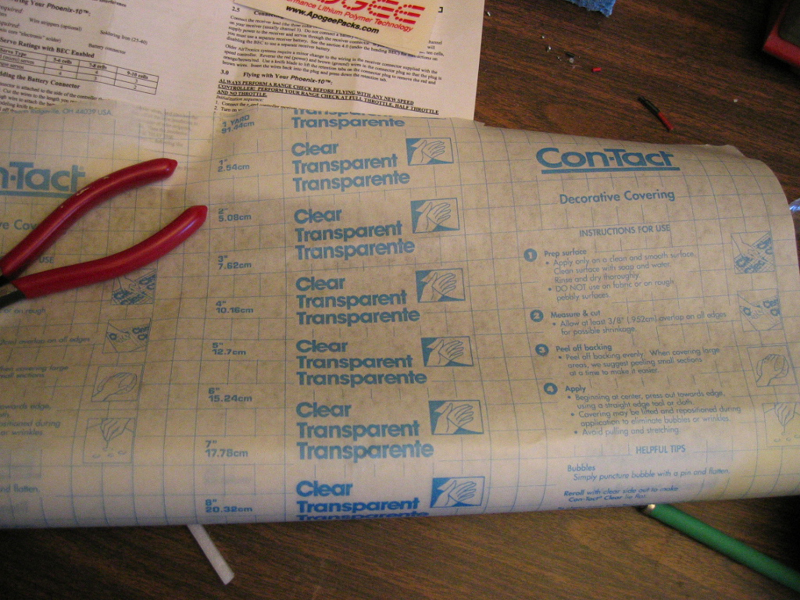 Here is some contact paper I found at the hardware store. It is low-tack, transparent, semi flexible (hope this works). I am experimenting here, but I did a test run and found that the contact paper didn't seem to damage the foam when removed, and didn't allow for any more bleeding than did my Blue Painters Masking tape. . .wish me luck.
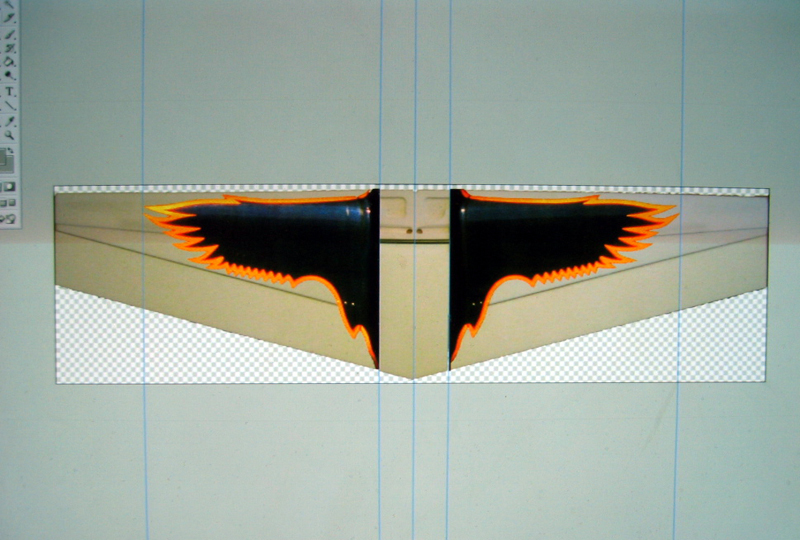 I used the photo before last to make the stencil mask for getting a true to life Raven graphic by taking the photo of the wing and setting it at 1:1 scale, and then resizing a photo of the full scale raven untill I had what I wanted.
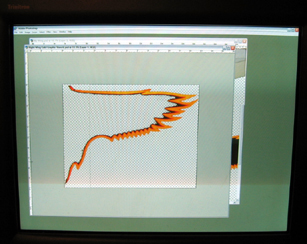 next I excised the blue/black portion of the Raven graphic to save on ink, and was then ready to output the Raven Graphic tiles on my InkJet. I split the image you see here in two so that I could print it at full size from my PC.
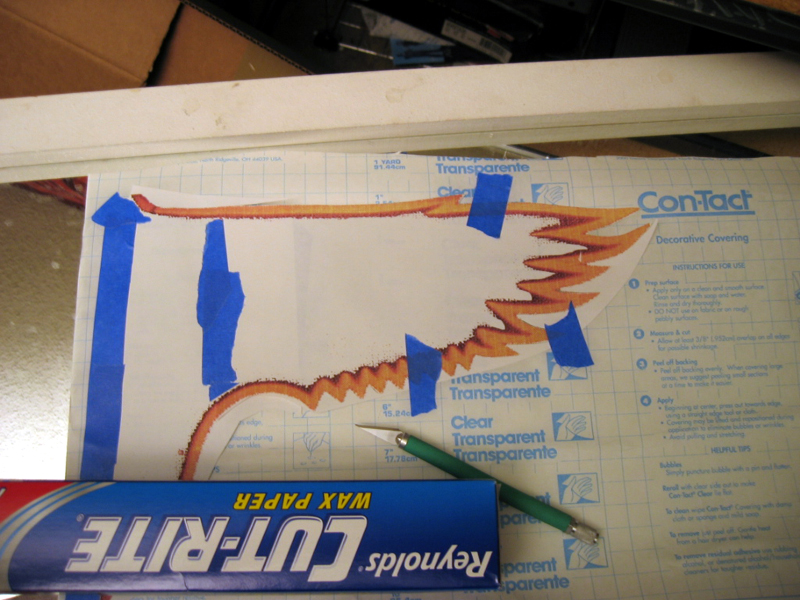 Then I lined up the two halves of the raven graphic and taped them together. Once they were lined up and joined I taped them to the contact paper.
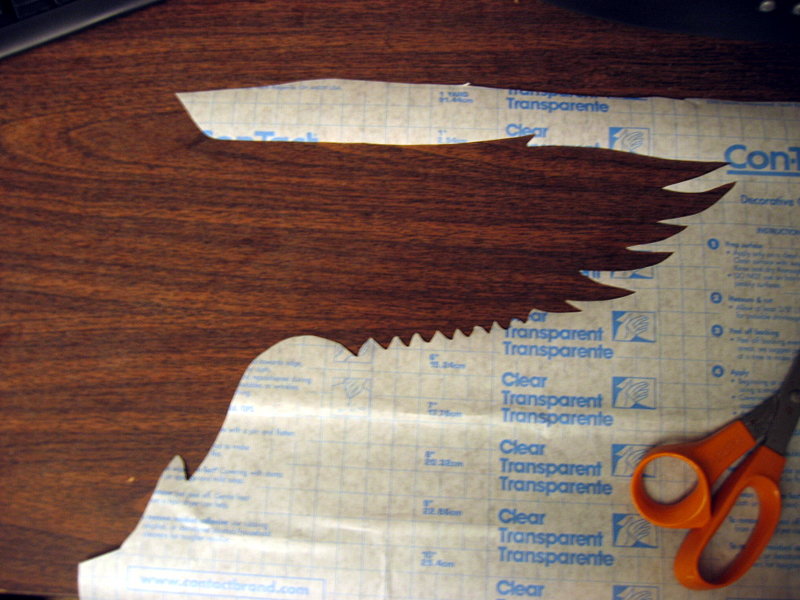
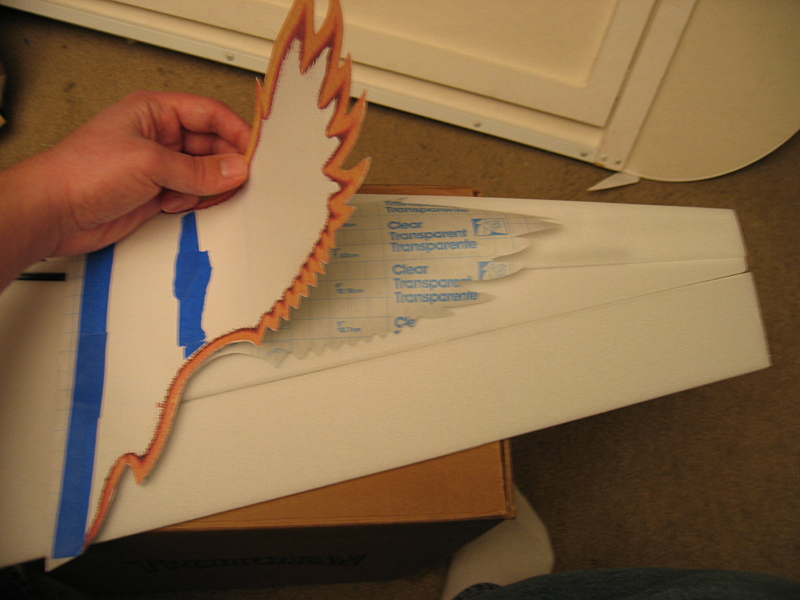 I laid the above assembly on a mirror and used a fresh Xacto knife and traced around the edges of the raven graphic, pressing hard enough to cut down to the glass. Once done you are left with the contact paper mask cut just like the full scale Raven!
Title: Re: TX-EcoDragon's 3D Foamy Raven Build Thread
Post by: TX-EcoDragon on February 06, 2005, 10:21:36 pm
 The handy thing about this method is that I make one session of cutting and I get two masks. . here is the outer part of the contact paper that I will use in conjunction ith a smaller inner mask to spray paint the gold detail.Not shown in the pictures but required for what I am doing is to cut two mroe raven wing graphic panels by tracing with an xacto the inner line of the gold trim in the inkjet output. this gives me what I need to paint all three colors and mask the others.
 Title: Re: TX-EcoDragon's 3D Foamy Raven Build Thread
Post by: TX-EcoDragon on February 07, 2005, 07:04:52 pm
 Here is the wing, fuse and side rails installed as a test run in prep for masking.
 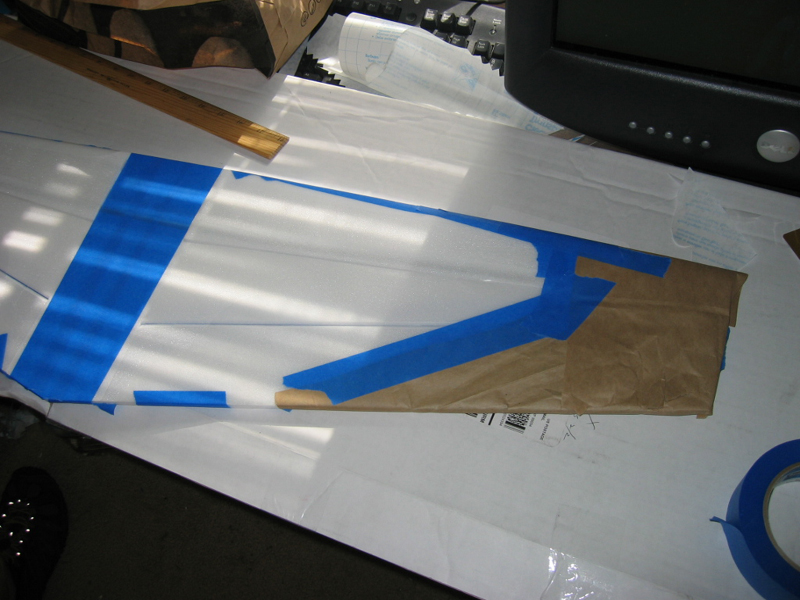 Wing masked for inner Raven Graphic with the transparent stencil and masking tape all ready to pant.
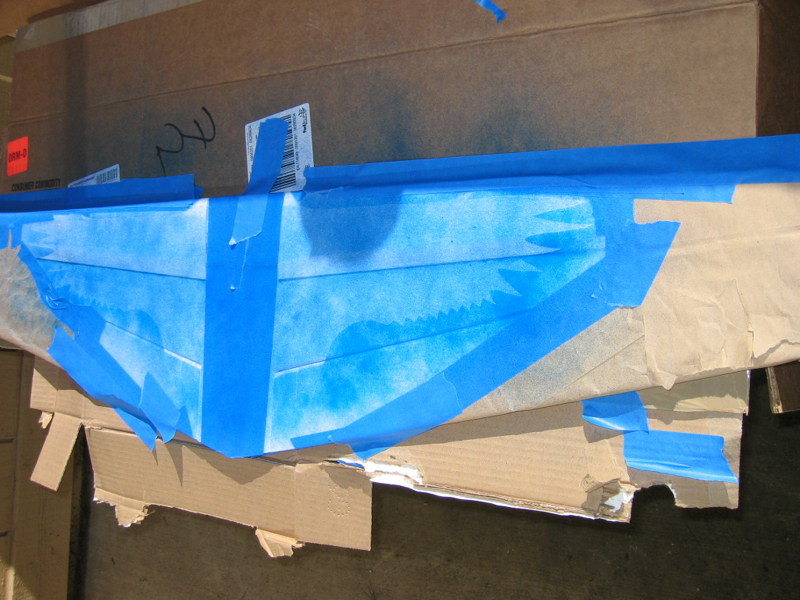 First Wing Coat. I wanted the blue to fill is some of the holes that the foam has, usually you can see these through the light coats of paint, so I thought this might give me a blue black look when the sun hit the plane. . .just like the full scale Raven.
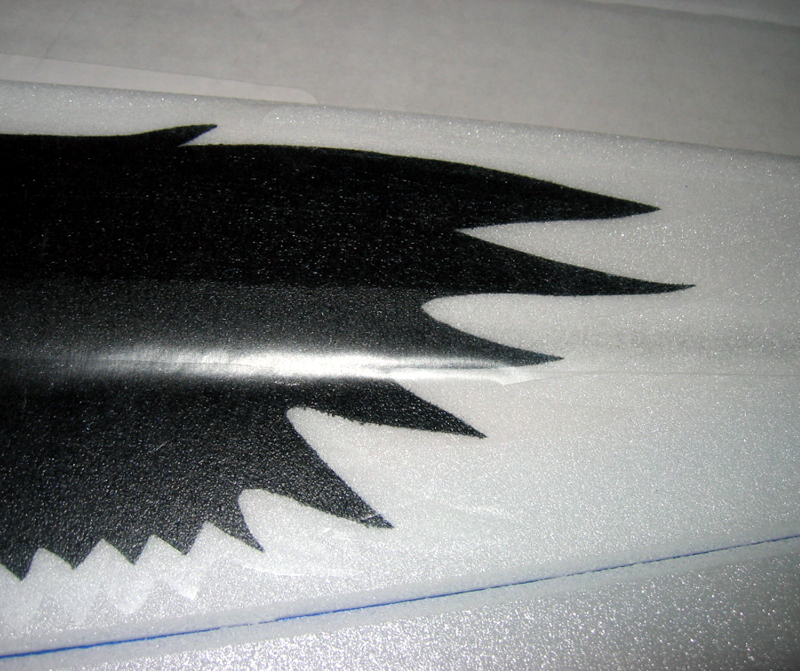
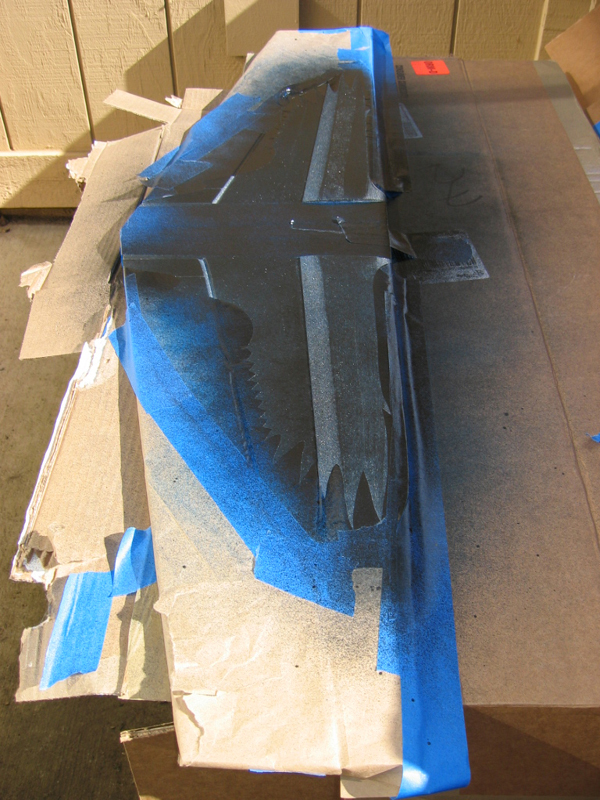 Here is the second coat of paint, this time in black. . .obviously.
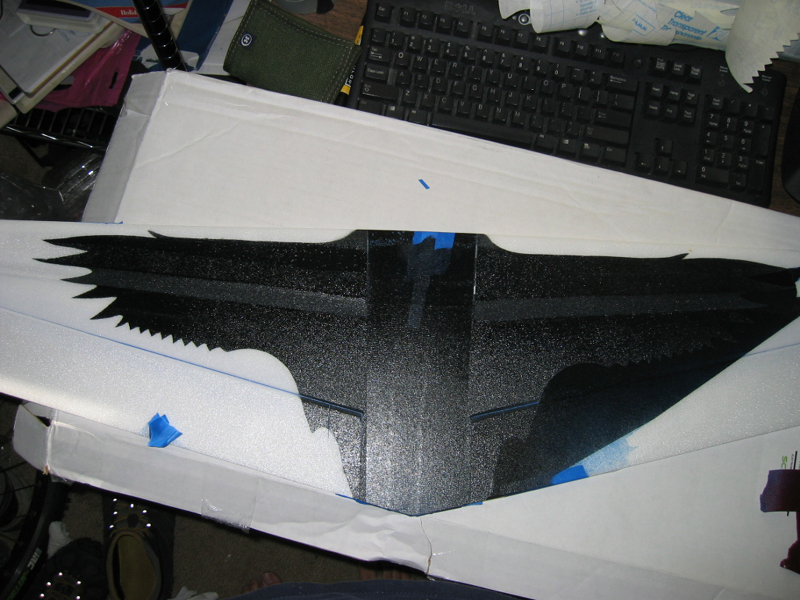 I did another coat and let it dry. . here is the finished inner Raven graphic as I remove the contact "paper" (more like vinyl) from the wing. Note that the center section, is masked off to save on some weight. As it is I will probably have a pretty heavy plane when all my painting is done. . . Oh well, that's why I bought 830 mAh batteries instead of 1200-1500 mAh packs! Next I will be doing the red coats, and lastly the gold.
Title: Re: TX-EcoDragon's 3D Foamy Raven Build Thread
Post by: TX-EcoDragon on February 07, 2005, 08:45:11 pm
 Here is the contact paper stencil mask applied to the right wing in prep for the red coat. This will mask off the black raven graphic, as well as the currently white border which will be be painted gold in teh next painting session. The neat thing about the way I am doing it is that I have enough masks that I don't need to have any paint layers overlapping, they sit right next to each other, just touching, but no layering of colors is needed.
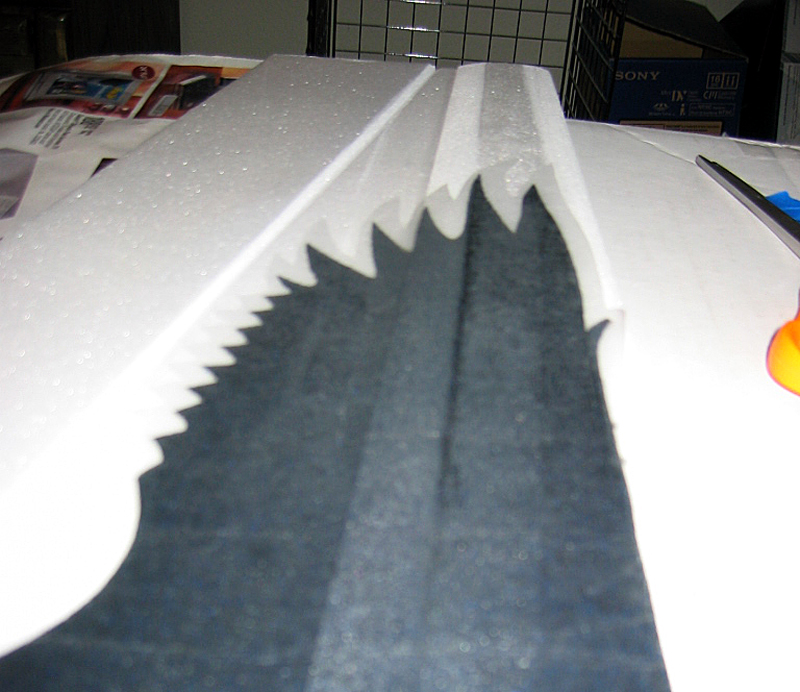 Another angle, I know the stencil is hard to see since it's clear. . . but as you see here that makes this job much more precise. Time to paint it!
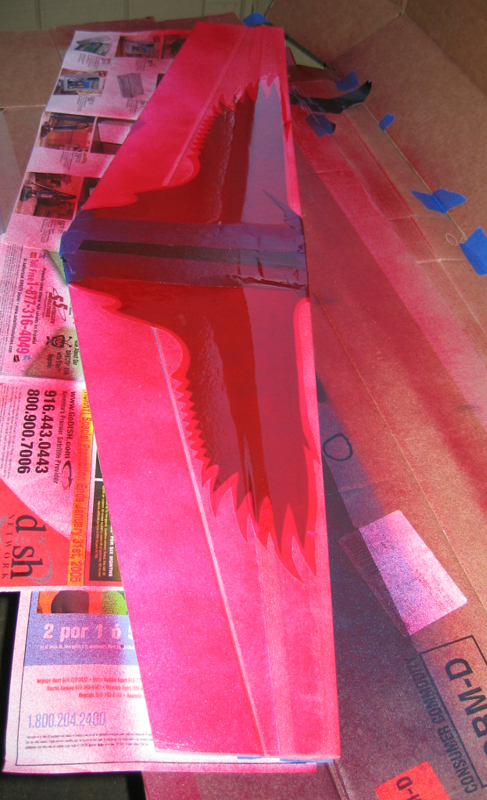 Here is the first coat. Here it is a little easier to see where the stencil mask is as it reacts to the paint differently than the foam does.
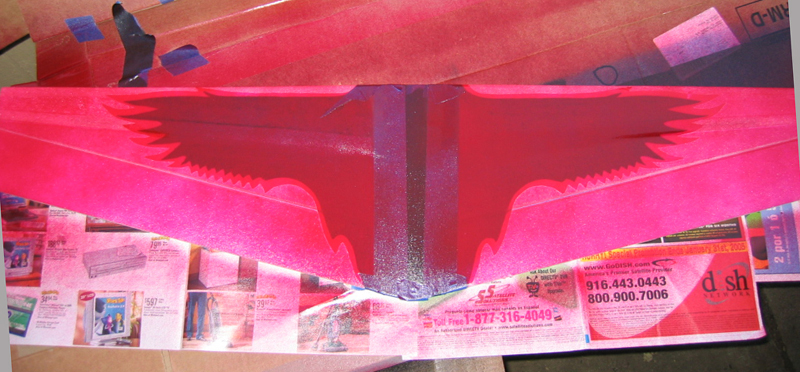 Another view.Since it looks like this Con-Tact Paper works and since I used the yard of it that I bought I need to head out to ACE again before doing the fuselage!
 Title: Re: TX-EcoDragon's 3D Foamy Raven Build Thread
Post by: TX-Deck on February 08, 2005, 08:18:18 am
Are you back yet? I'm eager to see what happens next... ;)TX-Deck out.
Title: Re: TX-EcoDragon's 3D Foamy Raven Build Thread
Post by: TX-EcoDragon on February 08, 2005, 03:31:38 pm
 Well, after drying overnight I peeled the contact paper off. It did take a little of the black paint with it, but nothing too bad. Perhaps leaving it in the sun for a few minutes, or simply not letting it sit overnight might have helped. From now on I will place a sheet of wax paper under the center parts of the contact paper to keep it from lifting much of the paint. Note that the center section of the wing, in between the skins and ailerons is masked off so it is still bare foam, it's just covered in masking tape! I also added all the control surfaces to the wings/stabs using CA hinges. I found the foam flexed a bit at teh point where the control horns meet the aileron so I might suggest that one hinge be placed just inboard of the control horn mounting location to keep the surface from getting tweaked under load.
  I also did the horizontal stab and elevator halves which you can see here, as well as the Apogee 830s that I just added Dean's Micro connectors to.. Next will come the gold layer. . . other than that I am waiting on my AXI motor mount to arrive to continue. I may just have to get one made. . .
Title: Re: TX-EcoDragon's 3D Foamy Raven Build Thread
Post by: TX-EcoDragon on February 09, 2005, 12:07:58 am
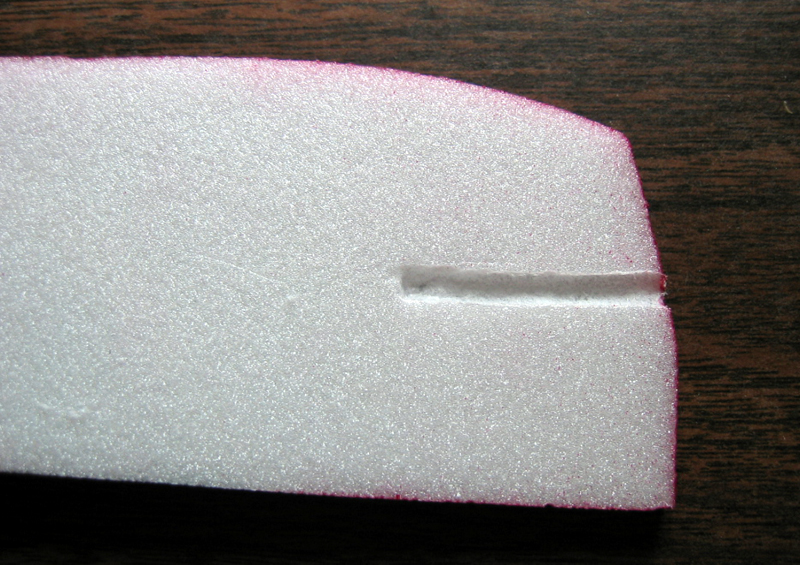
 I decided to cut out some wax paper to place in the center portions of the contact paper so i could minimize the paint removing that it did on the previous runs. I just drew a rough little line with a sharpie and then cut it out. This is to protect the black of the raven graphic.
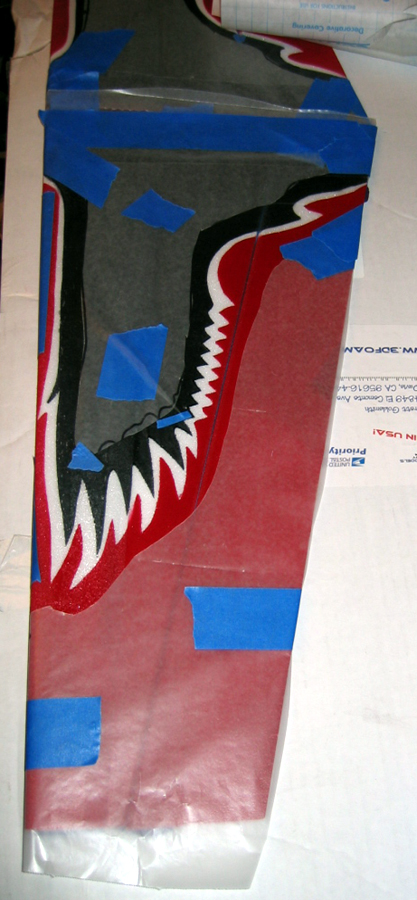 This section will protect the red of the wing.
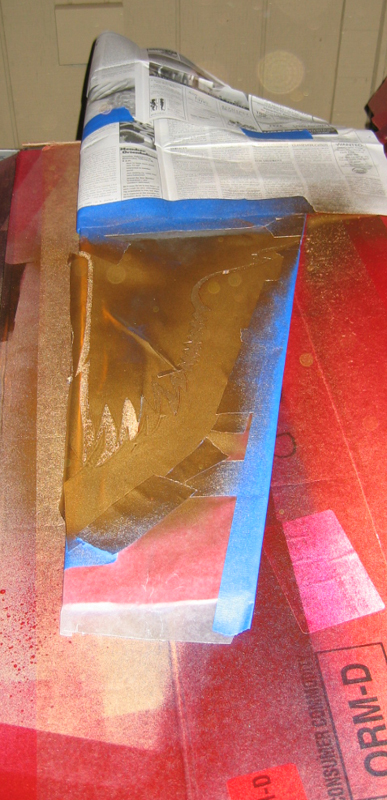 I placed the stencil over the wax paper, and then added the gold paint. The Leading edge was a real pain becasue the contact paper wouldnt stick to the curved area. . .I just sprayed the paint on an angle so that it was less prone to overspray under the mask.
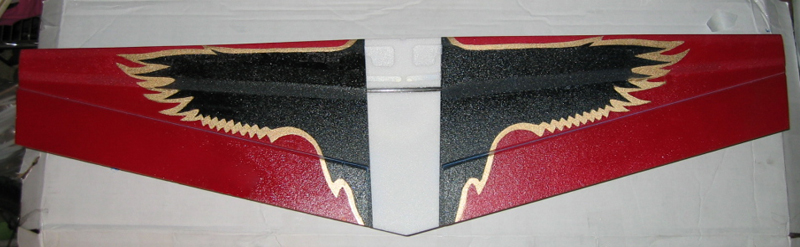 Here is the finished wing after touching it up a bit. Looks pretty good if I do say so myself!!
Title: Re: TX-EcoDragon's 3D Foamy Raven Build Thread
Post by: TX-EcoDragon on February 11, 2005, 02:32:41 am
 I have moved on from the Contact paper technique. . now it's masking tape laid out in sheets on wax paper. . . a little more conventional, and it sticks better on countours and hopefully wont pull as much paint off. Above you see the masking tape as cut for top of the fuse, this mask is for the red, there is an outer trim cut here which I will leave in the next painting session, and just peel the center section out to do the black next, while masking off everything that is red. As before I have the outlines of the wax paper masks that will fit like a puzzle piece over the red paint. . .hopefully it wont remove any paint when I peel it back off.
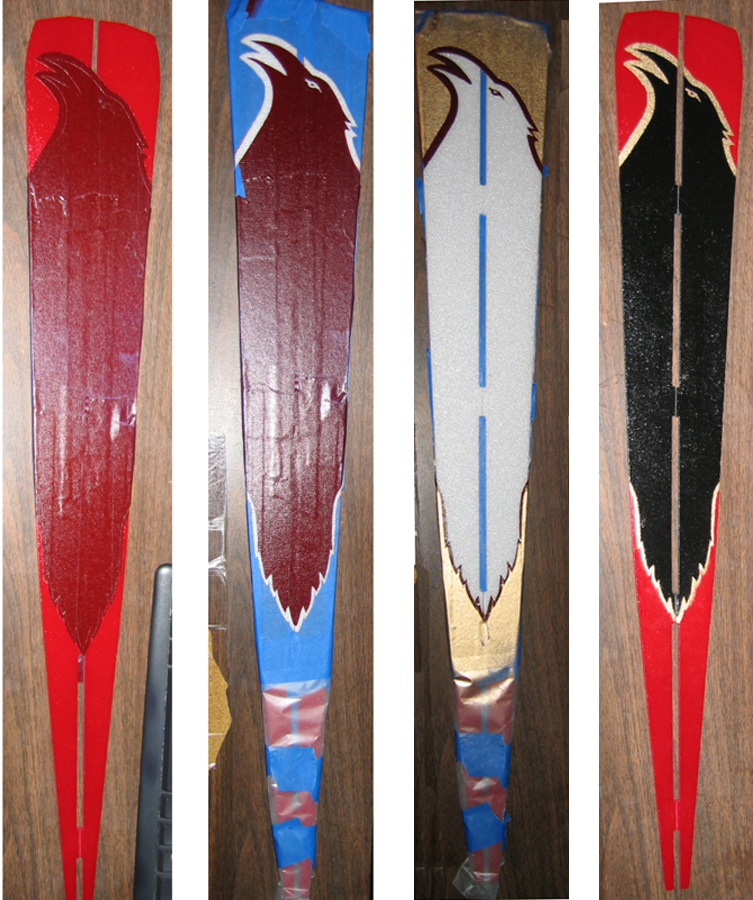 fuse tops 1,2,3,4(note that the angle I shot these at makes the fuse sides not look symmetrical . but they are.)Pic 1) This pic shows the fuse after applying the red coat.Pic 2) After the red paint dried I added the red mask (here seen in blue), and then peeled the gold trim mask out from between the two masks in prep to paint the gold layer.Pic 3) This is the fuse top after applying the gold coat. I removed the innermost section of the mask leaving the area that will be painted black exposed, and reapplied the thin masking layer where the gold was painted (after it fully dried). Now it's ready for the black!!Pic 4) Here is the finished paint on the fuse side tops. The masking tape does bleed more than the contact paper did, but part of that is that I had to reuse the tape stencils once and the removal and reapplication was a little tricky so the tape was not as sticky and crisp as it could have been, I used a hobby knife to etch the black bleed through areas off of the gold as the black paint had not fully dried when I removed the masks. Overall I am pretty happy with this! This is gonna be one sweet looking foamy. . . I just hope it's not 20 oz.!!Next I have to paint the side of the fuselage, and then there is not much left other than landing gear, radio and engine isntallation. . and I am still waiting on a motor mount. . . I bought some carbon tube that works in place of the elevator joiner, I attempted to hand cut (w/Xacto!) a firewall type motor mount, but it ended up being pretty much a waste of time and balsa. I am hoping the motor mount shows up tomorrow. . . it's high time I fly this thing!!
Title: Re: TX-EcoDragon's 3D Foamy Raven Build Thread
Post by: TX-EcoDragon on February 11, 2005, 07:04:04 pm
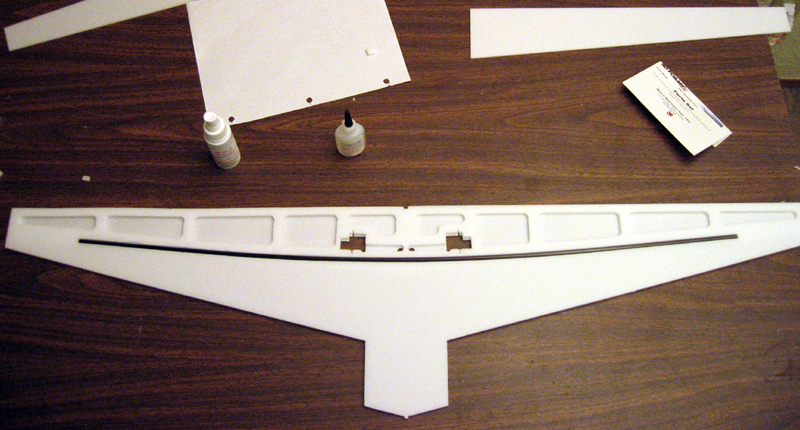
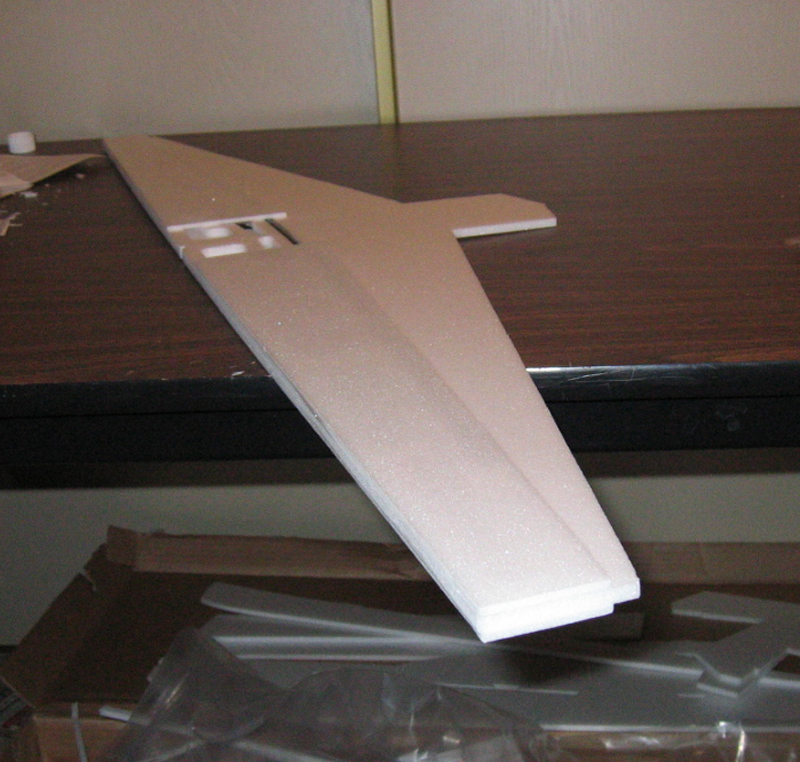
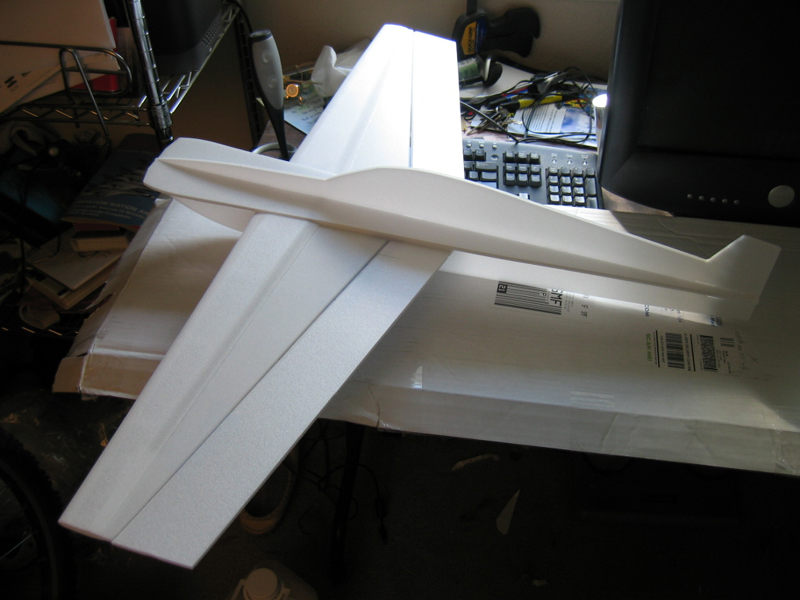
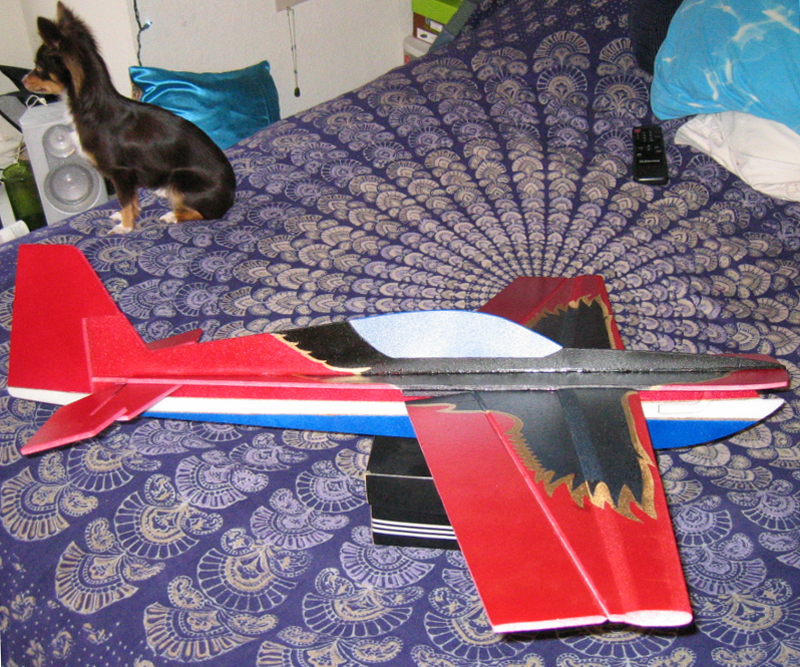
In preparation of making the side fuse stencil I did some side view shots and figured I would grab a top down view also for this post.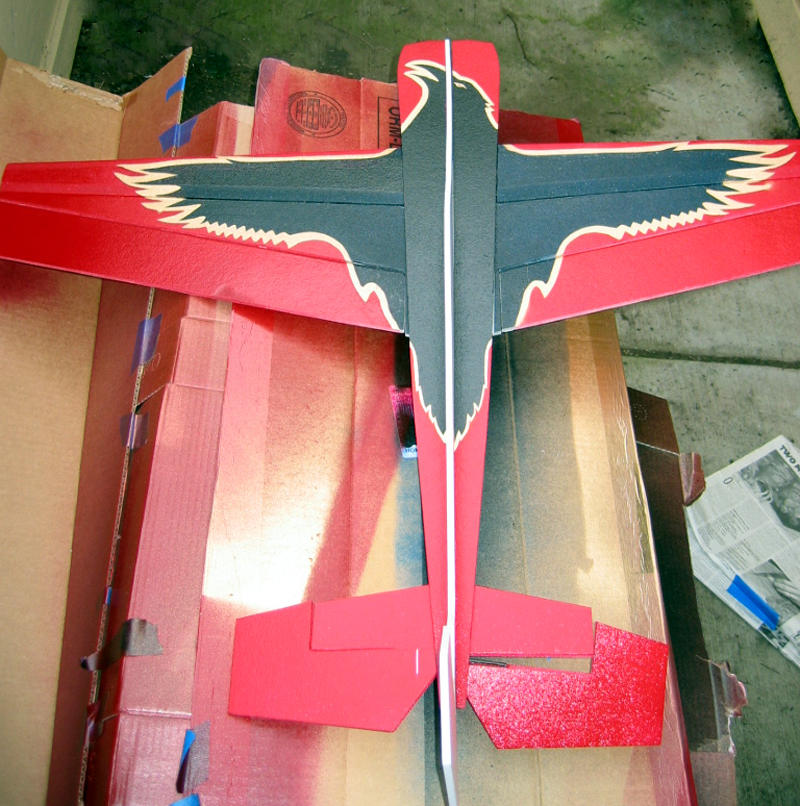 Here is the complete airframe (though the parts aren't glued togther yet, and the elevators aren't hinged obviously) This shows how the top down paint will look with exception of the vertical portion of the fuse which will be painted once I get the motor mount.
 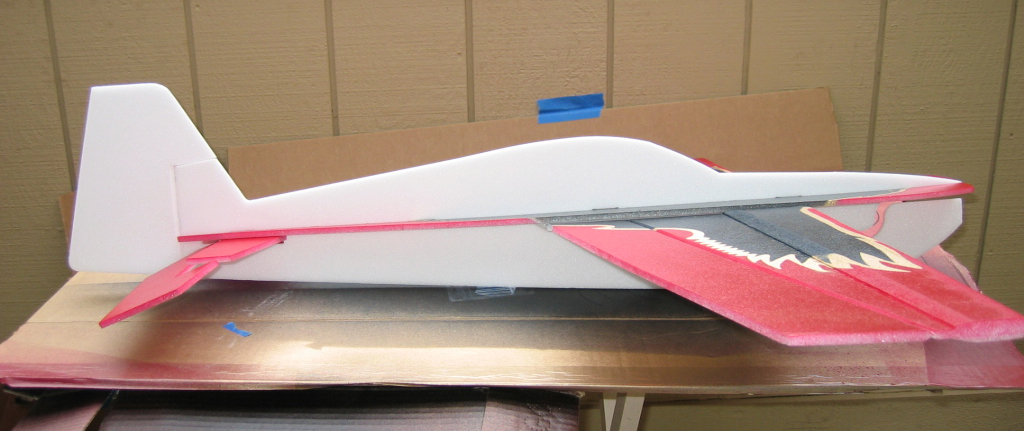 Here is the side view.
 Another
Here is the complete airframe (though the parts aren't glued togther yet, and the elevators aren't hinged obviously) This shows how the top down paint will look with exception of the vertical portion of the fuse which will be painted once I get the motor mount. Here is the side view.AnotherTitle: Re: TX-EcoDragon's 3D Foamy Raven Build Thread
Post by: TX-FlightRisk on February 12, 2005, 08:22:28 pm
Su Weet........S~TX-FlightRisk "If my plane is smoking it can mean one thing...I have been hit in one of my ass cheeks and I am cauterizing my wound....."
Title: Re: TX-EcoDragon's 3D Foamy Raven Build Thread
Post by: TX-Deck on February 13, 2005, 09:39:43 am
I dunno Eco, after looking at the size of that rudder, I think the plans may need to be revised to INCREASE the surface area....(that was sarcasm, in case it was lost in text)Can't wait for the video!TX-Deck out.
Title: Re: TX-EcoDragon's 3D Foamy Raven Build Thread
Post by: TX-EcoDragon on February 13, 2005, 07:58:16 pm
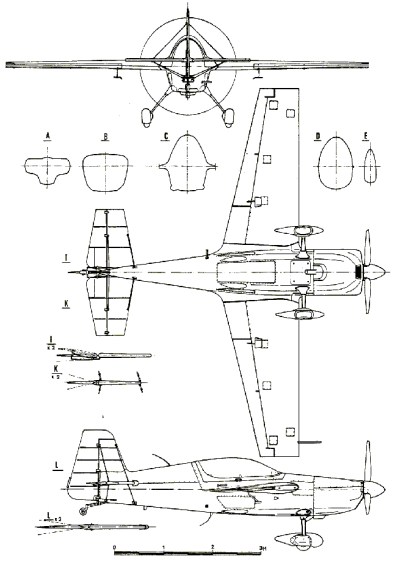 Here is the full scale 3 view. . . it's still got plenty of rudder, and other surfaces but not quite what the foamy has . that's for sure!!
Title: Re: TX-EcoDragon's 3D Foamy Raven Build Thread
Post by: TX-EcoDragon on February 13, 2005, 08:29:45 pm
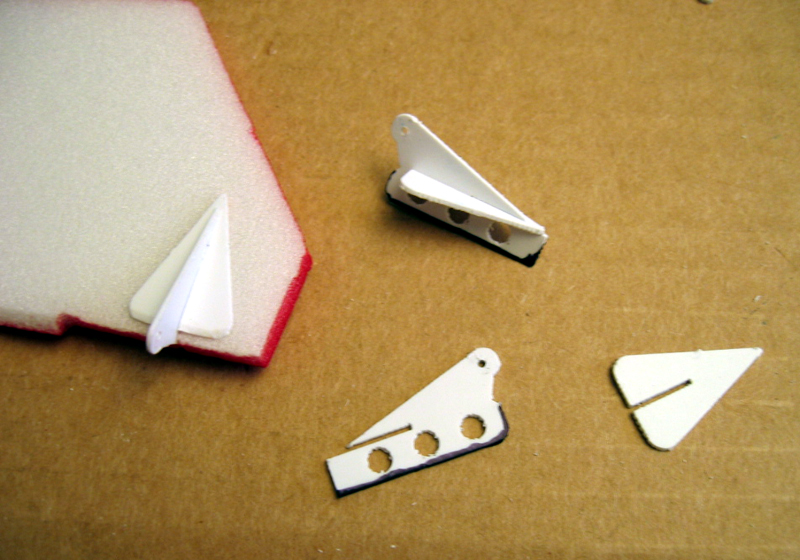
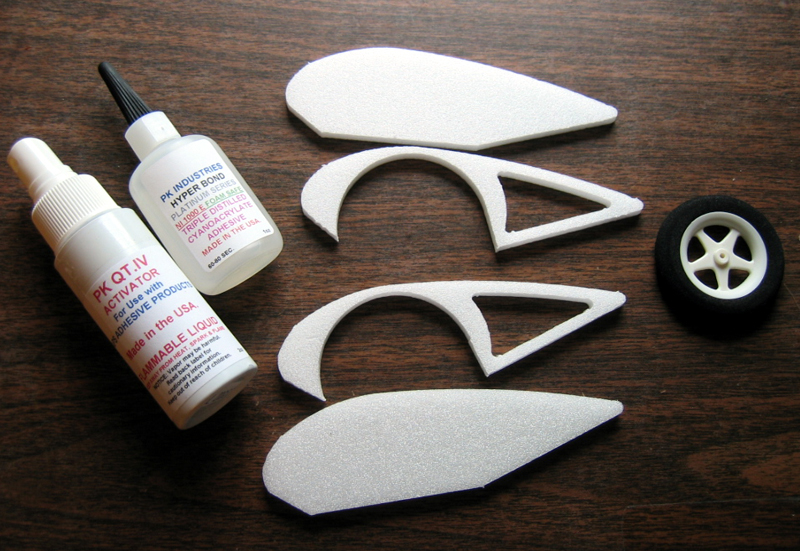 Here are the wheel pant components ready to build up on one of the pants. What you see here is the two solid side portions of the wheel pants, as well as the two spacers that you sandwhich between them to accomodate the wheel. There are two spacers provided, you can use one if the wheels are thin enough, in my case I used two to give some room for the wheels. The wheels are not included in the kit so you have a choice of which type you like to use. I opted for the MPI 2.0" as seen here.
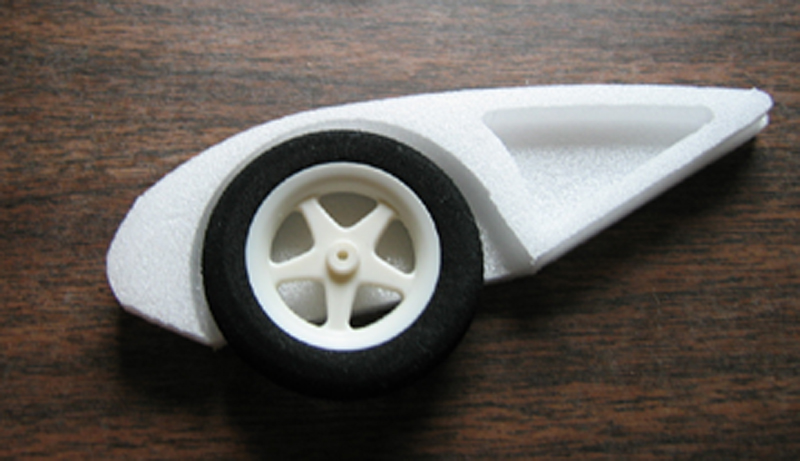 Here is how it looks assembled in cross section.
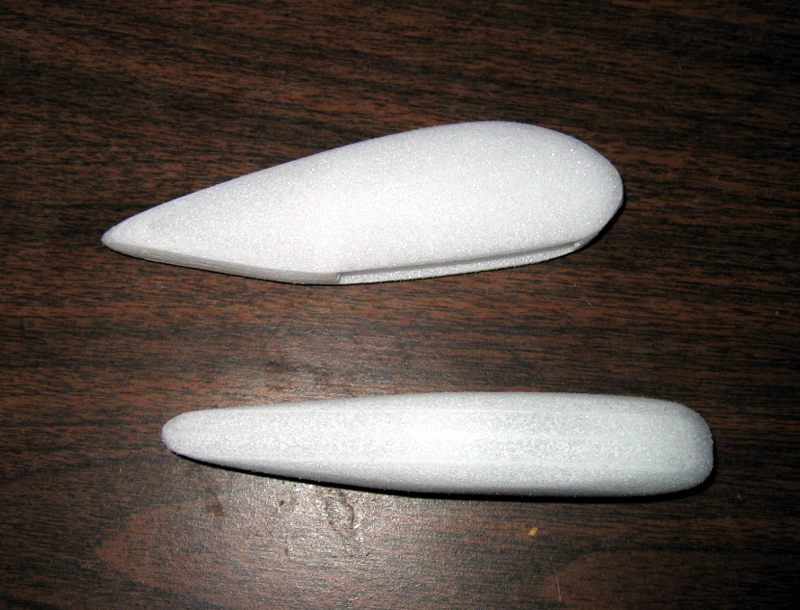 I am in the process of sanding the wheelpants to a more rounded and tapered shape. Here they are nearly completed.
 Title: Re: TX-EcoDragon's 3D Foamy Raven Build Thread
Post by: TX-EcoDragon on February 14, 2005, 07:08:05 pm
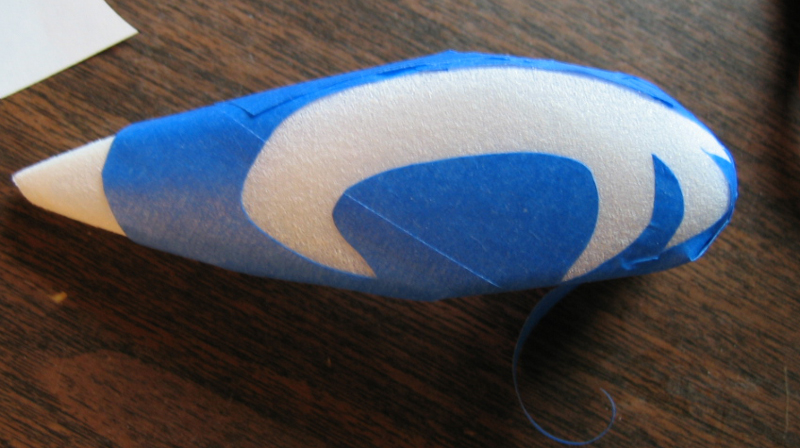 Here is the mask for the white paint around the Raven's claws.
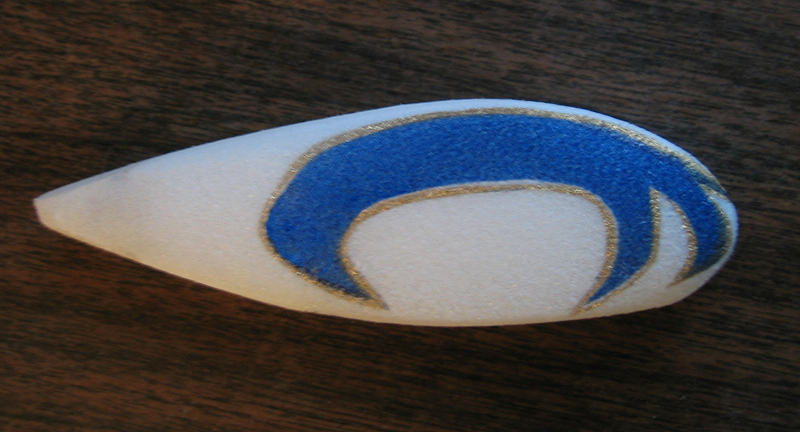 I had figured the wheel pants would be quick, but I opted to do the gold trim too, which is a very thin line of masking tape over lots of contours, and it ended up being a bit of a pain, and it still didn't look very good in the end. Not to mention that the dark blue I bought isnt all that dark when painted over white foam, but anyway, here is the first one I did. I figure it will look fine from 5 feet away anyhow . . . and im 6'2 so as long as I take off and land on the ground I should have nothing to worry about! ;-P
 Title: Re: TX-EcoDragon's 3D Foamy Raven Build Thread
Post by: TX-EcoDragon on February 17, 2005, 09:33:07 pm
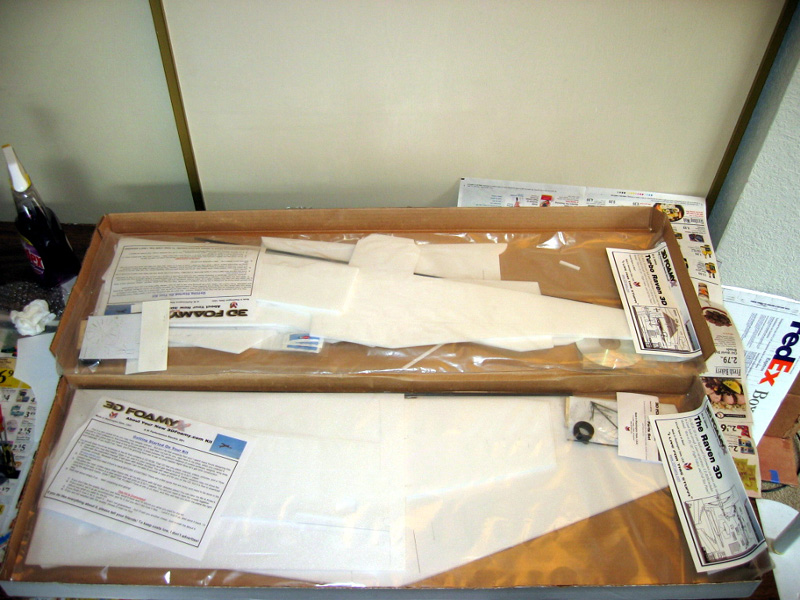 I recieved another package today from 3D Foamy and it contained a complete Raven replacement kit, as well as a the non-pro Turbo Raven to boot! The AXI motor mounts were also included.
 Here are the AXI motor mounts, there are two plywoods pieces in each package that must be epoxied together (EDIT: note that I didn't realize this when I built mine, and there were dire consequences as you will see later in this thread), the star shaped ones are for the turbo Raven/Giles kits, the cross shaped ones are for the Raven.
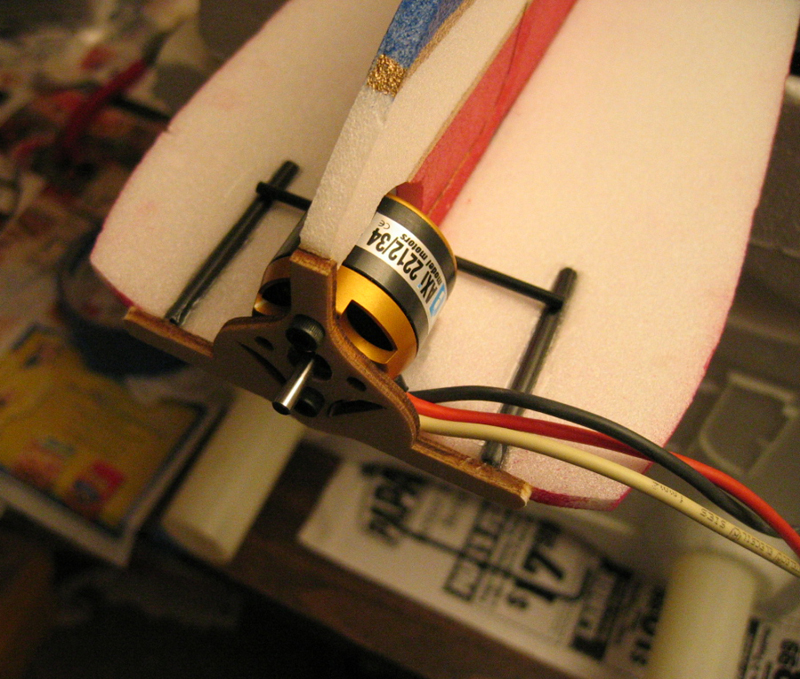
 Here is the mount ready to be installed or painted next to the motor.
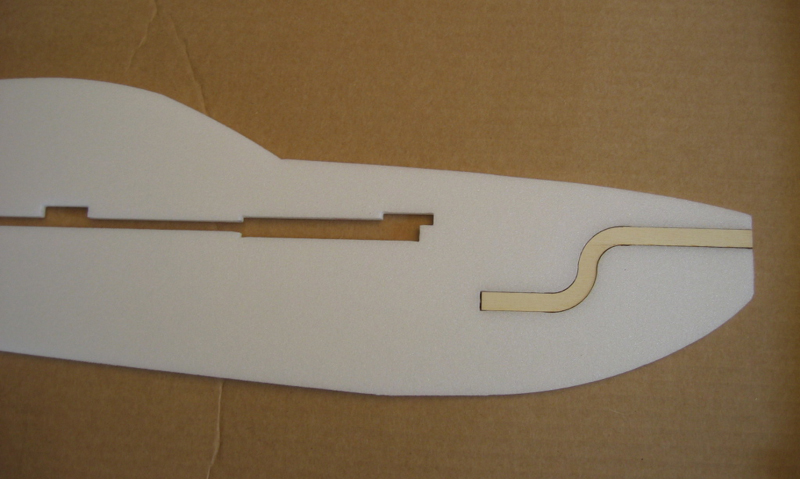 Trial fit of the "torqued" motor mount assembly.
 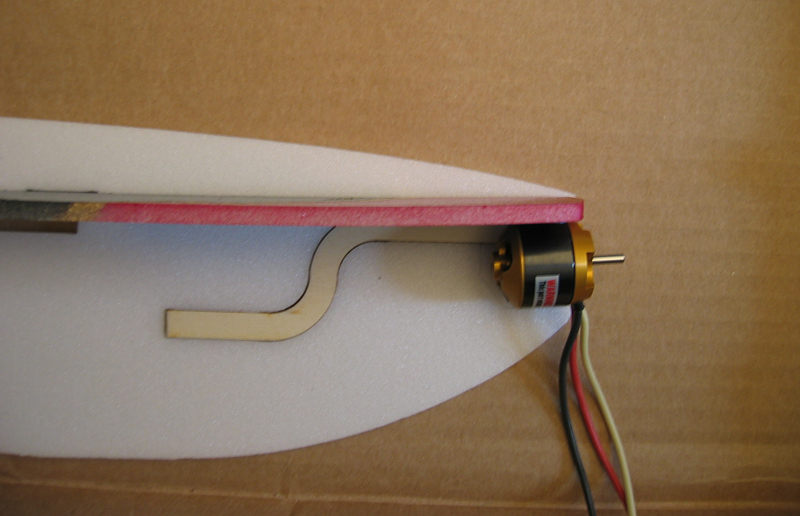 Now I am outlining the motor in preparation for cutting out the foam and triming the torqued mount.
 Here is how it looks for my AXI installation.
Title: Re: TX-EcoDragon's 3D Foamy Raven Build Thread
Post by: TX-EcoDragon on February 18, 2005, 02:52:44 am
 Here are the included control horns in various stages of assembly and installation, I just used a Sharpie marker to help blend the control horns in with their respective surfaces.
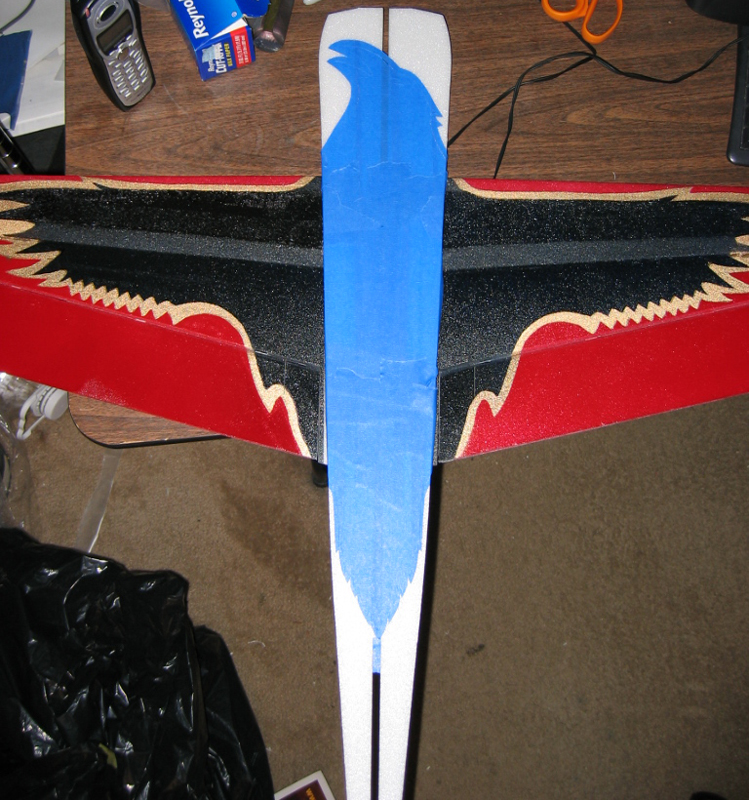
 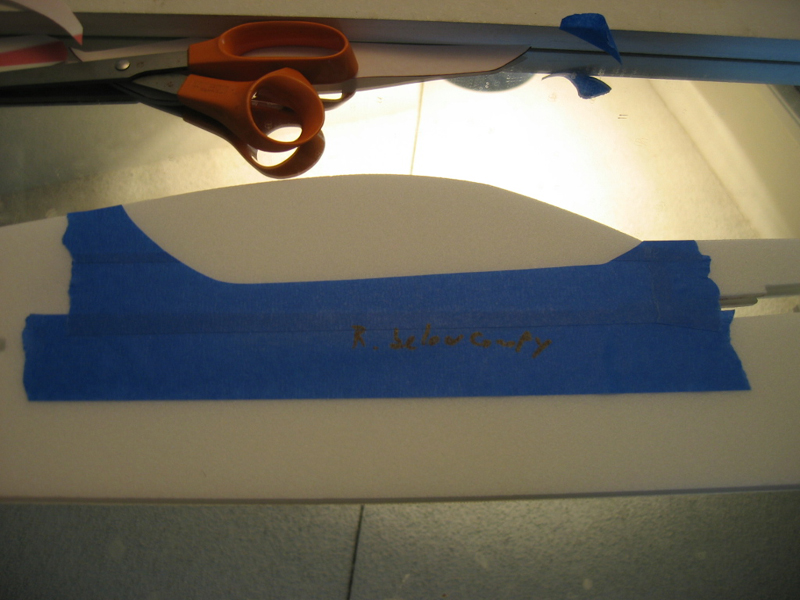 Here is the canopy area masked off for painting, I haven't really figured out what would look best, I didn't simply want the canopy to be black along with the Raven graphic, i was toying with silver or the blue that I already have.
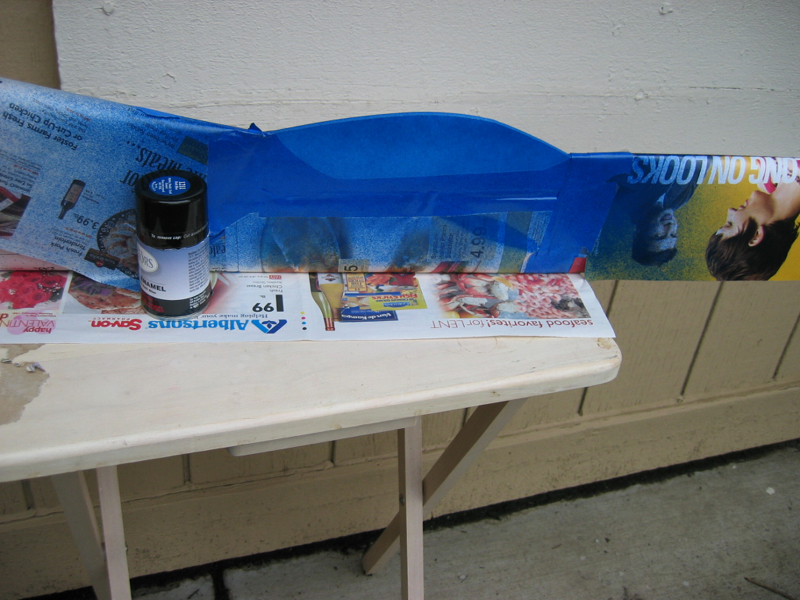 Well, I decided I would try the blue for the canopy.
 I don't really like the blue, but it would probably look good in the air. . . though I am thinking silver might have been a better way to emulate the canopy. . . a thin coat of silver over this might be just the ticket, but I will decide once it's all built up and flown. I have also started building my second Raven, it will be fully built without much paint as this is gonna be my basher. . . it should be done tomorrow along with this one.
 Title: Re: TX-EcoDragon's 3D Foamy Raven Build Thread
Post by: TX-Rahman on February 18, 2005, 09:05:41 am
Eco...looks great!! For the canopy...maybe mask the canopy off again and kinda overspray the silver lightly over the blue so the blue still kinda shows through?  So you have three planes now?!?Regards,TX-Rahman"BLACK 4"
Title: Re: TX-EcoDragon's 3D Foamy Raven Build Thread
Post by: TX-EcoDragon on February 18, 2005, 03:27:45 pm
Yep, I have three of them! One will be a gift though! Of course I don't have any gear for another plane so it will be a backup for now.
Title: Re: TX-EcoDragon's 3D Foamy Raven Build Thread
Post by: TX-Deck on February 18, 2005, 04:07:24 pm
/me holds credit card in hand....SOOOO tempting, but I better keep on trucking with the Berkut first....Nice Work, I want VIDEO soon!TX-Deck out.
Title: Re: TX-EcoDragon's 3D Foamy Raven Build Thread
Post by: TX-EcoDragon on February 19, 2005, 12:54:00 am
Yeah Deck. . . you don't want to get sidtracked!!! Then again it's nice to have something to keep you having fun while you work away at that Berkut. Of course you've got the PT-40 for that I guess. . .that Berkut is not really an ideal second aircraft, it will probably be a bit of a challenge so getting lots of stick time on thw PT before you fly that is a wise idea!  Well, I picked up some silver spray enamel today, which I will add lightly over the blue canopy, which I will do tonight. Right now the fuse is outside with the lower blue stripe in progress, when those two things are done all the painting tasks are done, then I just need to install the components of the airframe, the radio and engien gear, which shouldn't take too long. . . maiden flight should be tomorrow!!Here is the fuse just before the lower blue strip was applied. I tried a Testors gold paint marker for the gold on the fuse, I did the tailfeather gold trim and the pinstripe betweent he red and white freehand, it looks almost as good as the mask and paint method, but takes a lot less time to do.
  Here is the Fuse witht he lower blue stripe and the second gold pinstripe completed.
  Here are the parts for the carbon fiber gear assembly and mounting hardware. I sanded bevels onto the edges and painted the plywood portions blue to math the fuse where they mount.
 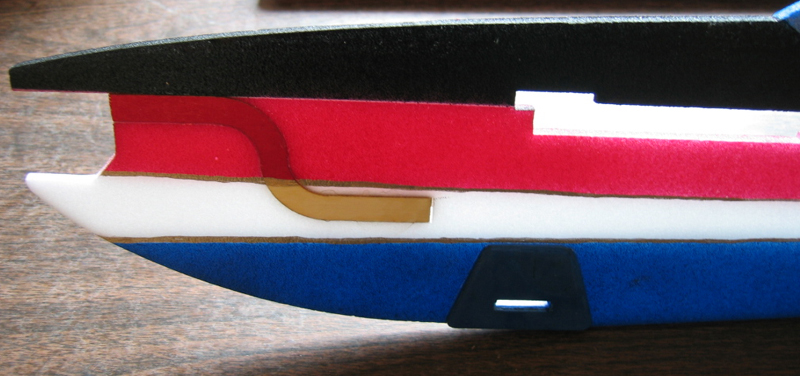 Here are the gear mounting plates installed and the hold is being cut for the gear to pass through. Post Maiden Edit: I would suggest adding some tape around the area of the ply mounts on the fuse, or perhaps a flat bar carbon rod on the bottom of the fuse in the area of the gear to distribute the loads over a greater area.
Well, I picked up some silver spray enamel today, which I will add lightly over the blue canopy, which I will do tonight. Right now the fuse is outside with the lower blue stripe in progress, when those two things are done all the painting tasks are done, then I just need to install the components of the airframe, the radio and engien gear, which shouldn't take too long. . . maiden flight should be tomorrow!!Here is the fuse just before the lower blue strip was applied. I tried a Testors gold paint marker for the gold on the fuse, I did the tailfeather gold trim and the pinstripe betweent he red and white freehand, it looks almost as good as the mask and paint method, but takes a lot less time to do. Here is the Fuse witht he lower blue stripe and the second gold pinstripe completed. Here are the parts for the carbon fiber gear assembly and mounting hardware. I sanded bevels onto the edges and painted the plywood portions blue to math the fuse where they mount. Here are the gear mounting plates installed and the hold is being cut for the gear to pass through. Post Maiden Edit: I would suggest adding some tape around the area of the ply mounts on the fuse, or perhaps a flat bar carbon rod on the bottom of the fuse in the area of the gear to distribute the loads over a greater area.Title: Re: TX-EcoDragon's 3D Foamy Raven Build Thread
Post by: TX-EcoDragon on February 19, 2005, 07:48:20 pm
 There has been some instances of failure of the front mounted firewall system so I decided to try adding a groove to the underside of each siderail that I will lay a carbon fiber tube in. This will mount up to the firewall mount and the fuse with some epoxy, I hand cut this, it's not pretty, but it should get the job done.
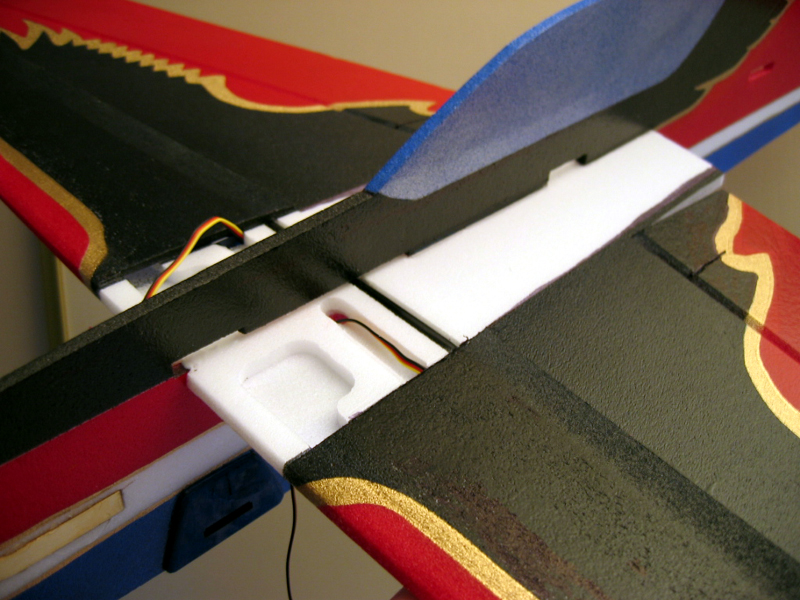 Next I installed the tail feathers and wing, this is easier and helps protect the paint if you fold some wax paper aroudn the wing as you feed it through the slit in the fuse. I used a straight edge and square to check alignment and glued using CA and kicker, with some small areas of canopy glue. Before moving on it is probably a good idea to install the aileron servos in the wing, as there is a handly internal tube for the wires but it will be covered by the side rails so be sure to do this before installing the side rails! You can see the servo wires that will be hidden away here.
 Here is the aileron servo installed in the nice little craddle. Something I'd like to see improved on is the aileron linkage geometry. . . the pushrods run perfectly lengthwise on the aircraft while the aileron hing line is swept forward. The aileron servo cradles should be canted a few degrees and the precut slots for the control horns should be angled in so that they are 90 degrees to the hinge line. I have a few suggestions that I will compile after a few more flights to send to Levi at 3D Foamy.Next I installed the side rails, and once done with those the basic airframe is complete, the landing gear will need to be isntalled, then it's jsut engine and radio gear installation to complete it. BTW, the weather is nice and stormy today, so I am in no big rush. :-/Here are a few pics of the current state of assmbly.
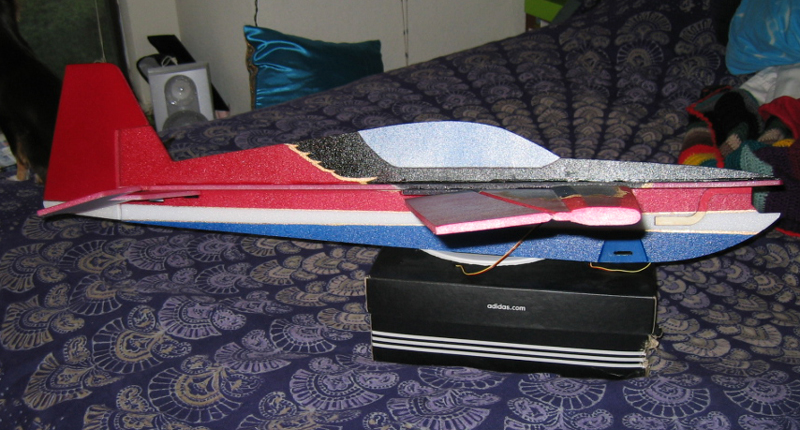
 Stina's Chihuahua Ladybug insisted on being included in the pics. . .
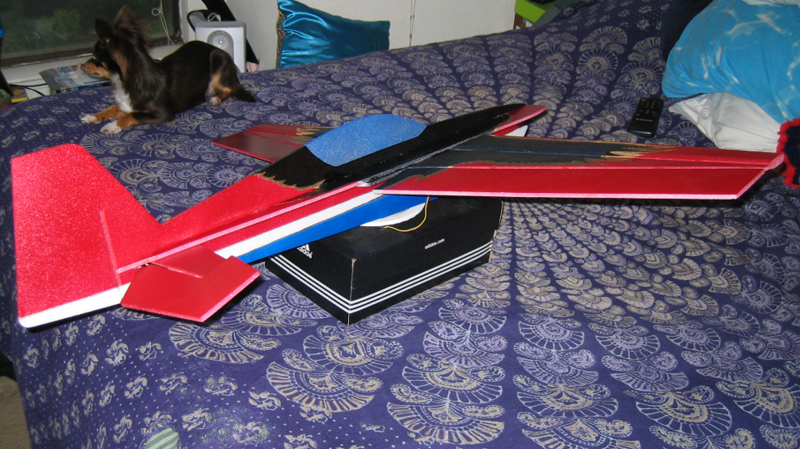


Title: Re: TX-EcoDragon's 3D Foamy Raven Build Thread
Post by: TX-CUDA on February 19, 2005, 09:14:00 pm
....Eco, What's your dog looking at out the back door?....LOL.,...Good Dog, Good Dog...TX-CudaMinister of Information
Title: Re: TX-EcoDragon's 3D Foamy Raven Build Thread
Post by: TX-FlightRisk on February 19, 2005, 09:40:32 pm
The plane is cool And you did an incredible job on it. LadyBug Rocks. Nice tri color Black and Tan!! You gotta like those lil dogs... I have two of them....S~TX-FlightRisk "If my plane is smoking it can mean one thing...I have been hit in one of my ass cheeks and I am cauterizing my wound....."
Title: Re: TX-EcoDragon's 3D Foamy Raven Build Thread
Post by: TX-Deck on February 19, 2005, 11:17:34 pm
The dog never moves... we need more pics to make sure it isn't "stuffed".Ok, that's a rather strange thought......nevermind.Great work on the Raven, still can't wait for Video!TX-Deck out.
Title: Re: TX-EcoDragon's 3D Foamy Raven Build Thread
Post by: TX-EcoDragon on February 20, 2005, 05:49:21 pm
There is a problem in the manual that has caused me some grief. The thing that makes it a little confusing is the wording in step 14 that states: "Slide the stab through the cutout. When centered push the stab forward into the centering notch." Well, it seems that that is wrong, the pictures depict the surface slid all the way back in the cutout, not forward. In the online manual pics it's clear from looking at them, but in my own printed copy it wasn't so I used the text more than the pics. I followed the text, and I didn't notice the issue until shortly after the glue had cured so I was faced with the option to try to cut the tail free and move it or fly it with the horizontal stabilizer and elevator halves 2/3 of an inch farther forward than they should be. . . the Raven already has a long tail moment, it should be fine, but wont be as easy to hover or rolling harriers. 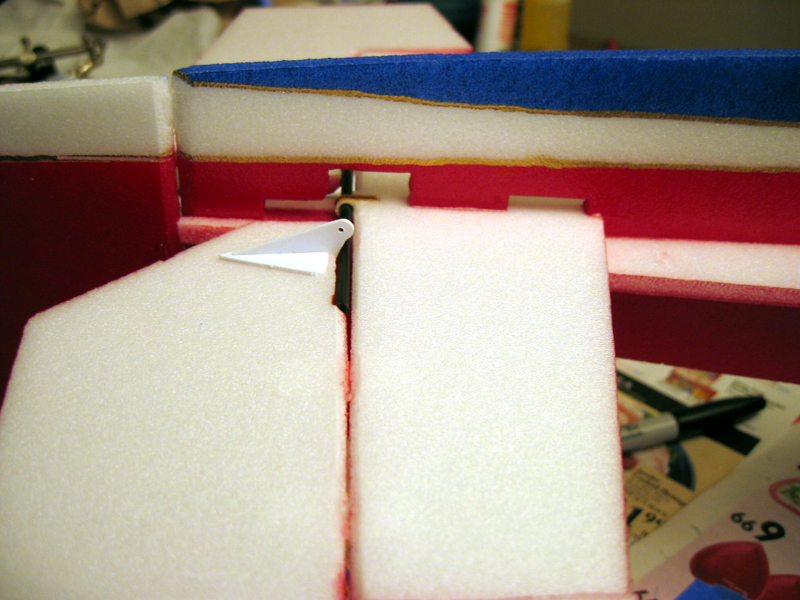 Here you can see the mistake I made, the space behind the black CF rod shouldn't be there.
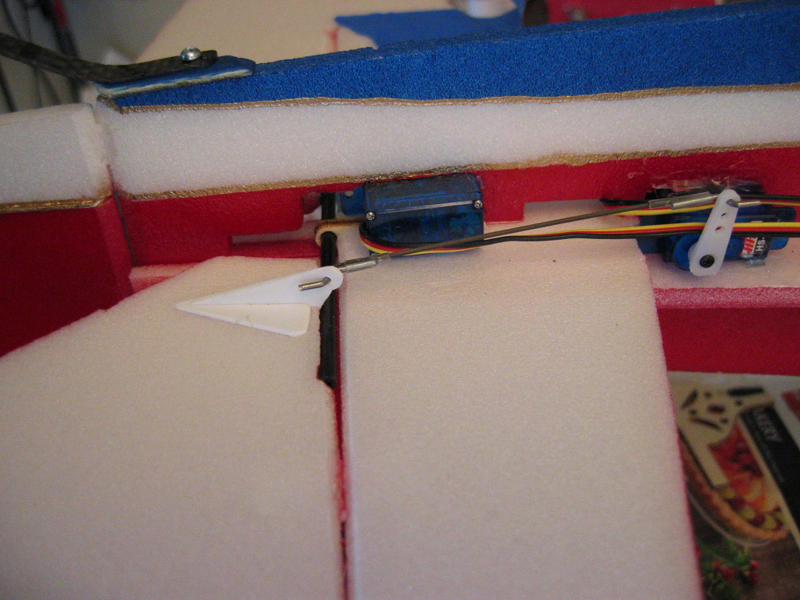 I had to cut the slots for the servos since the pre-cut ones couldn't be used after the goof up on the tail. Here is the completed installation including the carbon fiber tailskid, and the pushrods.
  Here is a better shot of the CF tailskid. EDIT: I suggest adding heat shrink tubing to the tailskid at the tip of it to keep it from getting sanded down when taking off and landing on hard surfaces.This seems like the lightest, best looking, and most durable method. The carbon fiber itself WILL grind down very quickly otherwise. If you take off of concrete, do this!
 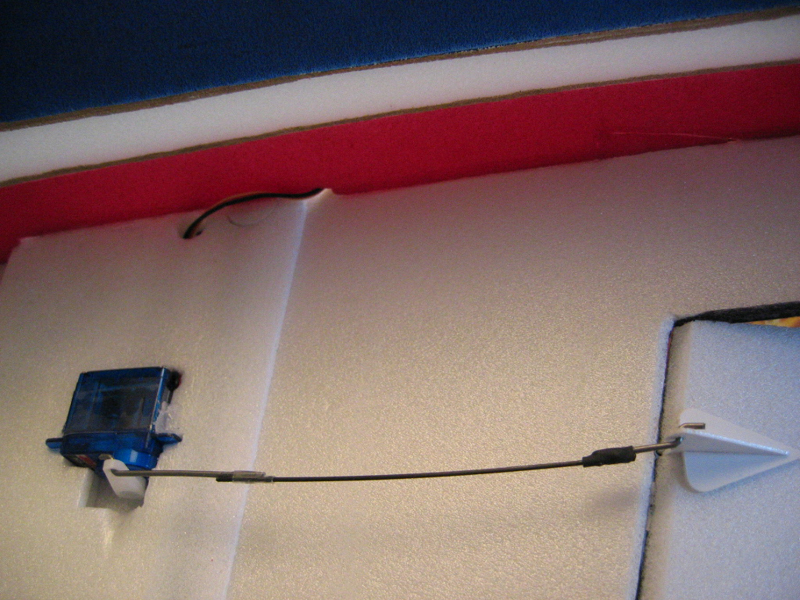 The supplied pushrod set up is too flexy for me to feel comfortable using them, I made all of them and installed them, but they are about half as strong as those that come on the shockflyer. . and those were too flexy too!I will probably replace these with the dubro micro pushrod system. This may be solved by using the full length of the Z-bent wire and cutting down the CF a bit more instead of vice versa.
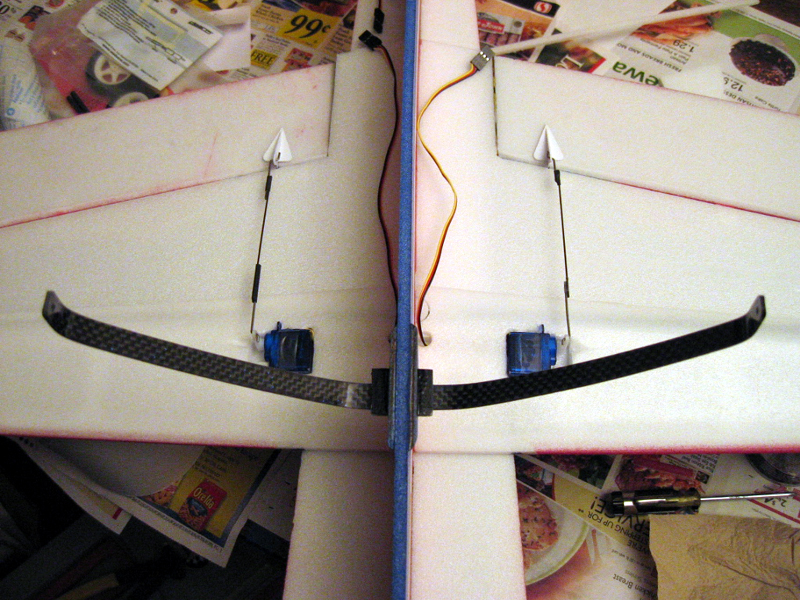 Here the gear are being assembled, In the above pic I am preparing to install the blind nuts and screws through the CF and balsa ply. the mounts are epoxied in place, I suggest doing the side plates first (just be sure they are lined up so the gear sit level), and once they are cured install the pass through plate of ply *and* CF gear legs and then add some epoxy to the pass through ply. In my installation the gear fit very tightly inside, there would have been no way to fit them through after fitting the ply side plates and pass through, at least without risking damage to the CF legs.
 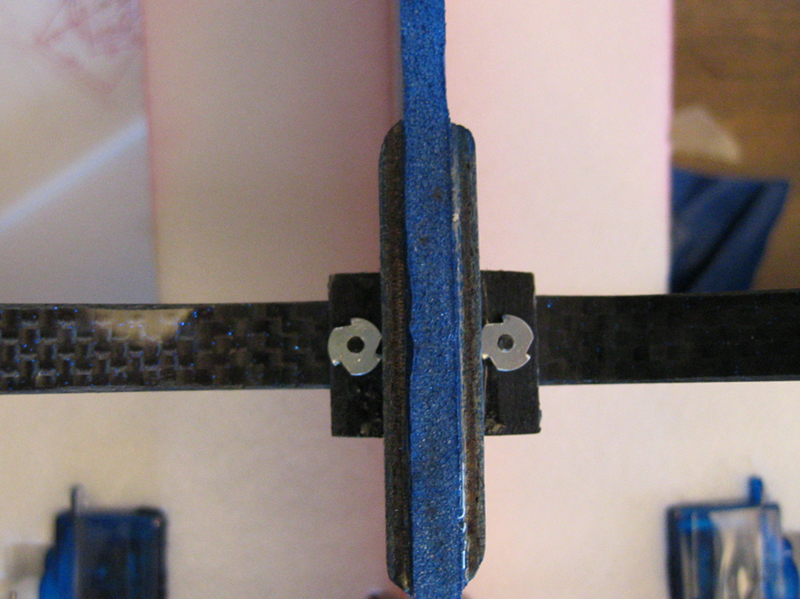 Here is the bottom of the gear mounting assembly once completed.
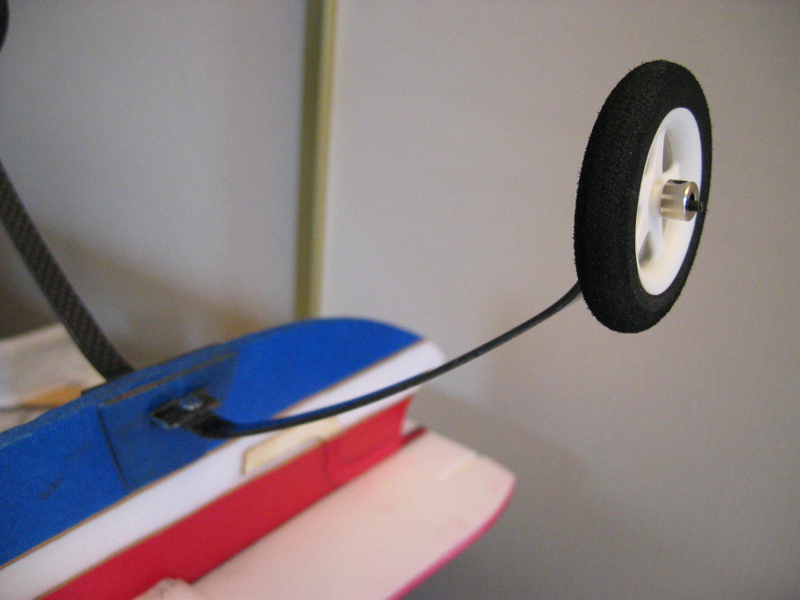 Thread the 2-56 screw and washer through the CF, isntall the nut, then the wheel, and lastly a 1/8 wheel collar to complete the gear and wheel installation.
 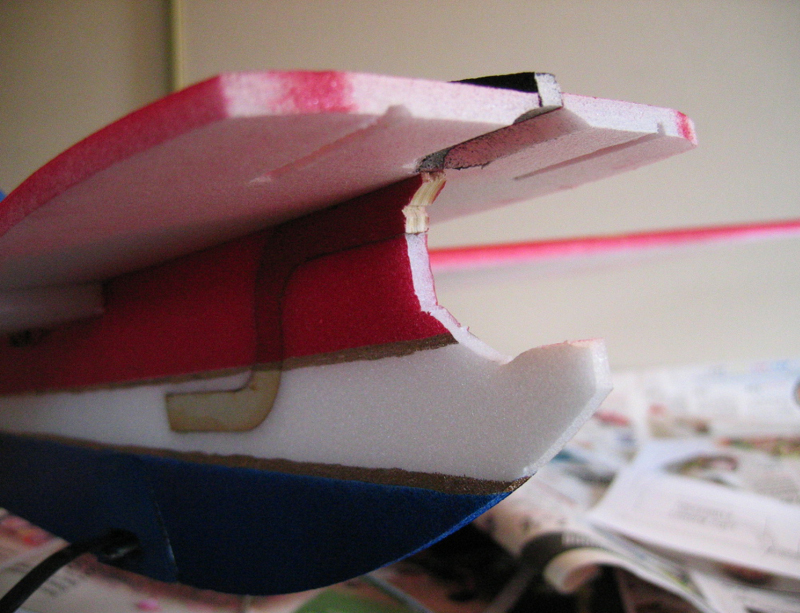 Well, my nice tidy cutouts needed to be redone since the front mount setup required some repositioning of things aft. This is before I sanded it down a bit to make it look a little smoother.
 I also cut a pass through the "torqued" motor mount, through this I will place a small CF rod, my intention is to distribute the torque through the ply mount so it isn't all going into the fairly weak foam nose side rails. If using this mount system you should probably use a little tape over the mount and rails just as a precaution. . . and be sure to include this area on your pre-flight.
 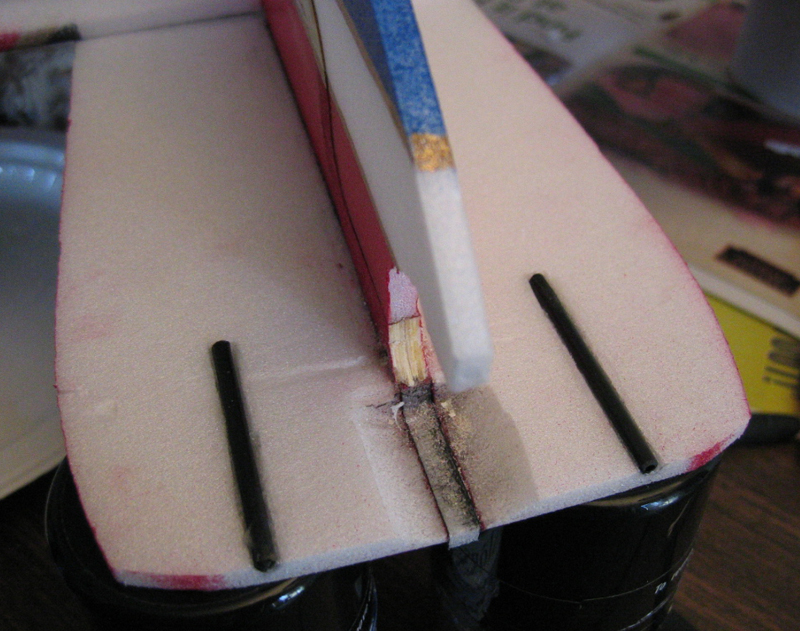 Here are the CF rods I installed to beef up the nose assembly. I used some 5 minute epoxy here.
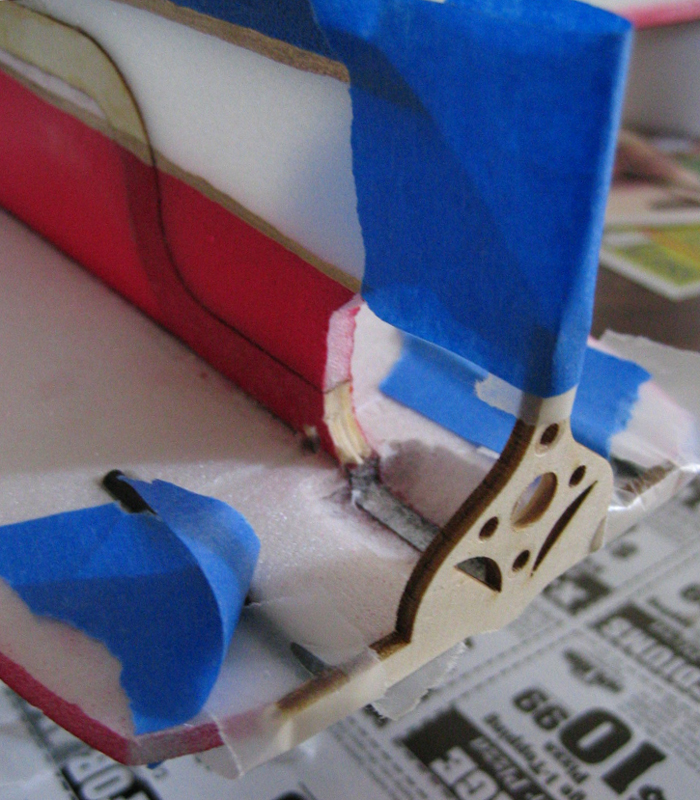 Here you see the installation of the firewall using 30 minute epoxy.
Here you can see the mistake I made, the space behind the black CF rod shouldn't be there.I had to cut the slots for the servos since the pre-cut ones couldn't be used after the goof up on the tail. Here is the completed installation including the carbon fiber tailskid, and the pushrods. Here is a better shot of the CF tailskid. EDIT: I suggest adding heat shrink tubing to the tailskid at the tip of it to keep it from getting sanded down when taking off and landing on hard surfaces.This seems like the lightest, best looking, and most durable method. The carbon fiber itself WILL grind down very quickly otherwise. If you take off of concrete, do this! The supplied pushrod set up is too flexy for me to feel comfortable using them, I made all of them and installed them, but they are about half as strong as those that come on the shockflyer. . and those were too flexy too!I will probably replace these with the dubro micro pushrod system. This may be solved by using the full length of the Z-bent wire and cutting down the CF a bit more instead of vice versa.Here the gear are being assembled, In the above pic I am preparing to install the blind nuts and screws through the CF and balsa ply. the mounts are epoxied in place, I suggest doing the side plates first (just be sure they are lined up so the gear sit level), and once they are cured install the pass through plate of ply *and* CF gear legs and then add some epoxy to the pass through ply. In my installation the gear fit very tightly inside, there would have been no way to fit them through after fitting the ply side plates and pass through, at least without risking damage to the CF legs. Here is the bottom of the gear mounting assembly once completed.Thread the 2-56 screw and washer through the CF, isntall the nut, then the wheel, and lastly a 1/8 wheel collar to complete the gear and wheel installation. Well, my nice tidy cutouts needed to be redone since the front mount setup required some repositioning of things aft. This is before I sanded it down a bit to make it look a little smoother.I also cut a pass through the "torqued" motor mount, through this I will place a small CF rod, my intention is to distribute the torque through the ply mount so it isn't all going into the fairly weak foam nose side rails. If using this mount system you should probably use a little tape over the mount and rails just as a precaution. . . and be sure to include this area on your pre-flight. Here are the CF rods I installed to beef up the nose assembly. I used some 5 minute epoxy here.Here you see the installation of the firewall using 30 minute epoxy.Title: Re: TX-EcoDragon's 3D Foamy Raven Build Thread
Post by: TX-EcoDragon on February 21, 2005, 02:35:43 am
 Here is the motor installed.
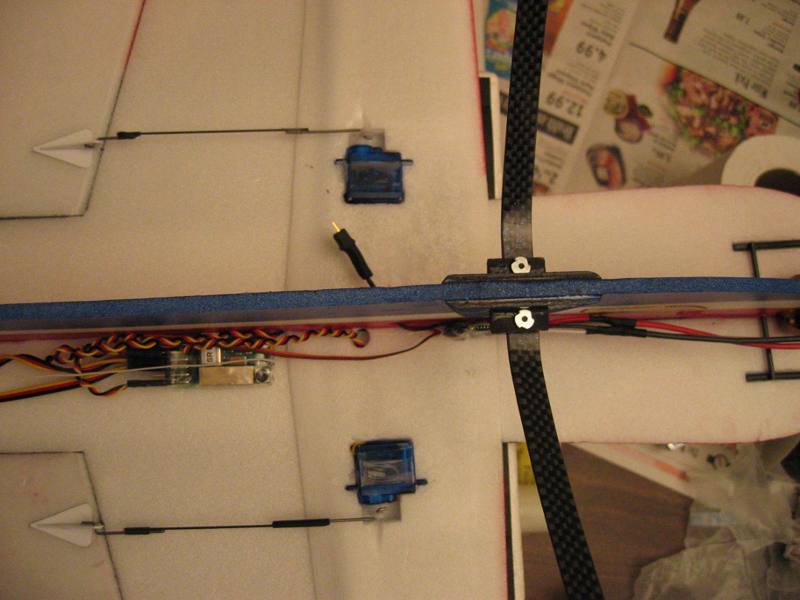
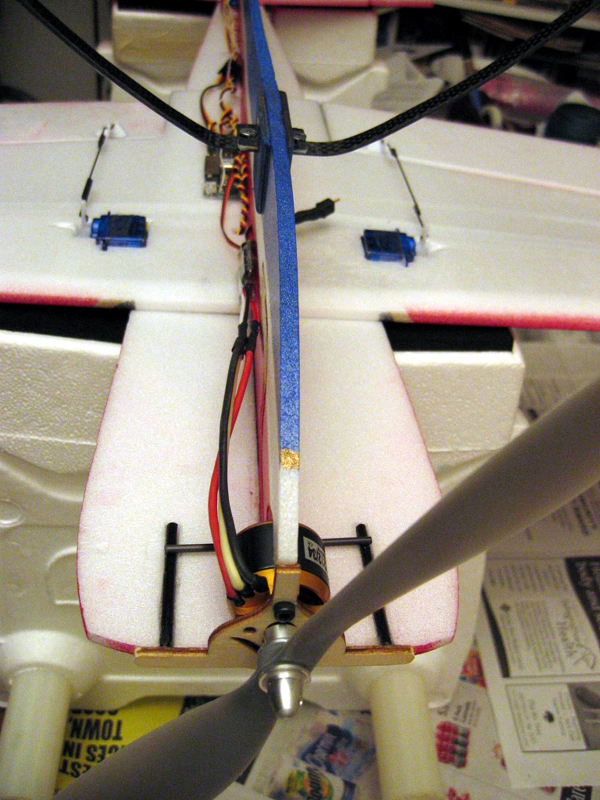 Here are a couple shots of the radio gear and ESC installed.
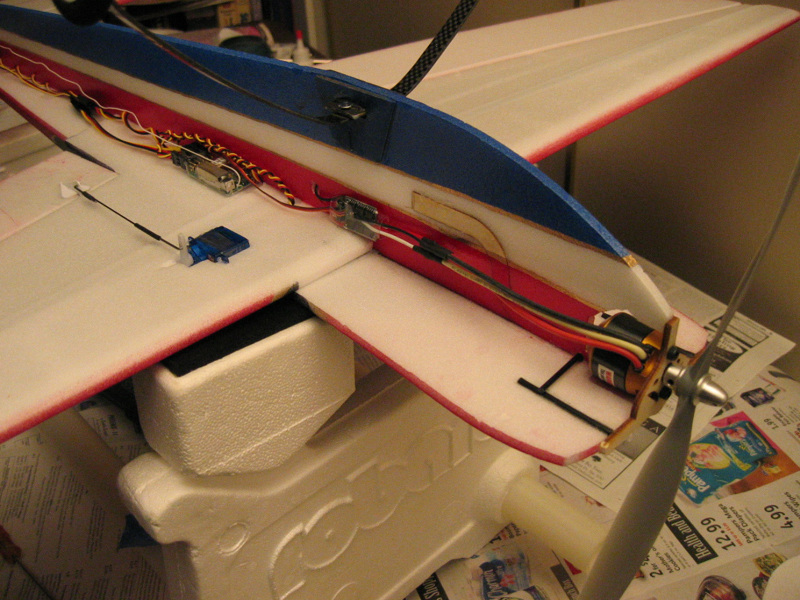 The receiver and ESC are mounted under the left wing as seen here, there is a small hole as a pass through for the battery connector as I was going to mount the battery on the right side.
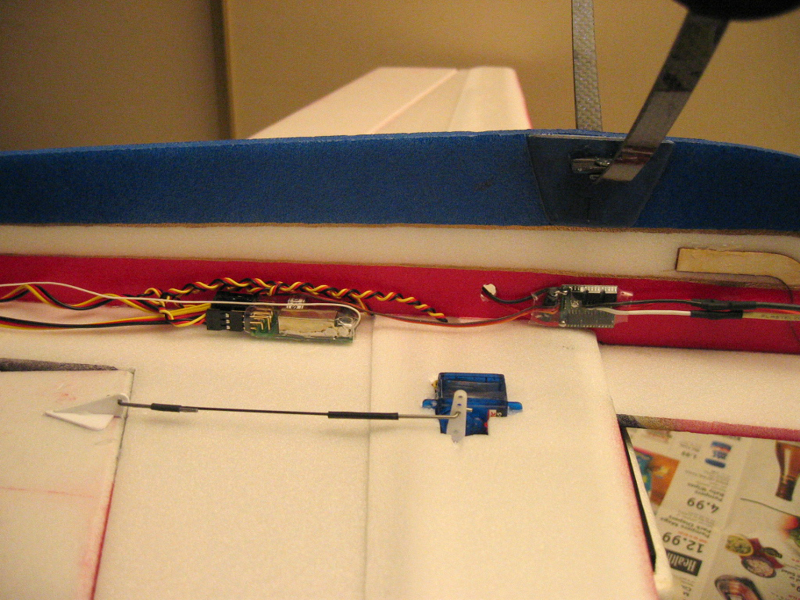
Title: Re: TX-EcoDragon's 3D Foamy Raven Build Thread
Post by: TX-EcoDragon on February 21, 2005, 05:31:00 pm
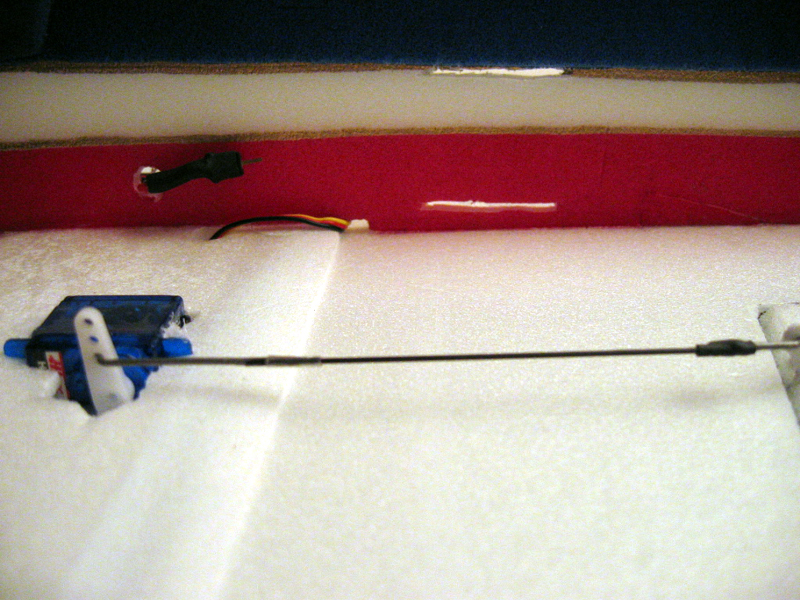 After checking CG I verified this is the location for my battery I made two slots in the fuse for the included velcro strap to pass through. These should be oriented this way to permit shifting the pack fore and aft to shift CG as needed.
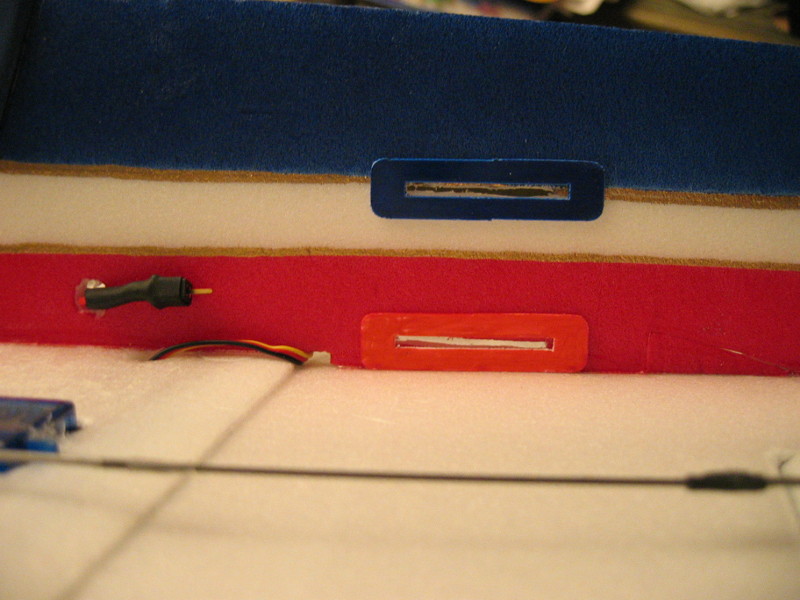 Next I used a little CA and kicker to apply the plastic doublers to each side of the fuse at the slots. These will keep the strap from cutting into the foam.
 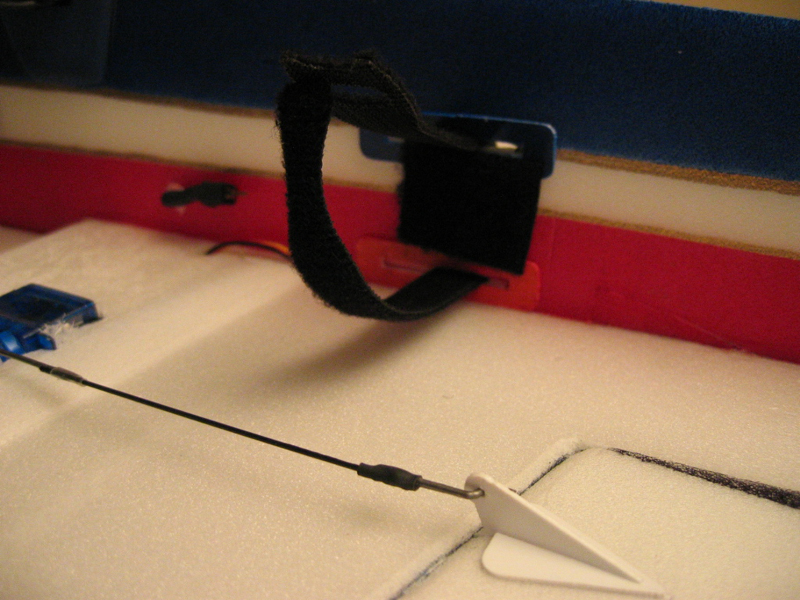 This is the velcro strap installed, as well as some velcro that will prevent the pack from sliding forward or backwards in the strap.
 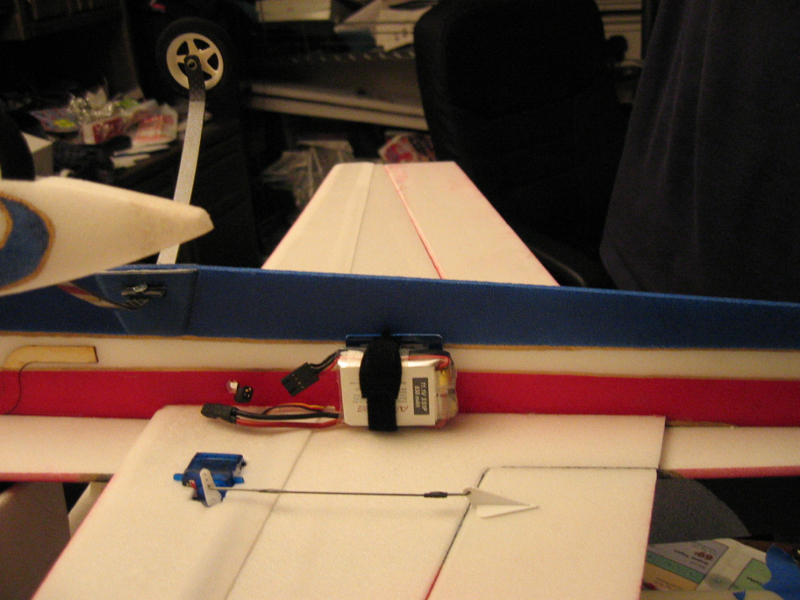 Here is one of the batteries installed (corresponding velcro on the back).
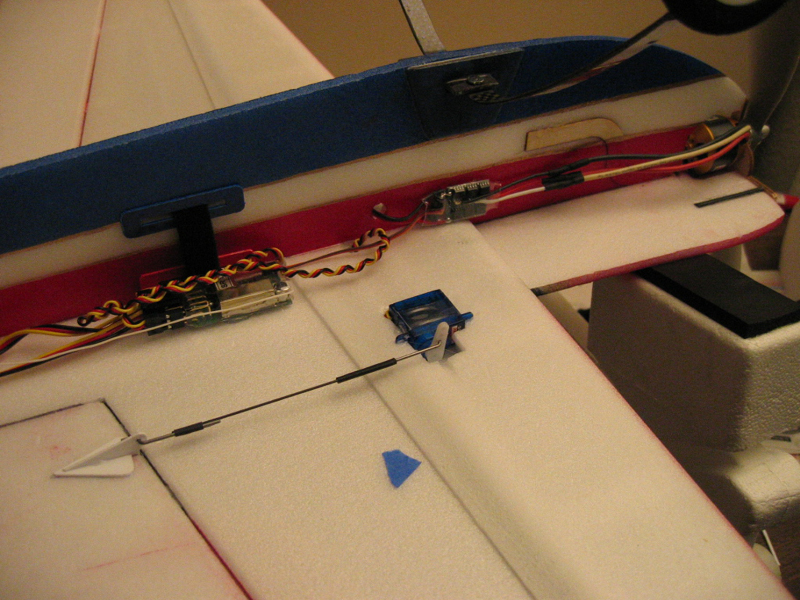 Here is the other side with the radio gear. Note that the blue tape indicates the desired CG range.
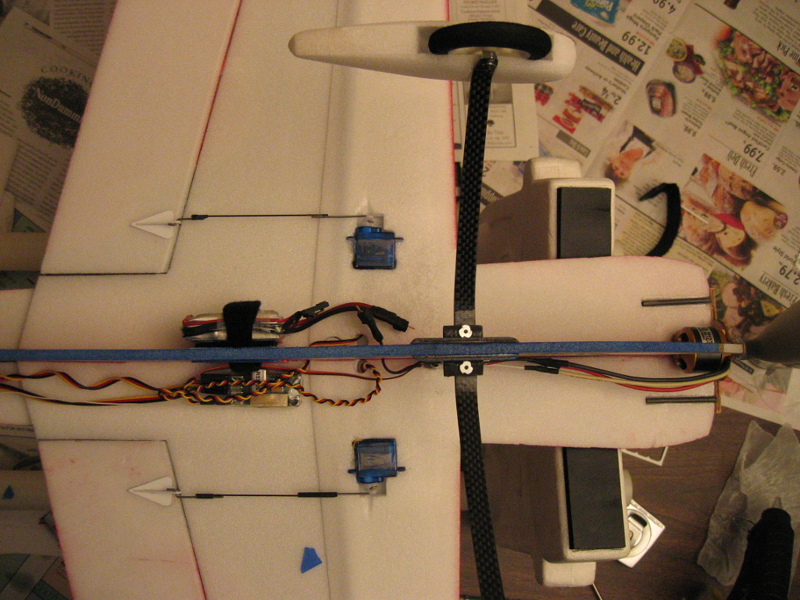 And here is how it all looks in mine.
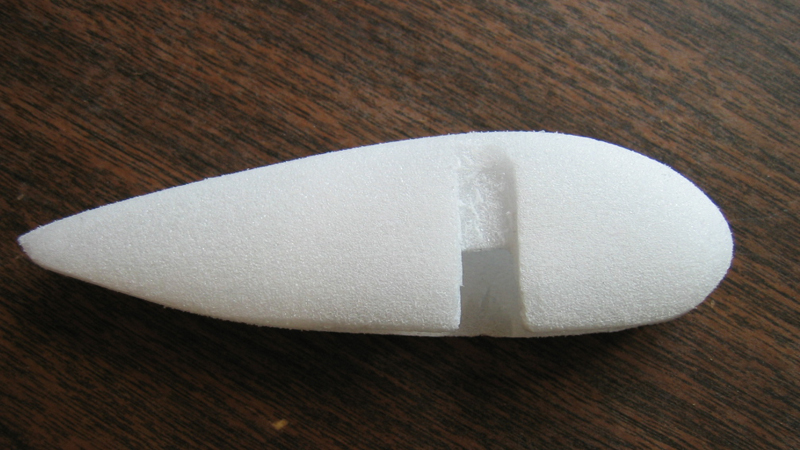 Now that your all done it's a good time to add the wheel pants, they require some cutting to get the best fit on my setup.I set my CG to 3.5 inches aft of the leading edge by placing the battery ~ 1 cm behind the wing skin trailing edge. . .after which I did my first hover with it. . .sure I was in my room supporting it with my hand. . but it looks like all systems are go once I get new pushrods made!No maiden today though, here is the SAC ASOS (note that right now there is a NWS advisory on the TC that two funnel clouds have touched down near me): Sacramento CA [KSMF] hourly observation on the 21st at 1:53pm PST (2153Z)wind 290° at 18 knots, visibility 1 miles, funnel cloud, thunderstorms with heavy rain, mist, 1,700 feet broken, 5,000 feet broken, 6,500 feet overcast, temperature 15°C (59°F), dewpoint 13°C (55°F), altimeter 29.75 FUNNEL CLOUD B47, automated station with precipitation discriminator, thunderstorms began at 36 minutes past the hour, rain began at 33 minutes past the hour, sea level pressure 29.75" Hg (1007.3 hPa) FUNNEL CLOUD 2SE, continuous lightning cloud-to-ground all quadrants, thunderstorms all quadrants, 0.35 inch (water equivalent) of precipitation in the previous hour, temperature 15.0°C (59.0°F), dewpoint 12.8°C (55.0°F).
Title: Re: TX-EcoDragon's 3D Foamy Raven Build Thread
Post by: TX-FlightRisk on February 21, 2005, 06:05:49 pm
How often do you guys see funnel clouds out your way???Isn't that unusual as a chicken or emu in this case with lips....\S~TX-FlightRisk "If my plane is smoking it can mean one thing...I have been hit in one of my ass cheeks and I am cauterizing my wound....."
Title: Re: TX-EcoDragon's 3D Foamy Raven Build Thread
Post by: TX-EcoDragon on February 22, 2005, 05:12:20 am
I had a strange thing happen today while I was cycling my batteries inthe plane, the elevator servo simply stopped responding for a second. . . then it came back to life, later on it happened again, this time I tapped the case and it worked. . there is something screwy going on, looks like the maiden will be delayed once again :-/Regarding the tornado. . . you know, they sure aren't common in California, but we had them up here in the Davis/Sacramento area last year too. . pretty strange. Oddly shortly after they touched down the weather got pretty nice today!Oh and about Ladybug. . . I don't know what she was looking at, but from the second floor window seat you can see lots of the local goings on. . enough to keep her entertained when she isn't being fawned over. . .no she's not stuffed yes she moves, in fact look she's standing in one pic and laying down in the others. . .golly. . .:-P
Title: Re: TX-EcoDragon's 3D Foamy Raven Build Thread
Post by: TX-EcoDragon on February 22, 2005, 11:56:03 pm
Today I bought a new servo and 6 inch extension since there was something difficult to trace wrong with one of those components. . . I also intended to get the Dubro Micro pushrod system, but after inspection of the dubro rods I see that the thin wire is way too thin for this application unless you used the included plastic sleeve and a guide setup, which I opted not to do. Instead I picked up some .04 carbon fiber rod, some Dubro micro clevis' (for .032 pushrods) and some mini EZ connectors. The CF rod can be glued right into the micro clevis using CA or epoxy (I used CA), and on the other end you can either CA a short length of .032 (or a little larger as .032 is flexy) piano wire for the EZ connector, or perhaps drill out the EZ connector a tiny bit for the CF rod to pass through directly, I tried this last method of using just the carbon rod and a drilled out EZ connector. . . this is a nice clean looking slop free setup that so far seems like a better setup than the included hardware. 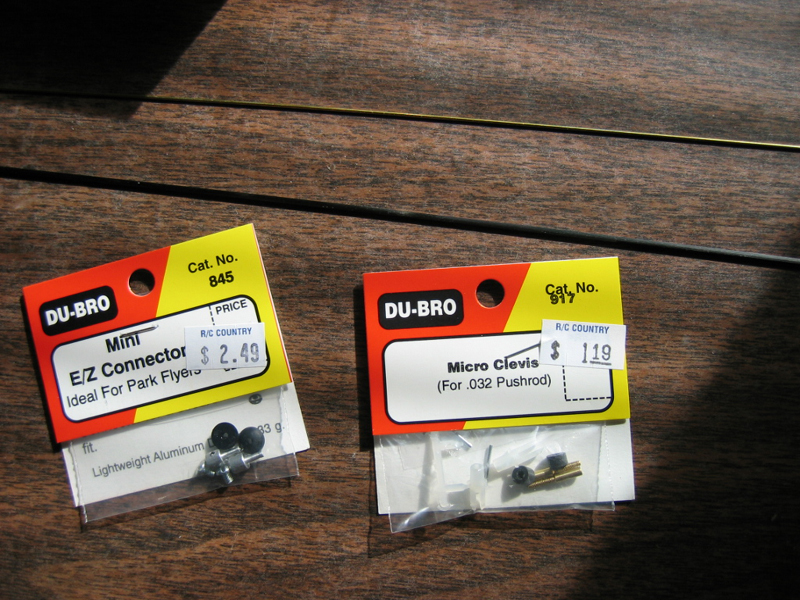 .004 CF rod, Dubro mini EZ conneccectors and microc clevis'
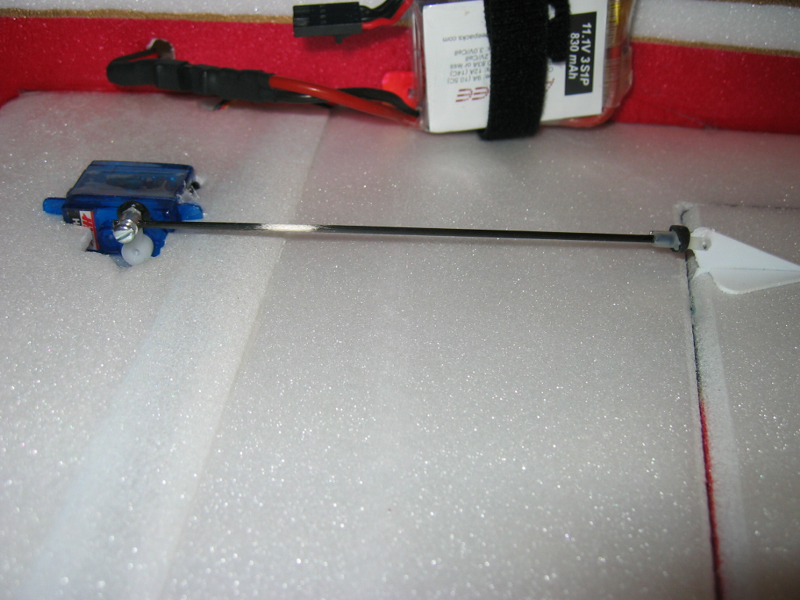 Here they are all finished up, note that I decided to not use any metal in these, I had bought that thin .032 piano wire seen above to CA to the ends of the CF rods, but decided to save soem weight, complexity and the weak point where the metal is glued to the CF. I did have to drill out the EZ connectors but not much at all so this was a 5 second task (Ok 20 total seconds ;-) The micro clevis ends fit perfectly over the CF rod without any effort.
.004 CF rod, Dubro mini EZ conneccectors and microc clevis'Here they are all finished up, note that I decided to not use any metal in these, I had bought that thin .032 piano wire seen above to CA to the ends of the CF rods, but decided to save soem weight, complexity and the weak point where the metal is glued to the CF. I did have to drill out the EZ connectors but not much at all so this was a 5 second task (Ok 20 total seconds ;-) The micro clevis ends fit perfectly over the CF rod without any effort. Title: Re: TX-EcoDragon's 3D Foamy Raven Build Thread
Post by: TX-EcoDragon on February 22, 2005, 11:57:32 pm
Well, I just got back from the maiden flight, well, two actually! It was sunset and getting dark fast, the park I usually go to had some soccer games going on so I found another one but there was not really any hard surface to land on but I thought I could make do with some shortly cut grass. . . Ben "Hwkmn" was there with me to watch and he got some pics and video though it's all *very* poor quality, he ended up just catching it for me in low hovers to save me form needing to land on the grass or try a spot landing on a 8 foot patch of concrete sandwiched between rows of trees. That worked out well. It was night so the third battery didn't get used. Based on these two flights which came to about 6-8 minutes each I observed the following:On takeoff as I pitched to vertical it kept on pitching up, I needed a lot of nose down trim for level flight (the trim lever is about 75% of the way up) and there was very little pitch stability on the first flight. I had placed the battery near the spot to get 3.5 inches aft of the LE of the wing root. . . but I might have been a little aft of that. . .OK. . it WAS aft of that as I left the wheel pants at home and that was enough to shift the CG back closer to 4 inches Even during the second flight with the battery moved forward a bit most of the nose down trim was still dialed in so it wasn't just a CG issue. I havent yet re-checked the CG on it, but will do that shortly. When the epoxy had cured on the motor mount the thrust line looked like it had a little upward angle to it. . .that could also be the problem, so some shims should fix that up.Roll response was very good, rolls are very axial with no need for differential or rudder, points on point rolls were nice and precise, the shocky was always a little less crisp and you could see it hunting a little as you stopped the points of the point roll. Roll rate was good, and also unlike the Shocky Edge it seemed perfectly content blasting out consecutive high rate rolls, the tail wasn't playing catch-up that I could see, and the plane didn't look like it was about to break! The axial nature of the rolls made them easily sustainable with little rudder or elevator work required to maintain alt and heading, even at high speed and high rate, I bet rolling harriers will be smokin!!I did find that in low speed flight the surfaces all needed more travel than I had allocated to them. 40 degrees of rudder gave good performance but twice I fell out of a torque roll on the yaw axis and couldnt bring the nose vertical very well without adding a lot of throttle to transition from high alpha knife edge back to the hover. The shocky had no trouble with this (but might have had more thow), and I don think this will with another 10 degrees of rudder travel dialed in. This is another point that I might appreciate though, as most of the glow 3D'ers I fly need a little help from the throttle in this too. . .and the shocky gave me a lazy throttle finger that didn't carry over to my other planes very well! I am not a fan of the specialty foam designs that depart too much from conventional flight characteristics of the larger 3D aerobats. . . this seems to blend the big 3D/IMAC glow gas aircraft character with the foamy performance extremely well.This also had a harder time doing anti-torque rolls (to the right) as the ailerons seem to be more shielded from the prop wash than the shocky though I had the aileron travel a little more conservative than it could be. It did them just at a slower rate than I'm used to with the shocky, and in order to get them going I found I needed to blip the throttle to add more propwash over the ailerons. I also noticed that when right at the stall AoA the ailerons lose a lot of their effectiveness so, again, I need more travel to better control it at low speeds. The AXI2212/34 would hold her in a hover at 1 ratchet click above half throttle (time to get a ratchetless heli setup BTW) I am still breaking in my batteries so I didn't go much above that yet, though a few more clicks of throttle and it climbed out with plenty of authority.I didn't want to test for Vne just yet but I did do some high speed downlines and 45s on the second flight with the battery moved forward a bit, and this plane tracked very true with visible stability and smoothness and none of that hunting or twitchiness of the shocky . . .very nice. . .you could probably fly a nice IMAC sequence with this bird!! I might just put my glow aircraft in storage at this rate! Inverted I needed a lot of aft elevator input given the aft CG and this made half rolls a little tricky to get a nice line before and after the roll, but a more forward CG should help there.So in summary:This does not fly like the Shocky. . . it feels like a much larger aircraft. . .it requires a little more attention to proper flying techniques when transitioning from flying on the wing to the harrier/hover attitudes than the shocky did. I needed to pop a little blip of power to help it draw a crisp corner in the pop-ups and if I didn't do that I had to work the rudder a bit to keep the wings level, just like I need to in larger RC planes, and full scale aerobatic aircraft. . . so for me, that is a pleasant surprise. This is probably due to the larger size and weight, and perhaps the unique wing design. It had minimal coupling in knife edge, and what it had was the same left or right wing low which is nice. This probably knife edges better than anything I have ever flown in 21 years, and was a much better torque roller than the shocky is, it pitches up and really locked into the rolls, I could hold it steady rolling with next to no deviations on any axis at all, even with my out of practice thumbs. The shocky always seems to be pitching, yawing, climbing or descending just a little bit in my most stable torque rolls. This was really obvious to Ben and he said he noticed that more than anything that it looked like a much larger plane in the air, it was rock solid in the torque rolls, and that it was very precise and smooth. . .and I agree heartily. I will make some changes tonight, more throws, re-trim the elevator, lower the angle of the thrustline a little ( think its a bit on the + side now) and move the Velcro on my batteries to get a more forward CG, and I will report back again tomorrow. . . so far I am loving it!!!!
Title: Re: TX-EcoDragon's 3D Foamy Raven Build Thread
Post by: TX-EcoDragon on February 23, 2005, 12:15:50 am
Well, These pics aren't exactly great, Ben wanted me to hover in front of the moon but his point and shoot didn't like that too much. They are sorta artistic though. . .and they do commemorate the Maiden flight. . .so. . .what the heck, here are a few ( the better ones if ya can believe it ;-) I kinda like the dark pics and how the flash reflected off the gold paint leaving a nice outline of hte Raven, and you can hardly make anyhting else out. . . just the bird!The videos were also kinda poor, and are only from the first few mintues of the very first flight with a very aft CG and a nervous pilot at the sticks (why I get more nervous flying an RC foamy than flying a low point roll over the runway in the full scale Extra is just beyond me . . .but I do!!
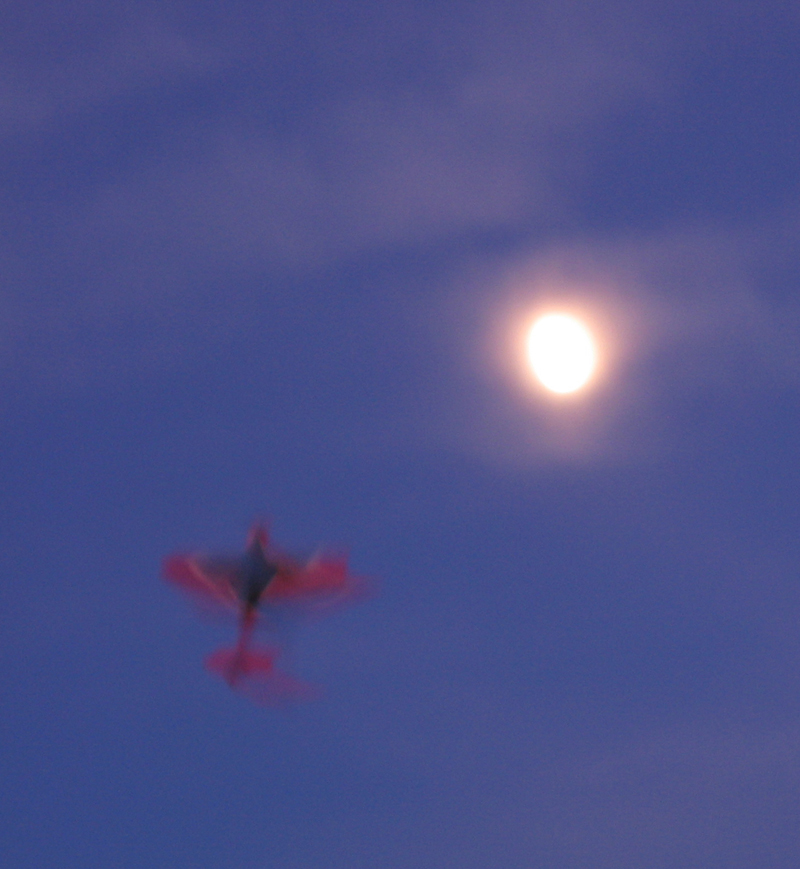
 here are the videos, these are better than the pics, but don't expect any great flying. . .or filming for that matter, Ben was watching the flying more than looking through the viewfinder. . .not that I would do any different. It sure was handy having him there to film. . .and he also caught the plane in the hovers so my problem of no place to land was solved.ftp://69.56.198.2/Brett's RC Flying Videos/3D Foamy Raven/MVI_0001.AVIftp://69.56.198.2/Brett's RC Flying Videos/3D Foamy Raven/MVI_0003.AVI
here are the videos, these are better than the pics, but don't expect any great flying. . .or filming for that matter, Ben was watching the flying more than looking through the viewfinder. . .not that I would do any different. It sure was handy having him there to film. . .and he also caught the plane in the hovers so my problem of no place to land was solved.ftp://69.56.198.2/Brett's RC Flying Videos/3D Foamy Raven/MVI_0001.AVIftp://69.56.198.2/Brett's RC Flying Videos/3D Foamy Raven/MVI_0003.AVITitle: Re: TX-EcoDragon's 3D Foamy Raven Build Thread
Post by: TX-EcoDragon on February 23, 2005, 11:43:16 pm
I went out to the Woodland-Davis airstrip today for day two of the flying, here are some pics I grabbed on the ground. 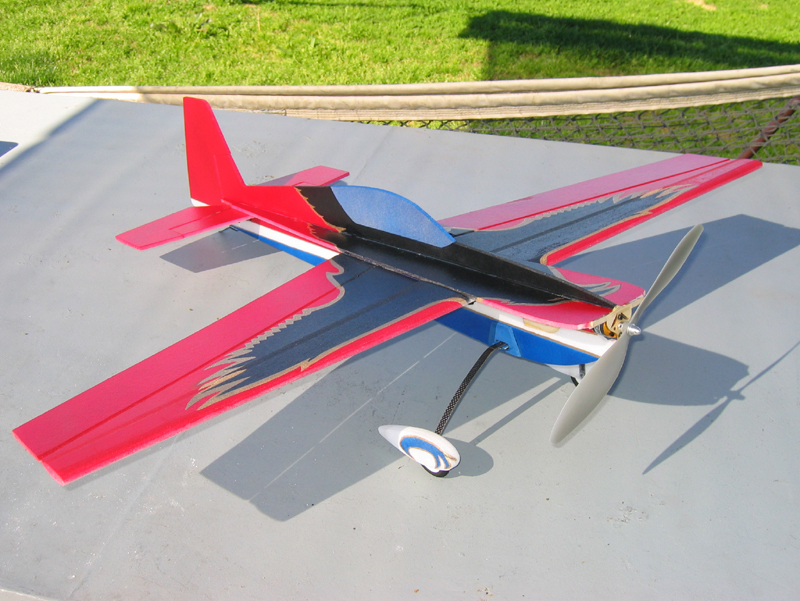
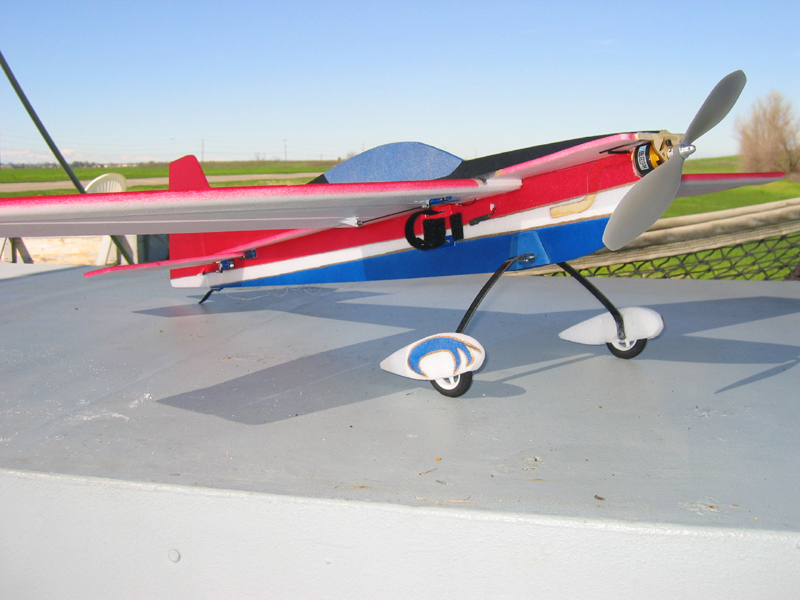

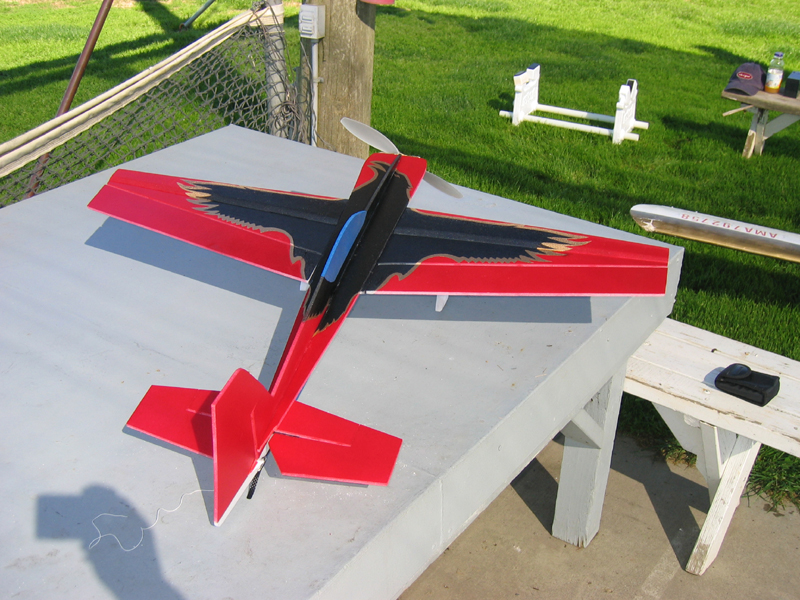
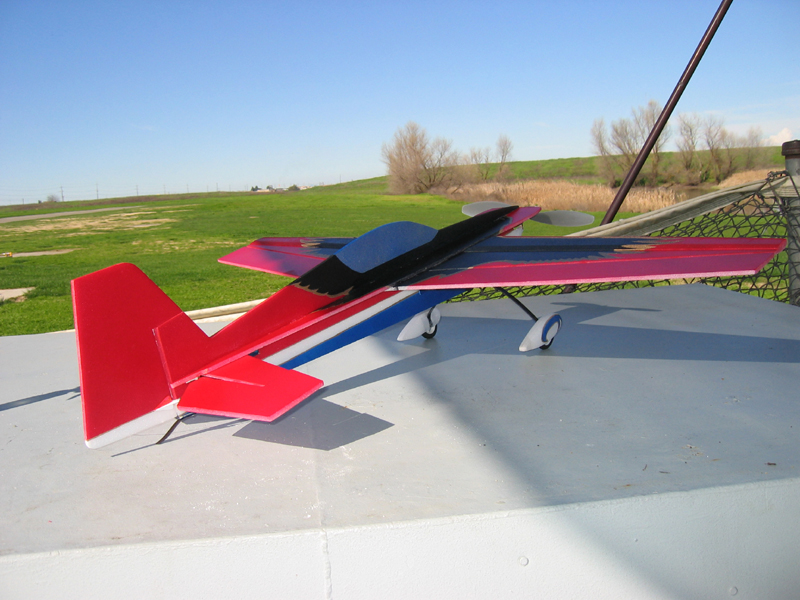
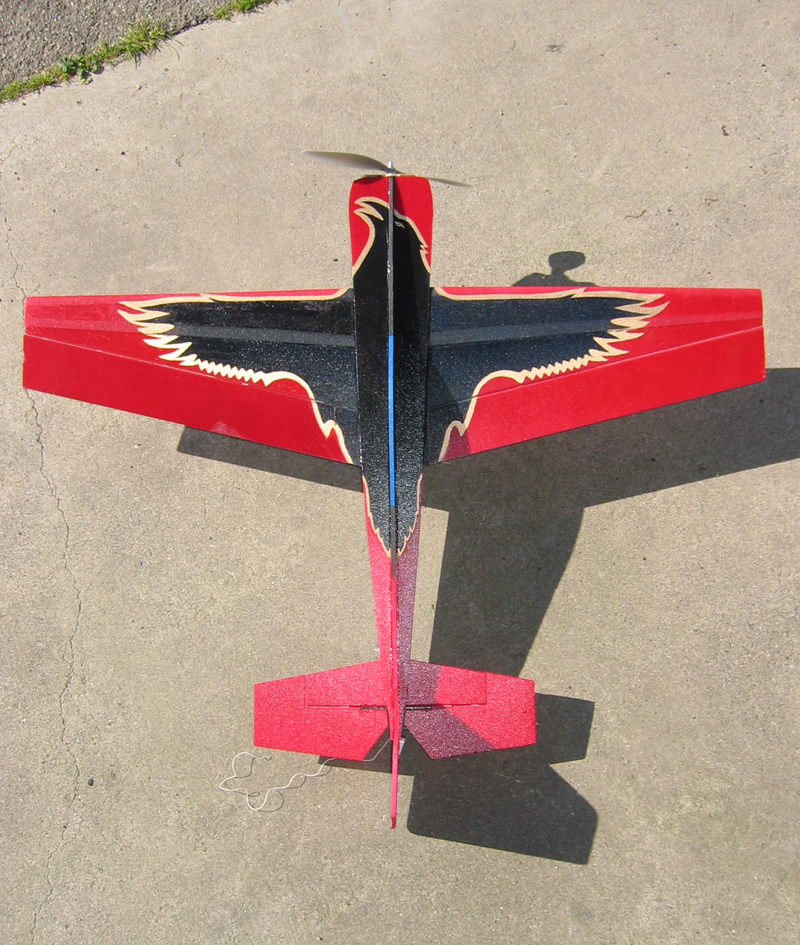
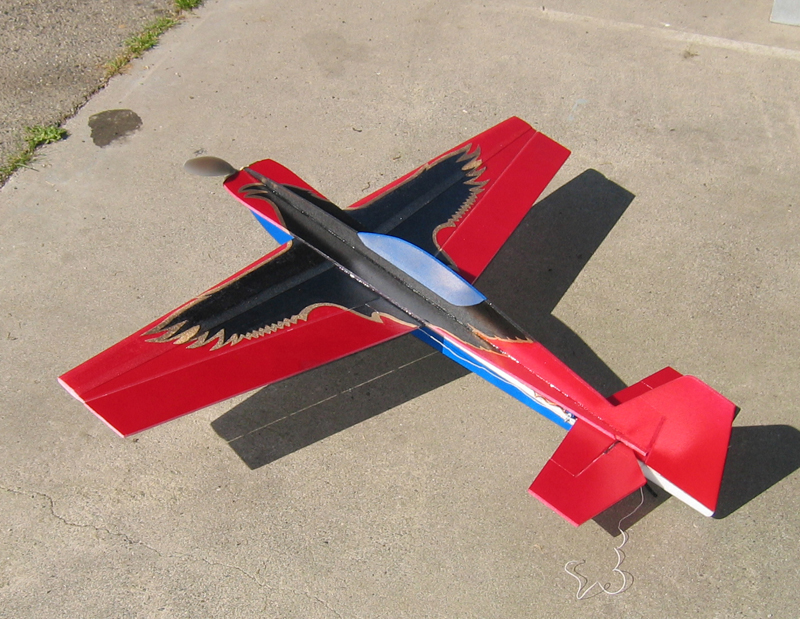
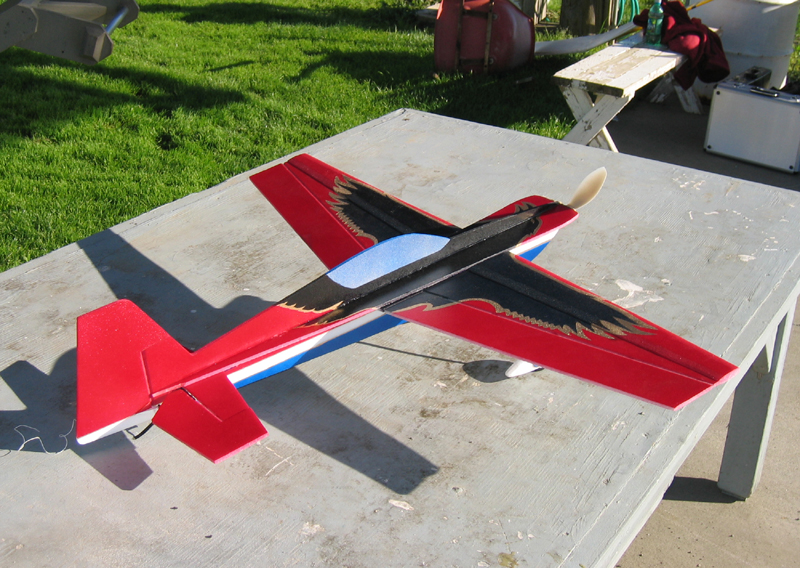
Title: Re: TX-EcoDragon's 3D Foamy Raven Build Thread
Post by: TX-FlightRisk on February 24, 2005, 02:16:39 am
Fine and outstanding job. What did that kit cost? I want one now.......S~TX-FlightRisk "If my plane is smoking it can mean one thing...I have been hit in one of my ass cheeks and I am cauterizing my wound....."
Title: Re: TX-EcoDragon's 3D Foamy Raven Build Thread
Post by: TX-EcoDragon on February 24, 2005, 04:32:02 am
I go into it pretty extensively earlier in this thread. . .on page one I think. . . Let me prepare you first off that they really aren't any cheaper than much more substantial glow/gas powered models, but they have some big perks that over time help to offset the cost, such as no expensive fuel needed, no fuel cleanup needed after flying, no need to drive to the flying field if you have a park nearby, you can fly everyday even if you only have a little bit of time, they are quiet, they are easy to fix if you hurt them (well, within reason) the fragile airframe is the cheapest part of the aircraft. . . fly on soft grass and you proabbly wont hurt anything too bad. . . judt use great caution when using Lithium-Polymer batteries as they must be charged, disscharged, and handled correctly, if they are involved in a crash they can short internally and caude some serious damage. . . short of that (no pun intended) these are fun and affordable to operate after the initial purchase.
Title: Re: TX-EcoDragon's 3D Foamy Raven Build Thread
Post by: TX-EcoDragon on March 02, 2005, 01:38:02 pm
2/23/2005 7:25:42 PMI just got back from 5 more flights. . . even with the wheel pants installed my CG is still needing to go forward for neutral trim upright and inverted, it is now at about 3.25 inches aft of the LE and it still climbs when trimmed for upright flight when it is rolled inverted. The roll rate is nice and fast now with the added aileron, but can still be precise when you stop it. This is a VERY nice flying plane other than the inverted climbing issue which is specific to my forward horizontal stab and elevators. You can tell it's a bit heavier than the Shocky types though, and right under the stall AoA the ailerons do seem to become rather unresponsive unless you blast a little power over them. . . I am not sure that more throw is the real solution, I think throttle managment is the first, best response, as if you are working the power a bit you won't notice this, but if you just gradually fly slower and slower you will hit a spot at the stall where the ailerons sorta fade out. . .go slower than this and you must increase power (you are behind the the power curve) and this makes them come alive quite well once again. I haven't weighed mine yet, but It does hover at 50% power with the AXI 2212/34. In reply to question about forward CG ruining the 3D flying characteristics: As far as the CG issue is concerned, the first flight with the aft CG it practically torque-rolled hands free. . . my flights on it yesterday with a more forward CG (set just aft of neutral trim upright and inverted) were with winds gusting to 13 knots so it wasn't hands free, but it was actually quite comfortable hovering and torque-rolling keep in mind I don't have expo and I fly it most of the time on high rates, and with the CG at 3.5 inches it is pitch stable enough to draw nice lines provided the wind isn't turbulent. I don't think this thing is in any danger of poor torque-rolls at any flight worthy CG to be honest, but I will slide the battery up to the front end of the range today, on this windless day and report back a more accurate appraisal. There is some rock in the harriers to counter, and they do lessen in magnitude as the CG moves aft, that said, there is ample control response in the harrier to fly out the rocking. Keep in mind that the rocking is also made worse by higher wingloadings, and while I haven't weighed mine yet I'm sure its heavier than mose 3DF planes will be with all the paint and glue I used.
Title: Re: TX-EcoDragon's 3D Foamy Raven Build Thread
Post by: TX-EcoDragon on March 02, 2005, 01:39:08 pm
Last night I worked up the courage to get out the Xacto saw and excise my horizontal stab/elevator assembly from the fuse so that I can move the surfaces back towards the rear of the fuse cutout where they should have been glued in the first place. I have had some issues with neutral pitch trim when rolling from upright to inverted such that when trimmed for level upright flight (at speed) a half roll to inverted requires aft stick to maintain level inverted flight, moving CG forward had less effect on this dynamic than usual so I think the tail position may be a factor. I will let you all know. This is actually sort of handy when in the low speed high alpha 3D realm as things like rolling harriers and such require a little less stick movement on the elevator, but for easier IMAC style flying I'd like the inverted qualities changed some. It will be fun to see if this has any effect, or rather, how much of an effect it has.
Title: Re: TX-EcoDragon's 3D Foamy Raven Build Thread
Post by: TX-EcoDragon on March 02, 2005, 11:53:40 pm
The glue is just about cured, I need to patch the hole from my previous servo mounting location and then re-install the servos. My JR 9303 arrived today so I will swap a new crystal into the Berg and my Funtana and try out some expo tomorrow!! Whoo hoo!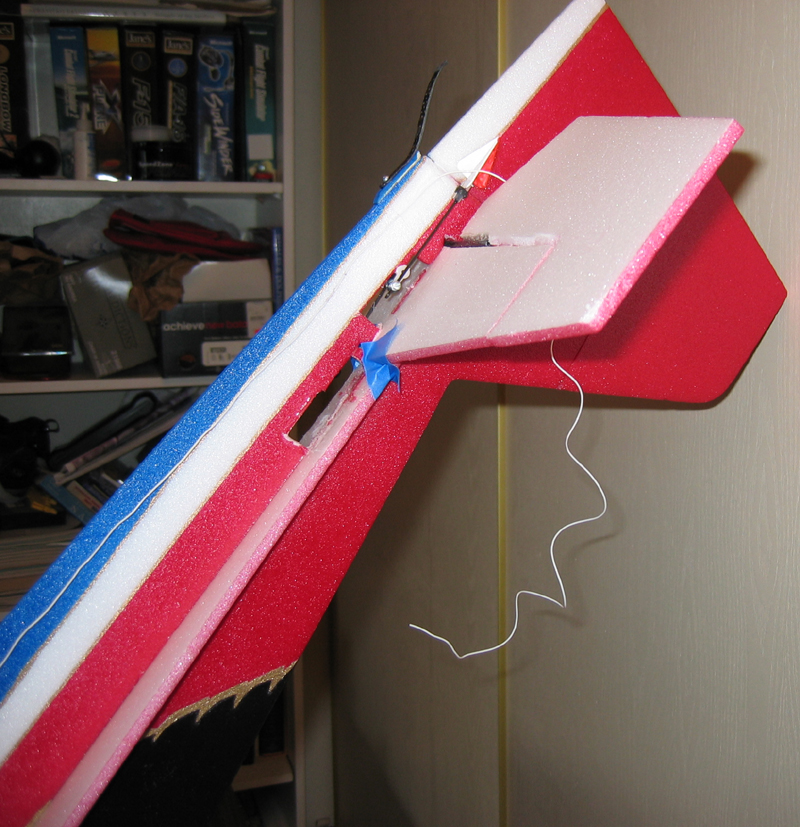 Here is the hack job I did to the Raven, I will patch this up and it should be as good as new. . .if not a bit heavier.
Here is the hack job I did to the Raven, I will patch this up and it should be as good as new. . .if not a bit heavier.Title: Re: TX-EcoDragon's 3D Foamy Raven Build Thread
Post by: TX-EcoDragon on March 03, 2005, 02:59:26 am
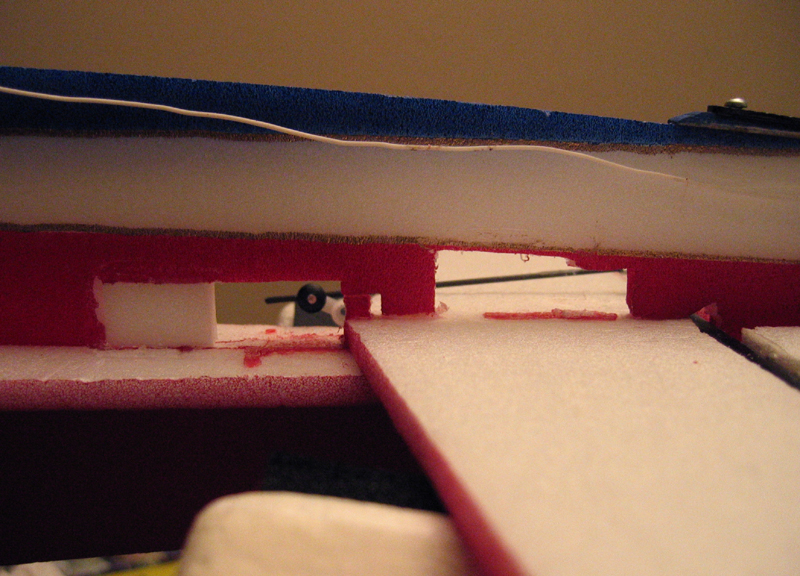 In this shot you see the patch job in progress as I test fit one of the foam inserts. I saved the extra foam from my kits so that was handy. You also see the red area that was once the joint between the stab and the fuse, I used an Xacto to clean up the glue and such from the area after this shot.
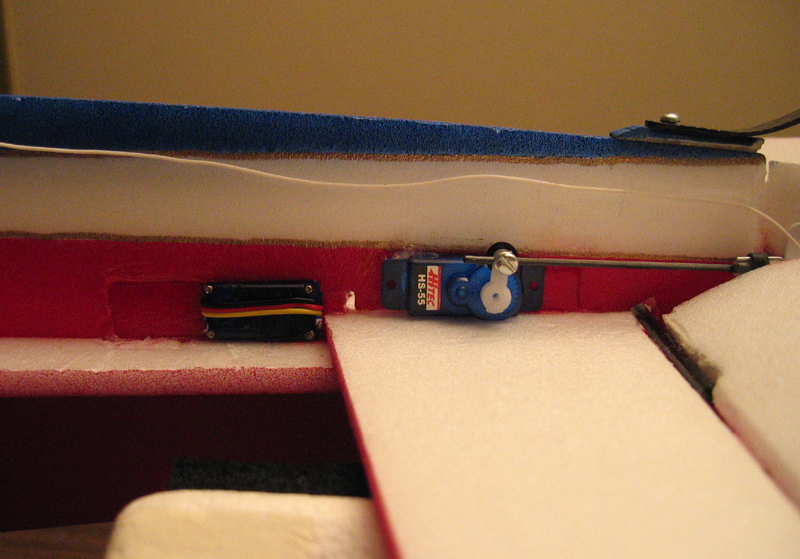 Here I have re-installed the servos for the elevator and rudder and the patches have been painted and installed
Title: Re: TX-EcoDragon's 3D Foamy Raven Build Thread
Post by: TX-Rahman on March 03, 2005, 08:29:58 am
Looks good as new....nice job there Hackford!  Regards,TX-Rahman"BLACK 4"
Title: Re: TX-EcoDragon's 3D Foamy Raven Build Thread
Post by: TX-Deck on March 03, 2005, 08:36:54 am
I agree with Rah... nice repair work there! I'm sure you'll be glad you took the time to make it happen.NEED MORE VIDEO!TX-Deck out.
Title: Re: TX-EcoDragon's 3D Foamy Raven Build Thread
Post by: TX-EcoDragon on March 03, 2005, 11:25:55 pm
Yeah, Every time I get out to fly it Ben brings one of his planes and get's distracted with that so my camera guy is in the doghouse right now. I have sold my two older tansmitters and some radio gear and transfered those funds to a lovelly new JR 9303 9 Channel computer radio, I got the Raven programmed in, so one of these days I will need to fly it! I am really curious how the moved tail will affect the flying characteristics. In addition the weather's been bad, when it's clear it's really windy. I have been REALLY busy, tonight I am helping the girlfriend's mom pack up the moving truck, and then I get to drive it 6 hours tomorrow and unload it. . whooo hoooo!!This sunday I am going to try to get back in time to go to the SWAN Aerobatic Safety Seminar. . . so it won't be until monday at the soonest. . . I am thinking of taking it to Metz. . . maybe a little video of it doing a nice knife edge pass then the Full scale Raven doing one in the background. . . that'd be cool!! I'll talk to Wayne!:-D
Title: Re: TX-EcoDragon's 3D Foamy Raven Build Thread
Post by: TX-EcoDragon on March 09, 2005, 10:00:03 pm
yesterday I had two flights, and today I had three on the new tail and transmitter. I had to remove most of the exponential I dialed in as I am simply not yet used to it, 21 years of high rates and no expo has given my thumbs a reluctancy to move large amounts on the sticks, setting it at no more than 20% was OK, but I still flew better with none. I had my first motor mount fail, not at the fuse joint, the plywood itself split in half, causing damage only to my motor and ESC wires, but the fuse was fine. I replaced it with a second AXI mount of Levi's the day before yesterday. I flew it lightly yesterday on the new mount, but it was a bit too windy to really report on anything. Today was still a little bit windy, but I flew at a park with the cover of trees and buildings to lessen the windspeed a bit. Today I could see that the tail moved back did improve the pitch tracking and stability by a noticable amount. My 3 flights today each had the CG in different spots and the model was most well behaved all around at about 3.25 inches aft of the LE. It would still climb a little when inverted at speed, but at lower speeds it was neutral, and near 3D speeds it required a forward push on the stick for level flight. The pitch tracking was better too as it was easier to draw good lines. There is still a deadspot in the aileron response, it's right at the speed between flying and 3D'ing though in the harrier it has a nice roll response, and of course when flying on the wing it has more than enough. Rolling harriers were easier than on the shocky, mostly because the models stores more rotational energy in the roll so it presents better, being more stable and consistant as it rolls, this also makes it a little easier to fly through the figures as it simply feels more solid, even with wind. I noticed a little more pitch coupling in the Knife Edges today, buty nothing unusual, and once the KE coupling is dialed out it is content to fly around KE as long as you are. It was starting to really come together at this point! I did some snap roll and spin attempts on the third flight which had the CG at around 3.75 inch aft of the wing LE which were strange, the snaps would not snap the aircraft would pitch through the snap into very high alpha flight or even do the worlds smallest immelman. I went up high and went for an upright spin, it didn't really turn into a spin it more or less spiralled down very slowly and gently ina harrier with healthy pitch oscillation where it appeared to fly in and out of the stall. I tried this one with no aileron (a full scale style spin) and intended for the next spin to use aileron which I expected would give me a better spin. I didn't have the chance to though. . . as I exited the spiral harrier and turned back to head away from me I heard a rather loud pop and saw foam fly, then the engine and speed control could be seen dangling from below the aircraft I had some roll control but couldnt turn and decided to just glide it straight ahead and did a greaser harrier landing into the grass. The fuse forward of the wings was not in good shape though. [&:]There really was nothing on this flight that was what I would call hard aerobatics other than that I attempted three snap rolls, and did one outside tumble on a upline into a torque roll. . . nothing out of the ordinary through so you can imagine my dismay when I saw my nose explode. . . in level, 1/3rd throttle, 1 g flight no less. In any case I am a bit bummed.  Needless to say my next plane will not use the front firewall mount.I got video yesterday and today which I will upload.Here are some pics:Top Down view of the fuse
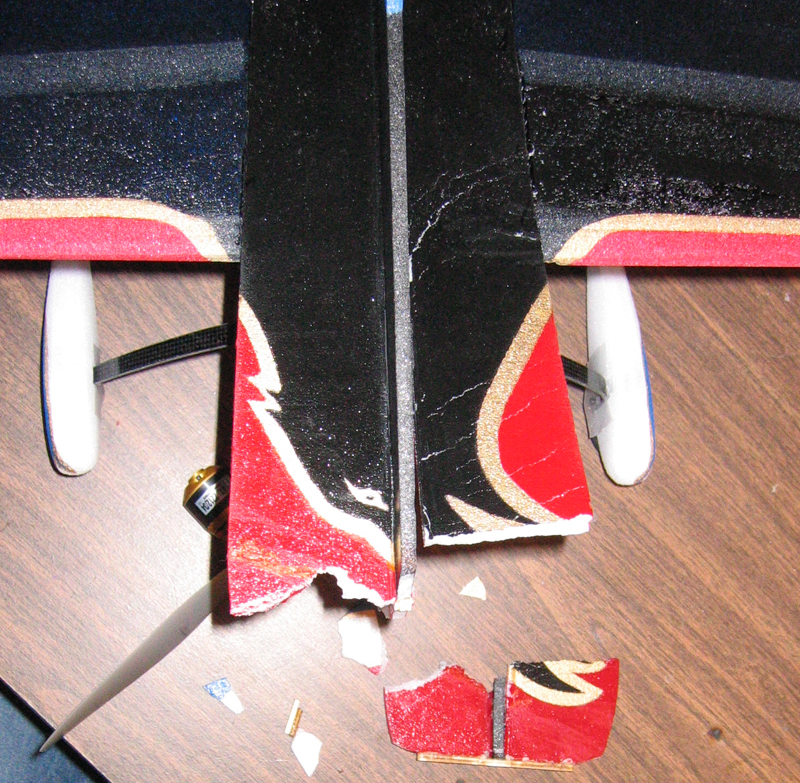 :-(
:-(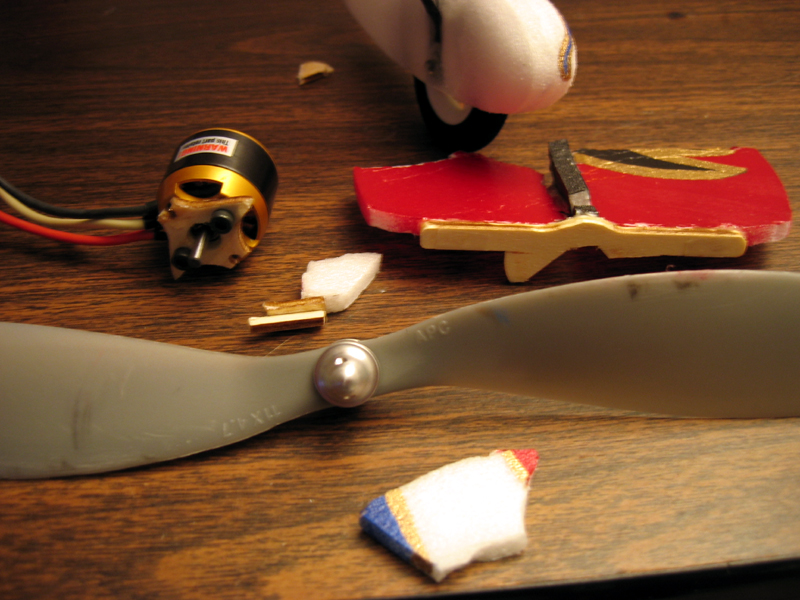 I found all the parts except the carbon fiber crossbeam. Here you can see how the motor mount failed, this is much like the first ones failure, at the bottom screw hole, as well as at the top of the cooling holes in the mount. Note that the bottom portion of the mount broke at the screw hole despite the patch of ply that I epoxied over it!
  Here you can see that the prop disc actually rotated downwards and cut clear through the fuse foam below and behind the motor mount. . . note the paint on the leading edge of the prop and how it lines up with the foam placed next to it. There is also a nice slice out of the left wing LE where the prop must have hit it when teh engine was flying around on the end of it's wires.
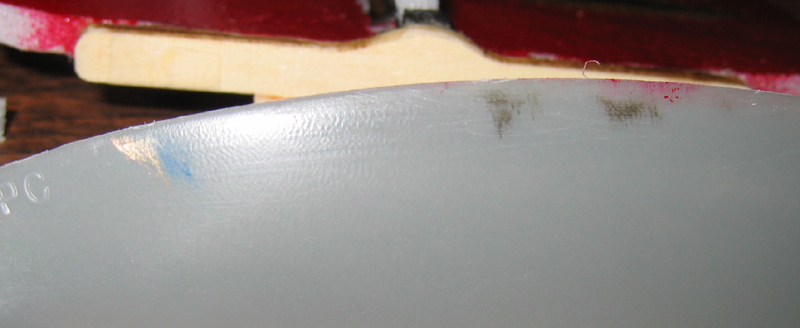 Here is a close up of the paint marks on the prop.
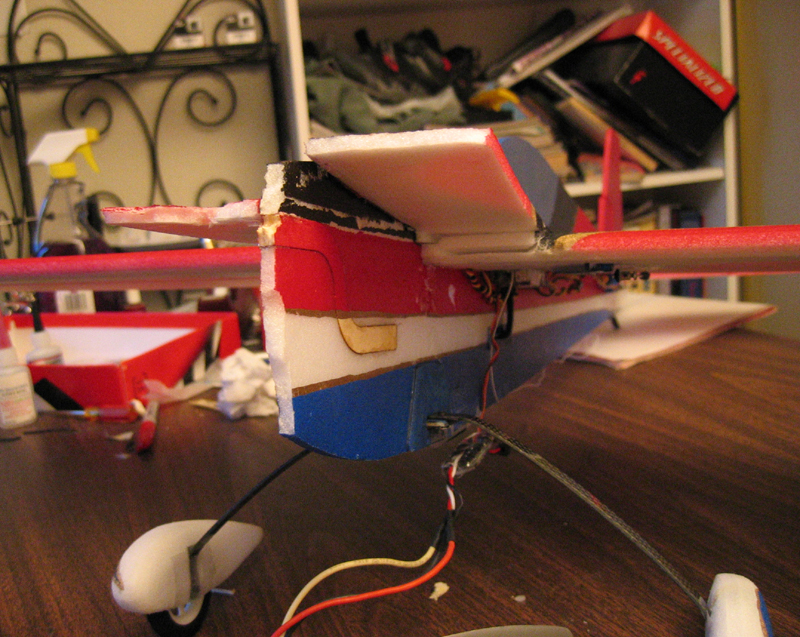
 The damage to the left side was pretty bad, here you see the fuse side rail damaged all the way back, as well as the split in the wing.
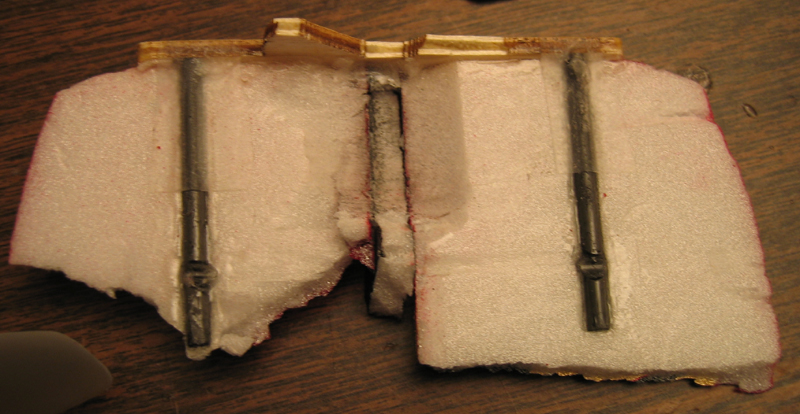 Here is the bottom of the fuse nose, and the carbon CF rods. . . these at least add lots of rigidity to the mount assembly, but the plywood itself is too flexy at the lower mounting screw for the motor to be secure. You may notice that the at all places where the mount glues to the fuse foam the joints are instact. The Break started at the bottom of the motor can, the prop hit the fuse lower portion, and then all heck broke loose. I guess it's time to fly the sim and full scale for a while till I get in a better mood.S!TX-EcoDragonBlack 1TX-Squadron XO
:-(I found all the parts except the carbon fiber crossbeam. Here you can see how the motor mount failed, this is much like the first ones failure, at the bottom screw hole, as well as at the top of the cooling holes in the mount. Note that the bottom portion of the mount broke at the screw hole despite the patch of ply that I epoxied over it! Here you can see that the prop disc actually rotated downwards and cut clear through the fuse foam below and behind the motor mount. . . note the paint on the leading edge of the prop and how it lines up with the foam placed next to it. There is also a nice slice out of the left wing LE where the prop must have hit it when teh engine was flying around on the end of it's wires.Here is a close up of the paint marks on the prop.The damage to the left side was pretty bad, here you see the fuse side rail damaged all the way back, as well as the split in the wing.Here is the bottom of the fuse nose, and the carbon CF rods. . . these at least add lots of rigidity to the mount assembly, but the plywood itself is too flexy at the lower mounting screw for the motor to be secure. You may notice that the at all places where the mount glues to the fuse foam the joints are instact. The Break started at the bottom of the motor can, the prop hit the fuse lower portion, and then all heck broke loose. I guess it's time to fly the sim and full scale for a while till I get in a better mood.S!TX-EcoDragonBlack 1TX-Squadron XOTitle: Re: TX-EcoDragon's 3D Foamy Raven Build Thread
Post by: TX-Deck on March 09, 2005, 10:15:13 pm
Man! I don't really know what to say other than I'm terribly sorry that it happened! At least the damage to the electronics was minimal, and foam is cheap. From my point of view, it appears you had a good time building everything from the kit level, so look back on that and be proud of the fine job you did with the construction. I never really realized how sharp a foamie could turn out until I saw your work on this one.Hang in there, revise, and rebuild. I'm positive it will fly again and be better than the original design. Might be a good chance to provide some feedback to the kit designer, or at least research a little bit and see what others have done if this is indeed a common issue. Good luck, if I can help with the rebuild mods, let me know!TX-Deck out.
Title: Re: TX-EcoDragon's 3D Foamy Raven Build Thread
Post by: TX-EcoDragon on March 09, 2005, 11:33:27 pm
After analysis of the point of failure on the two mounts this is a proposed modification to the mount to beef up the week points of the current mount. .jpg) This will eliminate the weak points from the half moon cooling cut-outs, as well as the real problem, the screw hole at the six o clock position.Too bad I had to figure this out the hard way.Photoshop work done by TX-DeckS!TX-EcoDragonBlack 1TX-Squadron XO
This will eliminate the weak points from the half moon cooling cut-outs, as well as the real problem, the screw hole at the six o clock position.Too bad I had to figure this out the hard way.Photoshop work done by TX-DeckS!TX-EcoDragonBlack 1TX-Squadron XO
This will eliminate the weak points from the half moon cooling cut-outs, as well as the real problem, the screw hole at the six o clock position.Too bad I had to figure this out the hard way.Photoshop work done by TX-DeckS!TX-EcoDragonBlack 1TX-Squadron XOTitle: Re: TX-EcoDragon's 3D Foamy Raven Build Thread
Post by: TX-EcoDragon on March 11, 2005, 02:56:39 am
I just found out that the AXI mount is supposed to be built twice as thick. I had two kits and got a bag with two mounts in it, and with no instructions assumed that the mounts where 1 for each kit, turns out that I should have laminated the two together before mounting in the aircraft. Too bad I didn't find that out before trashing my month's worth of work on this one and damging my ESC and motor. :-/I had fun though, even if for only 10 flights. . . If I build another it will probably use the backplate mount, but at least now I see what the trouble was. S!TX-EcoDragonBlack 1TX-Squadron XO
Title: Re: TX-EcoDragon's 3D Foamy Raven Build Thread
Post by: TX-EcoDragon on March 25, 2005, 06:00:42 pm
Here are some of the AXI stick mounts available. These will work with Levi's "Torqued" motor beams.I haven't used these, but will probably try one for my next plane: wood built up mountshttp://www.cl-i-max.com/axi-mounts.shtmlaluminum mountshttp://www.topcreationsrc.com/catalog/accessories/motor_mounts/index.htmI like this one. . but 12.50!! Sheesh. . . S!TX-EcoDragonBlack 1TX-Squadron XO
S!TX-EcoDragonBlack 1TX-Squadron XOTitle: Re: TX-EcoDragon's 3D Foamy Raven Build Thread
Post by: TX-EcoDragon on April 21, 2005, 04:56:35 pm
I managed to rebuild my Raven (thought it's a bit ugly) and use the new stick mounted AXI. The weight of the aircraft with the fixes is a bit higher than it must have been before, but I jsut weighed it fully ready to fly witht eh 830 3 cell pack and it was just 12.9 oz! I did an uneventful and very soft touch and go on the baseball diamond today, and then on the landing the gear dug into some loamy soil and folded aft breaking clean out of the fuse! The surface wasn't as smooth as a ruwnay of course, but I had oeprated there with the shockflyer without issues. This plane is a full fledged beater now I guess! In any case I will use this to test a new gear mounting setup. In other 3DFoamy news. . .
 Levi has recently released a new product line starting with the "Super"Extra and the SuperCap 232. These are 45 inch wing span hollow core composite foam aircraft. All surfaces are laminate layers of depron foam instead of single sheets, much like the leading edge of the "Pro" wing on the older kits. This allows the structures to be more or less hollow, and the laminate contstruction boost the rigidity of the foam quite a lot. . . the result is a stronger, more rigid, and lighter structure that also looks a little more scale. The model is also scaled up in size from 40 inch span, to a 45 inch span. See the Flight Video here: http://www.3dfoamy.com/Videos/SuperXtraPromo.wmvLevi also incorporated changes to the new design some of which were suggested in this build thread. The new kits have aileron cutouts that are now placed perpendicular (and closer) to the aileron hinge line which gives better pushrod and surface geometry of the ailerons. The horizontal stab has a ply tab and notch that makes correct placement easy. The size, and weight of this Foamy are higher than most, and for me that's a good thing, this has the effect of making the aircraft fly more precise and scale when you want that, as well as increasing it's ability to handle wind. My only gripe is that the landing gear mounting system is the same one, and IMHO this needs to be redone such that the mounting plates are flexible and large enough to distribute loads into the foam from the fore/aft and torsional forces that some landings (or landings on anything that isn't a smooth firm surface). I am currently fabricating a new mounting system that I will test and if it works as planned I will send the specs to Levi for his review and perhaps incorporation into the kits.S!TX-EcoDragonBlack 1TX-Squadron XO
Levi has recently released a new product line starting with the "Super"Extra and the SuperCap 232. These are 45 inch wing span hollow core composite foam aircraft. All surfaces are laminate layers of depron foam instead of single sheets, much like the leading edge of the "Pro" wing on the older kits. This allows the structures to be more or less hollow, and the laminate contstruction boost the rigidity of the foam quite a lot. . . the result is a stronger, more rigid, and lighter structure that also looks a little more scale. The model is also scaled up in size from 40 inch span, to a 45 inch span. See the Flight Video here: http://www.3dfoamy.com/Videos/SuperXtraPromo.wmvLevi also incorporated changes to the new design some of which were suggested in this build thread. The new kits have aileron cutouts that are now placed perpendicular (and closer) to the aileron hinge line which gives better pushrod and surface geometry of the ailerons. The horizontal stab has a ply tab and notch that makes correct placement easy. The size, and weight of this Foamy are higher than most, and for me that's a good thing, this has the effect of making the aircraft fly more precise and scale when you want that, as well as increasing it's ability to handle wind. My only gripe is that the landing gear mounting system is the same one, and IMHO this needs to be redone such that the mounting plates are flexible and large enough to distribute loads into the foam from the fore/aft and torsional forces that some landings (or landings on anything that isn't a smooth firm surface). I am currently fabricating a new mounting system that I will test and if it works as planned I will send the specs to Levi for his review and perhaps incorporation into the kits.S!TX-EcoDragonBlack 1TX-Squadron XOTitle: Re: TX-EcoDragon's 3D Foamy Raven Build Thread
Post by: TX-CUDA on April 21, 2005, 07:43:54 pm
Killer plane Eco. I noticed on the video that the one flying had what appeared to be a fuel engine. Why did they go with gas and not the electric? No matter what it used for propulsion that was a very good fly they put on! Very good video I might add. One of these days I might venture into the R/C world and those "foamies" look very nice. Thanks for the update....TX-CudaMinister of Information
Title: Re: TX-EcoDragon's 3D Foamy Raven Build Thread
Post by: TX-EcoDragon on April 22, 2005, 10:13:11 pm
Actually, it is electric, but in some of the videos they used an interesting little smoke system that simply attatches to the aircraft. These are little cartridges that you ignite and then when you fly it leaves a little smoke trail.Here they are: http://www.hobby-lobby.com/atricks.htmS!TX-EcoDragonBlack 1TX-Squadron XO
Title: Re: TX-EcoDragon's 3D Foamy Raven Build Thread
Post by: TX-Kingsnake on April 29, 2010, 07:30:58 pm
Perching UAV (http://www.youtube.com/watch?v=AYf5gUN4Ufs&feature=player_embedded#lq-lq2-hq-vhq)
Spry leg mod for a foamy.
Spry leg mod for a foamy.