Username:

Password:

Pages: [1] 2 3 ... 5
  Print  
Author Topic: TX-EcoDragon's 3D Foamy Raven Build Thread  (Read 69758 times)
TX-EcoDragon
BLACK 1
Administrator
Hero Member
*****
Offline Offline

Posts: 3034


G's Please


View Profile WWW
« on: January 28, 2005, 11:38:56 pm »

Well,

Through the wonders of modern debt technology, ie. a Credit Card, I should soon be in posession of the Raven from www.3dfoamy.com  I am building one of these as a gift for a  nephew, and one for me pretty soon.

My specs are

Plane: 3D Foamy Raven "Pro" package with Depron and G-Force wing, and Carbon Fiber Landing Gear kit.
Powerplant: AXI 2212/34
Prop: APC 11x4.7
Receiver: Berg 6*G III
Electronic speed control: Castle Creations Phoenix 10
Servos: (4) Hitec Hs-55 sub micros
two 6 inch servo extensions
Testors Spray Enamel in Dark Red 1207 , Black 1247, Gold 1244, Dark Blue 1211, Silver 1246 (mist over blue canopy), and a Testors Gold Paint Marker (I wish I bought this sooner, it works great!)
Batteries: Apogee High Discharge 830 mAh 3cell Lithium Polymer packs
Apache 2500 LiPo Safe Charger (LiPo packs are known to blow up, like. . . for real!)

All up ready to fly weight with Apogee 830 3 cell, and after a few rebuilds, and a top creations AXI stick mount is now 12.9 oz.


Some of the needed gear has already arrived, but I am still waiting on the Kit, motor, Batteries, Charger.


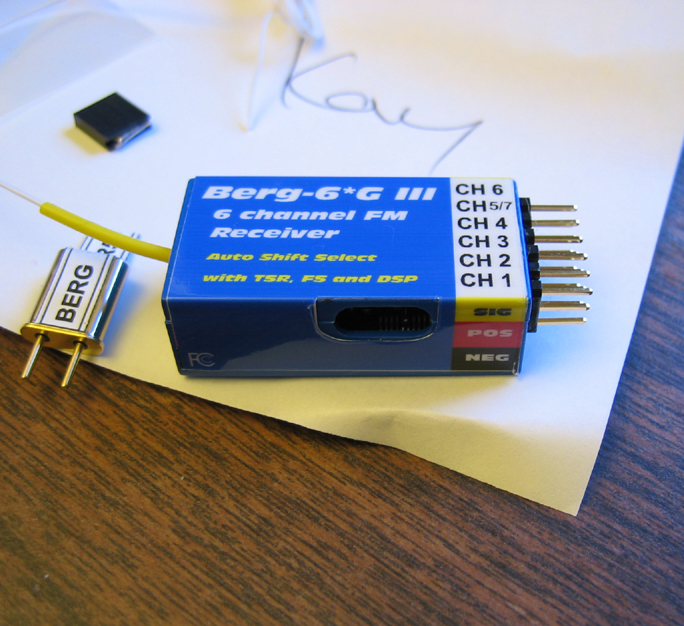
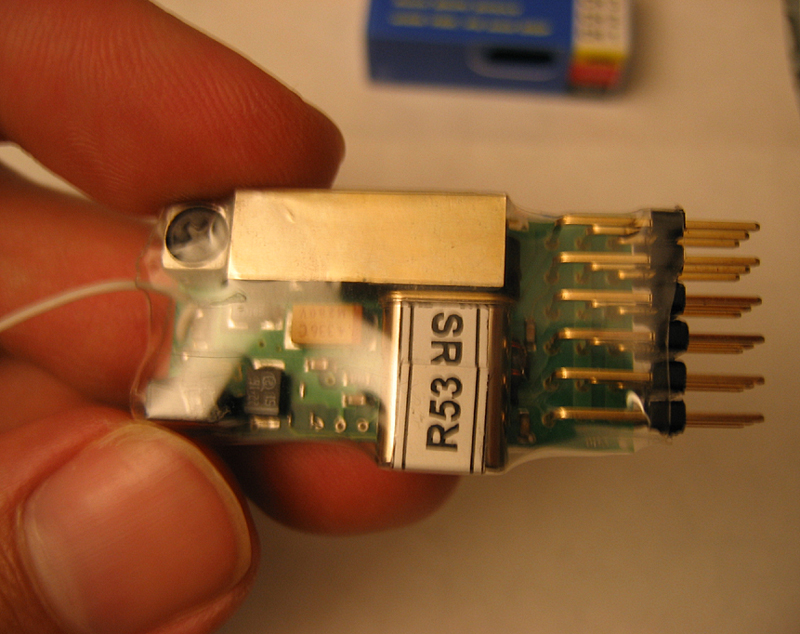
Here is the Berg 6* G III Receiver as it came out of the package today. These are very small, light, and jam packed with awesome features, see the link below if interested.


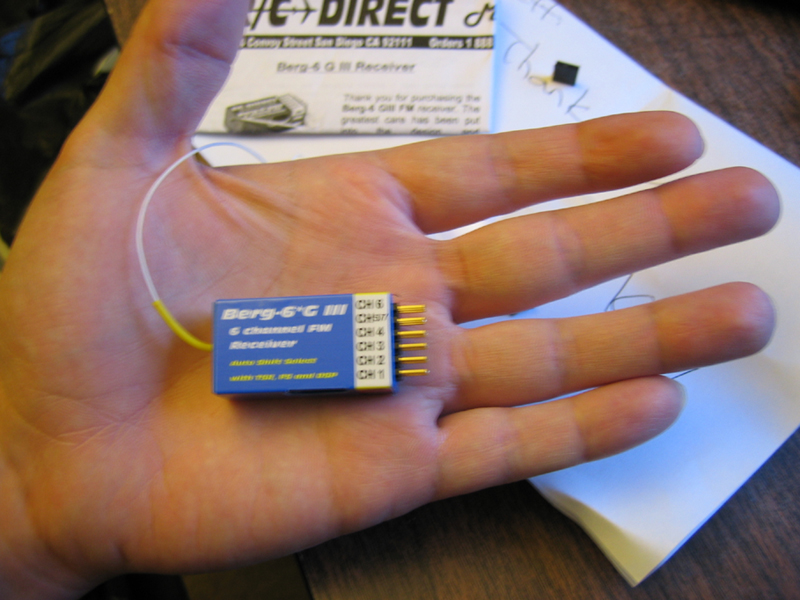
See, it's pretty small. . . and as I said pretty light at 13 grams. . .but. . .


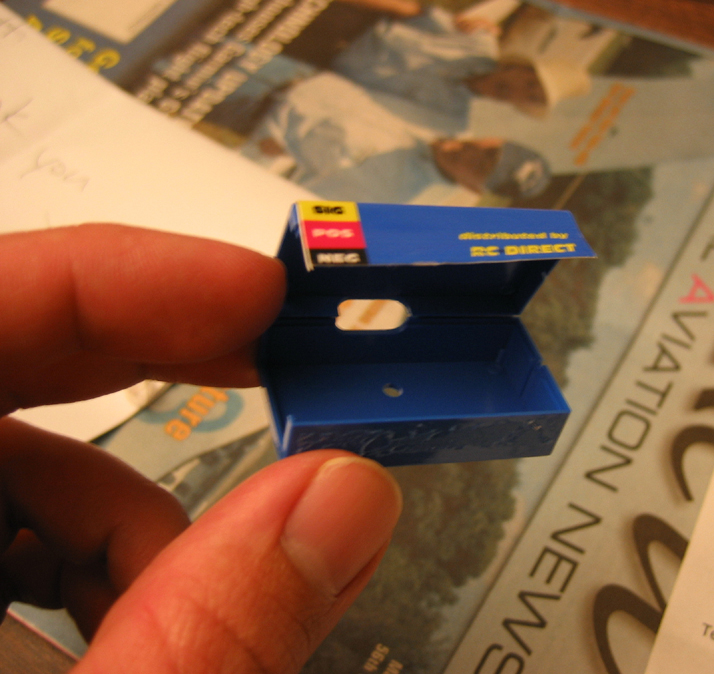
Slide a notecard under the adhesive opposite the Crystal and gently lift it off and you can open the case as seen here.


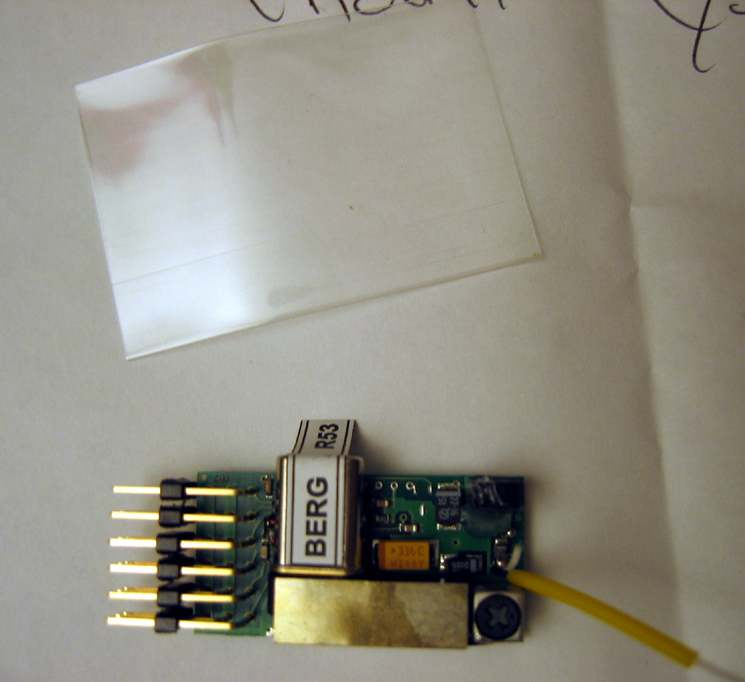
Which gives you this and saves you 3.5 grams off the total weight!
Berg is nice enough to provide some pre-cut shrink wrap along with the Receiver


Install the Crystal, then place the bare receiver inside the shrink wrap tube and gently heat with heat gun (blow dryer) or as I did you can use a Iron-on covering iron *near* but not touching it. to shrink the tubing tight around the board.  I also trimmed the extra wrap off the ends a bit, mine won't need much protection from the elements anyway.


Here is a side view once it's wrapped.


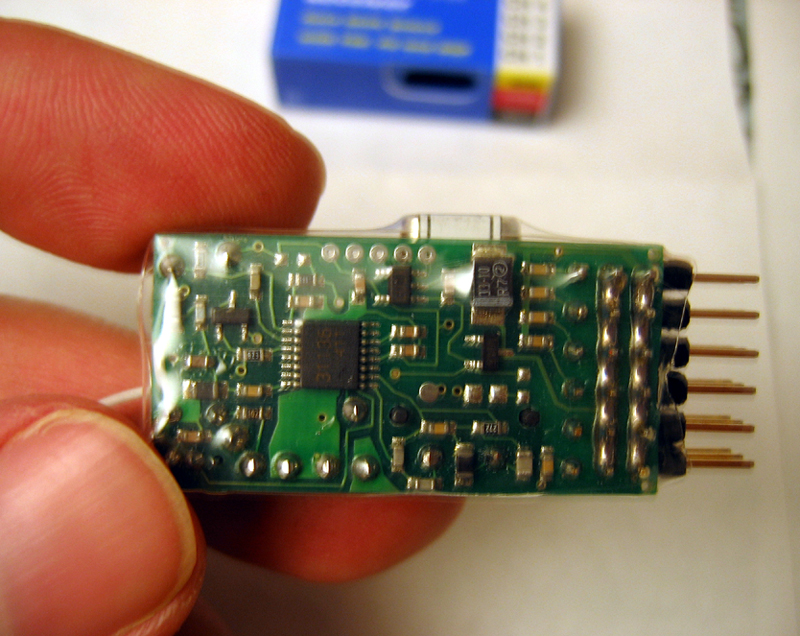
And just to be complete about it, here is the bottom of the receiver.


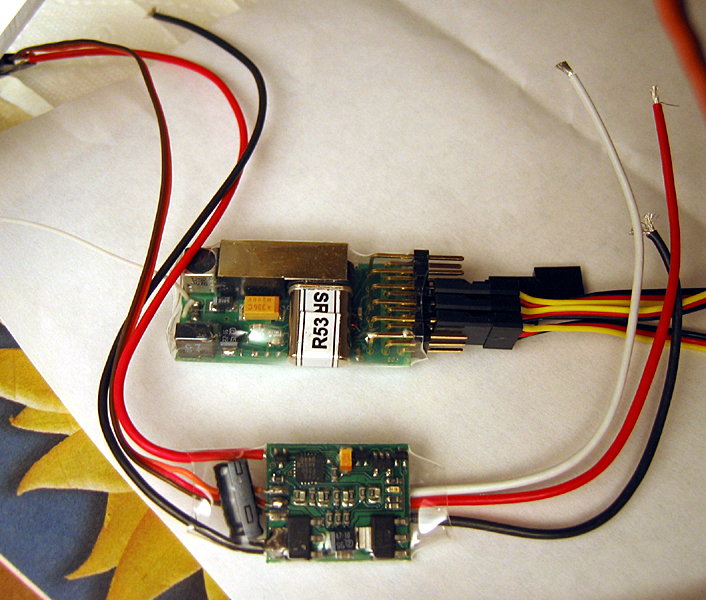
Here is the Castle Creations Phoenix 10 ESC next to the receiver.  .  . this little wonder is dwarfed even by the Berg Receiver. This is also shrink wrapped but that is how it comes from the manufacturer. Most of the weight of this is the wires.


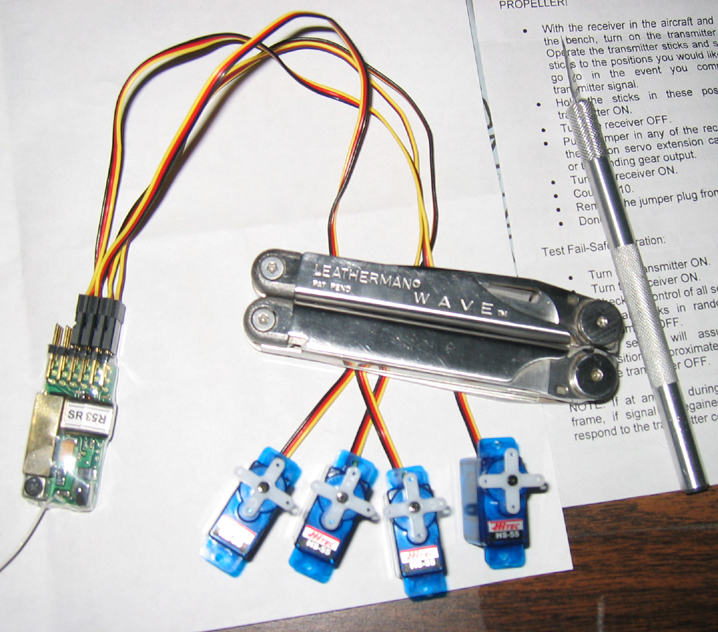
And while we are on the subject of small, here I am getting ready to test the servos and receiver.  These little servos are interesting in their transparent blue cases, and they sure are tiny and cute!!  :-p


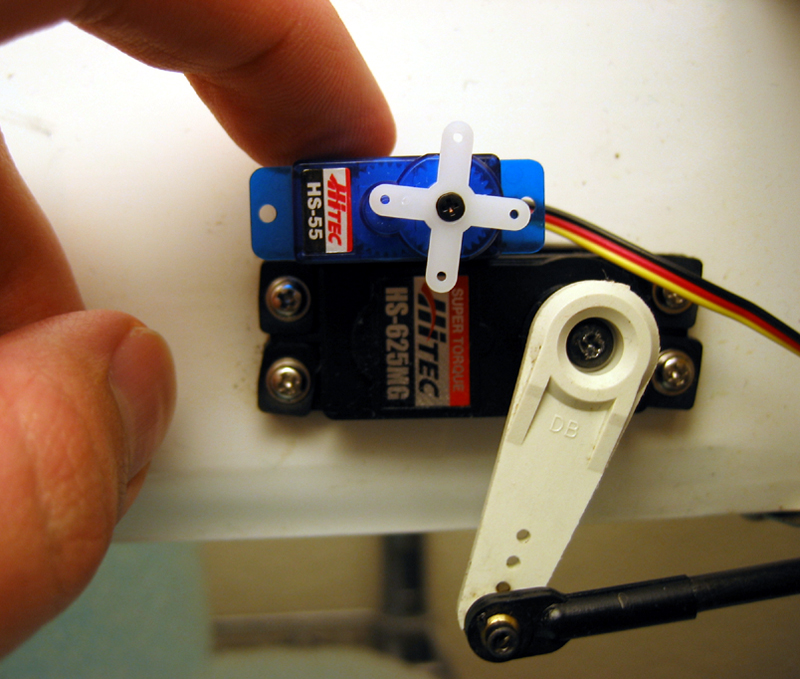
For a size comparison, here is one of the micro servos next to the HS-625MG rudder servo on my Funtana.


Berg Rx: http://www.aeromicro.com/berg6g3.htm

Phoenix 10 ESC: http://www.castlecreations.com/products/airplane/brushless/phoenix-10.html

But I got mine, as well as the the servos,  from towehobbies with 20.00 off  my order :-D


Logged

S!

TX-EcoDragon
Black 1
TX-Deck
BLACK 3
TX-Member
Hero Member
*****
Offline Offline

Posts: 906


View Profile WWW
« Reply #1 on: January 29, 2005, 10:01:39 am »

Heh, build threads are cool..... heh heh.....Looking great, keep us posted!TX-Deck out.
Logged

TX-Deck out.
TX-EcoDragon
BLACK 1
Administrator
Hero Member
*****
Offline Offline

Posts: 3034


G's Please


View Profile WWW
« Reply #2 on: January 29, 2005, 03:28:51 pm »

Looks like the Raven should ship out on monday, the rest of the gear should be here monday. . .
Logged

S!

TX-EcoDragon
Black 1
TX-EcoDragon
BLACK 1
Administrator
Hero Member
*****
Offline Offline

Posts: 3034


G's Please


View Profile WWW
« Reply #3 on: February 01, 2005, 03:46:58 am »

Well, today I received the charger, the three battery packs, the AXI 2212/34 motor and motor mount. . .Now I just need the plane, Dean's Connectors, solder, and other miscellaneous gear to get started.When the box came I thought there must be another box somewhere, the box is tiny, it wouldn't even hold a VHS tape. . . but then sure enough all was there. . . I just can't seem to get used to how small all this stuff is!
Logged

S!

TX-EcoDragon
Black 1
TX-Deck
BLACK 3
TX-Member
Hero Member
*****
Offline Offline

Posts: 906


View Profile WWW
« Reply #4 on: February 01, 2005, 09:10:54 am »

If you are really eager to get to work, you could make a plane outta that cardboard box, right?hehehe....TX-Deck out.
Logged

TX-Deck out.
TX-CUDA
BLACK 8
TX-Member
Hero Member
*****
Offline Offline

Posts: 1730


View Profile
« Reply #5 on: February 01, 2005, 08:46:40 pm »

...Eco, just be thankful that you are still young and have your eyesight! Just looking at those small components for your plane had me looking for my WalMart +2.5 specials!!TX-CudaMinister of Information
Logged

TX-Cuda
Minister of Information
<img src="http://miniprofile.xfire.com/bg/bg/type/2/txcuda340.png" border=0>
TX-EcoDragon
BLACK 1
Administrator
Hero Member
*****
Offline Offline

Posts: 3034


G's Please


View Profile WWW
« Reply #6 on: February 02, 2005, 06:37:58 pm »

Oh . . .that's probably just my crappy camera!!! ;-)I just picked up my Raven at the front office. The USPS shipping was pretty quick for being sent on monday (today is Wed.). The box did arrive damaged, and there are portions of the depron that are crushed a little on a few of the parts, though that's not Levi's fault. It was well packaged, just not well treated by the USPS. I patched the ailerons where they were crushed and the foam skin was a creased, it's a little less nice looking, but only when you are close. It's mostly just cosmetic and should be fine as far as flying goes. Otherwise the kit looks great. . . the CF gear are pretty snazzy too! Levi did forget to include my AXI motor mount though, or perhaps it fell out of the rather large hole in the box, the carbon fiber elevator joiner rod was also missing, he said he would send them out tomorrow. This is a pretty darn nice kit for the money!EDIT: Because of the box and contents damage as well as the missing joiner rod and motor mount Levi is sending me a replacement kit, even thought I told him that this one was in good enough shape. . . nice guy!I was a bit worried when I saw the box. . . though the damage was light.Here is what's inside.Here is the Carbon Fiber Landing Gear kit, with the wheel pants and misc. parts.Here you see the CNC Laser cut 6mm depron horizontal stabilizer and elevator halves.The Fuselage and Rudder. Jsut below this part you see the wing and fuse sides witha little damage.These are the wing skins which will be mounted to the main wing leading edges on top and bottom. . . you can also see the aileron servo cutouts on the bottom skins.Here is the Wing, and Fuselage sides, on top of them you can see the provided carbon fiber spar tube.  You can see that this is not just a flat plate wing, this shot shows the lightening holes in the leading edge under where the skins will go, the servo wire trenches that will conceal the wiring, the large ailerons, and the precut carbon fiber spar slot. There are some compressed/folded over areas on the outboard portions of both of the ailerons from shipping damage but I patched them with some scrap foam, and they are not going to be too obvious unless your looking close.
Logged

S!

TX-EcoDragon
Black 1
TX-CUDA
BLACK 8
TX-Member
Hero Member
*****
Offline Offline

Posts: 1730


View Profile
« Reply #7 on: February 02, 2005, 11:28:09 pm »

....looks good Eco. What would one of these kits with the other stuff such as servos and rcvrs/tsrs run if one of us would like to build the same thing? And what would the Helo front end add to the cost? Just curious here as I am still pumping parts into this darn box....TX-CudaMinister of Information
Logged

TX-Cuda
Minister of Information
<img src="http://miniprofile.xfire.com/bg/bg/type/2/txcuda340.png" border=0>
TX-EcoDragon
BLACK 1
Administrator
Hero Member
*****
Offline Offline

Posts: 3034


G's Please


View Profile WWW
« Reply #8 on: February 03, 2005, 01:46:34 am »

Well, the truth is that the startup cost for the initial purchase is still as high as a more substantial R/C model. Part of this is because the motor, speed control, servos, and receiver are not really much cheaper, in fact compared to an entry level .40 size glow model these are maybe even *more*! A big part of this is the higher tech stuff in use. The powerplants, the Lithium Polymer batteries, the speed controllers, the receiver, and the servos are all very small and light yet still fully featured so this rather cutting edge stuff. Having said that the cost of operation is basically zero, and with these the airplane itself is usually a few dollars for plans built ones, up to $50-60 for the more prefabricated, larger sized models. Keep in mind though that unlike a larger balsa built up model these can be dumb thumbed into teh ground at low speeds without much issue. . . maybe the fuse breaks in half. . well. . you brought your tape and glue with you right?  It's that simple. Not to mention that once you have the gear each plane you get after that will only cost you a little cash. Now, to get to the point.Here is a very complete kit sold as a package deal from FancyFoam for $329.00:http://www.fancyfoam.com/extra300l.htmWith this one you could probably stand to get another battery so you can have multiple flights, the charger will run you 45.00-50.00, and the transmitter can be a basic four channel radio  which will run you as little as 90.00,  though a radio with dual rates and exponential, and maybe some spoileron mixing functions is a wise idea if you want to best setup and this will be about 150.00-170.00 for the cheapest versions of these radios (these prices dont include the onboard gear, but the kit listed above does). You will also need some epoxy, some CA, and some CA kicker so the minimum total cost for the above would be:329.00+89+46+20=484Here is the all up deal for the shockflyer like ben and I have, the price is in the same range:http://www.hobby-lobby.com/shockflyer-edge.htmThe thing about these that makes them worth it for someone into RC is that you can fly everyday, it costs you nothing each time, you dont have to drive to the model airstrip, there is no noise, no cleanup, no club dues, no AMA insurance, if you crash most likely you can just use some glue and fix it. . if not, you just buy another plane for 30 bucks and off you go. Here is the one I bought: http://www.3dfoamy.com/raven.htmOh, I guess I do have two older 4 channel and two 6 channel Airtronics Vangaurd Radios. . . I would pretty much give these away to a TX member for shiping costs, though a new one would probably be a better investment in particualr if you want to do anything fancy. The variable pitch prop (tailrotor) modification is not really gonna be that pricey in itself, though to make it user friendly you will need a more capable transmitter than most 6 channels are. . .a JR 6102 or Futaba 7C would probably work allright. Also, these are custom jobs so you need to make the hollow motor shaft and linkage assembly with a suitable motor, as well as buy the tailrotor, whihc probably is pretty cheap. . and you'll need another servo which may require a greater investment in a higher cpacity speed controller to handle the extra current going to the radio gear. In the thread I posted (or did I??) are the people to ask about that. Here is the link to the RCG thread on the subject:  http://www.rcgroups.com/forums/showthread.php?t=270730
Logged

S!

TX-EcoDragon
Black 1
TX-EcoDragon
BLACK 1
Administrator
Hero Member
*****
Offline Offline

Posts: 3034


G's Please


View Profile WWW
« Reply #9 on: February 03, 2005, 02:06:08 am »

After checking the kit contents (mine was missing the custom motor mount I ordered as well as the elevator joiner rod)  you need to liberate the laser cut parts from the Depron sheets using a hobby knife or razor. Here is what you will have afterwords.I skipped the next step according to the manual because I don't have the motor mount yet. . .and moved into skinning the wings. Here you see the bottom wing skins each installed on the main wing. This is done by using Foam Safe Odorless Cyanacrylate (CA)  on one surface, and a foam safe kicker/accelerator on the other surface, or if you aren't sure you can work as fast as you need to for this combo you can use epoxy at a weight and time penalty.  In the first picture you see these sitting just above the main wing. I used CA and kicker and had some trouble with it. The instant curing makes it harder to get everything lined up because of the cutouts in the main wing the foam can displace forward or back, and in my case the spar slot was a tad compressed after I added one of the skins, and with the glue cured there wasn't much I could do. If I was doing it again I would join up the parts without kicker and then flip the wing over to the opposite side and spray the kicker on through th holes in the wing cutouts to secure it, and then let it sit overnight so that the CA that didn't come in contact with kicker has time to cure.
Logged

S!

TX-EcoDragon
Black 1
TX-EcoDragon
BLACK 1
Administrator
Hero Member
*****
Offline Offline

Posts: 3034


G's Please


View Profile WWW
« Reply #10 on: February 03, 2005, 02:17:23 am »

Once the bottom skins are on you flip the wing over and can now insert the carbon fiber spar. On this kit the spar is kept under tension buy it being flexed forward as you can see. Once you verify the spar will seat correctly in the spar cutout prepare some 5-30 minunte epoxy and use this to secure the spar in the wing slot. Ensure that the spar is pressed flush in the groove, I like to weight the assemply a little to be certain things are where I want them, wipe off any excess with denatured alchohol treated cloth, and let the epoxy cure. Be careful to use the minimal amounts of glue in everything that you do on these, this is a prime example. Here is my fancy shmancy method for weighing down the spar while the epoxy cures.Once the epoxy has cured it is time to use CA and kicker to glue the top surface skins over the wings leading edge, just like was done on the underside of the wing leading edge. The top surface skins don't join in the middle as teh bottom ones did, these should be lined up flush witht eh leading edge and wing tips as seen above.
Logged

S!

TX-EcoDragon
Black 1
TX-Deck
BLACK 3
TX-Member
Hero Member
*****
Offline Offline

Posts: 906


View Profile WWW
« Reply #11 on: February 03, 2005, 08:21:12 am »

A Leatherman, some scotch tape, and some funky purple windex.... I love it!TX-Deck out.
Logged

TX-Deck out.
TX-EcoDragon
BLACK 1
Administrator
Hero Member
*****
Offline Offline

Posts: 3034


G's Please


View Profile WWW
« Reply #12 on: February 06, 2005, 10:06:34 pm »

Here is the fully built main wing before sanding the Leading edge and before sanding the trailing edge of the top and bottom skins. Here is a Great Planes Controur Sander loaded with 80 Grit sticky-backed sandpaper that I shaped as you see here, this will be used to sand the leading edge of the wing into an airfoiled shape.Here is the wing after sanding the LE.Note that I also beveled all leading edges of the control surfaces, and the trailing edges where they meet up.Here is how you prepare the wing to have the wing skin trailing edges blended into the main wing. (optional, and sanding may actually reduce lift and drag somewhat, I did a 50/50 blend, I didn't leave it as it, and I didn't blend it cleanly into the main wing.)Once you have this done use a sanding block with 80 grit sandpaper to smooth the trailing edge a bit. Do this on all four wing skins. The Masking Tape should help protect teh areas of the wing you dont want sanded. Here is a tip: I discovered after the wing was painted that the sanded foam, and the unsanded foam hold paint differently and you can see this in the finished product, though it's not bad, for htose of you who spend weeks building something like a foamy then you might want to consider a light sanding to the wing skins between the bevels at teh LE and TE of the skins to give them a more uniform appearance.Here is what mine looks like all done.Here is the Wing and Ailerons mated up and ready to be painted. I have been trying ot figure out how to paint th rather tricky Raven Graphic onto the aircraft, I wasn't really sure how I was going to do it, but I think I have found a way!Here is some contact paper I found at the hardware store. It is low-tack, transparent, semi flexible (hope this works). I am experimenting here, but I did a test run and found that the contact paper didn't seem to damage the foam when removed, and didn't allow for any more bleeding than did my Blue Painters Masking tape. . .wish me luck.I used the photo before last to make the stencil mask for getting a true to life Raven graphic by taking the photo of the wing and setting it at 1:1 scale, and then resizing a photo of the full scale raven untill I had what I wanted.next I excised the blue/black portion of the Raven graphic to save on ink, and was then ready to output the Raven Graphic tiles on my InkJet. I split the image you see here in two so that I could print it at full size from my PC.Then I lined up the two halves of the raven graphic and taped them together. Once they were lined up and joined I taped them to the contact paper.I laid the above assembly on a mirror and used a fresh Xacto knife and traced around the edges of the raven graphic, pressing hard enough to cut down to the glass. Once done you are left with the contact paper mask cut just like the full scale Raven!
Logged

S!

TX-EcoDragon
Black 1
TX-EcoDragon
BLACK 1
Administrator
Hero Member
*****
Offline Offline

Posts: 3034


G's Please


View Profile WWW
« Reply #13 on: February 06, 2005, 10:21:36 pm »

The handy thing about this method is that I make one session of cutting and I get two masks. . here is the outer part of the contact paper that I will use in conjunction ith a smaller inner mask to spray paint the gold detail.Not shown in the pictures but required for what I am doing is to cut two mroe raven wing graphic panels by tracing with an xacto the inner line of the gold trim in the inkjet output. this gives me what I need to paint all three colors and mask the others.
Logged

S!

TX-EcoDragon
Black 1
TX-EcoDragon
BLACK 1
Administrator
Hero Member
*****
Offline Offline

Posts: 3034


G's Please


View Profile WWW
« Reply #14 on: February 07, 2005, 07:04:52 pm »

Here is the wing, fuse and side rails installed as a test run in prep for masking. Wing masked for inner Raven Graphic with the transparent stencil and masking tape all ready to pant.First Wing Coat. I wanted the blue to fill is some of the holes that the foam has, usually you can see these through the light coats of paint, so I thought this might give me a blue black look when the sun hit the plane. . .just like the full scale Raven.Here is the second coat of paint, this time in black. . .obviously.I did another coat and let it dry. . here is the finished inner Raven graphic as I remove the contact "paper" (more like vinyl) from the wing. Note that the center section, is masked off to save on some weight. As it is I will probably have a pretty heavy plane when all my painting is done. . . Oh well, that's why I bought 830 mAh batteries instead of 1200-1500 mAh packs! Next I will be doing the red coats, and lastly the gold.
Logged

S!

TX-EcoDragon
Black 1
Pages: [1] 2 3 ... 5
  Print  
 
Jump to: