|
TX-EcoDragon
|
 |
« Reply #15 on: February 07, 2005, 08:45:11 pm » |
|
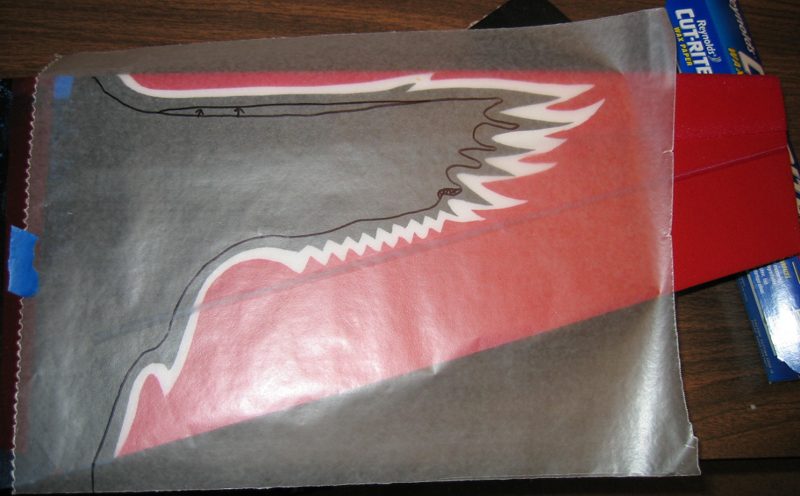
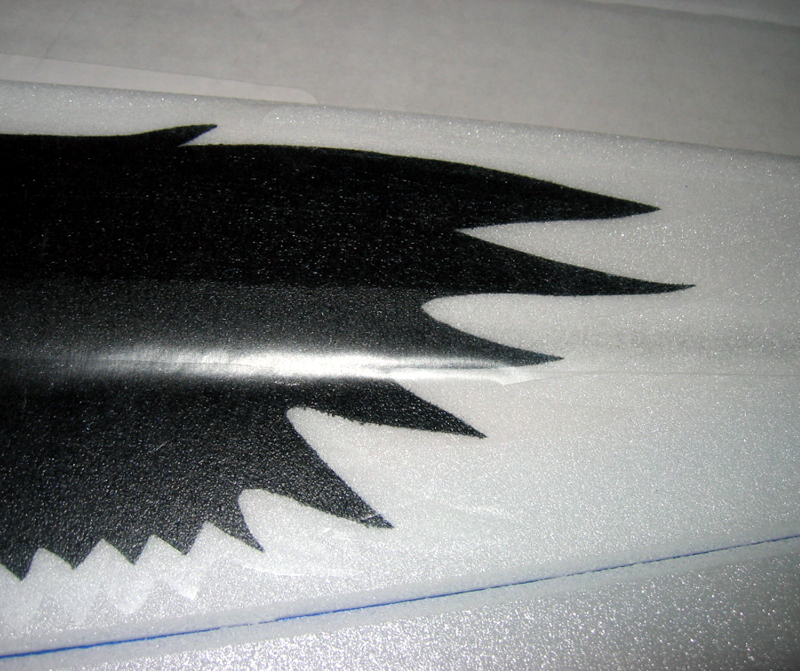 Here is the contact paper stencil mask applied to the right wing in prep for the red coat. This will mask off the black raven graphic, as well as the currently white border which will be be painted gold in teh next painting session. The neat thing about the way I am doing it is that I have enough masks that I don't need to have any paint layers overlapping, they sit right next to each other, just touching, but no layering of colors is needed. 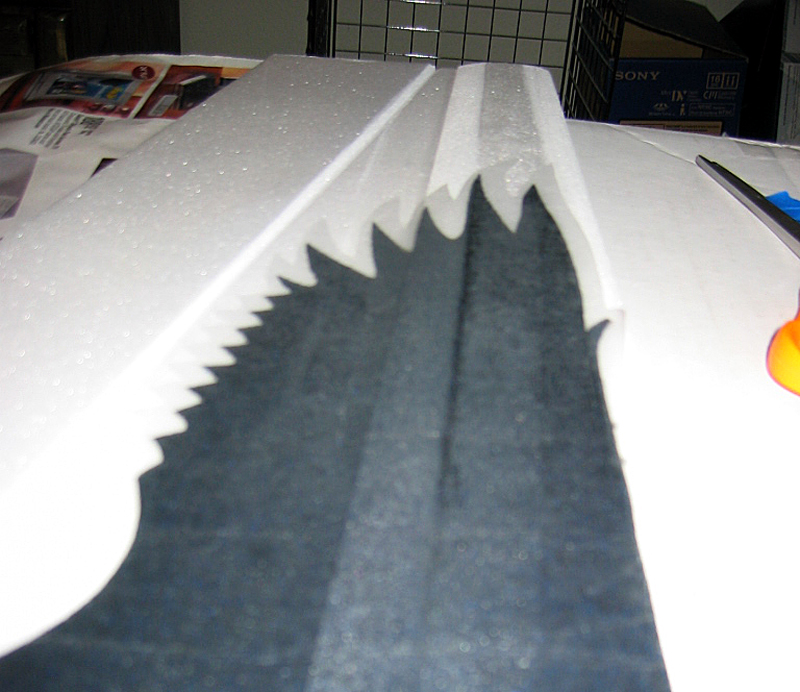 Another angle, I know the stencil is hard to see since it's clear. . . but as you see here that makes this job much more precise. Time to paint it! 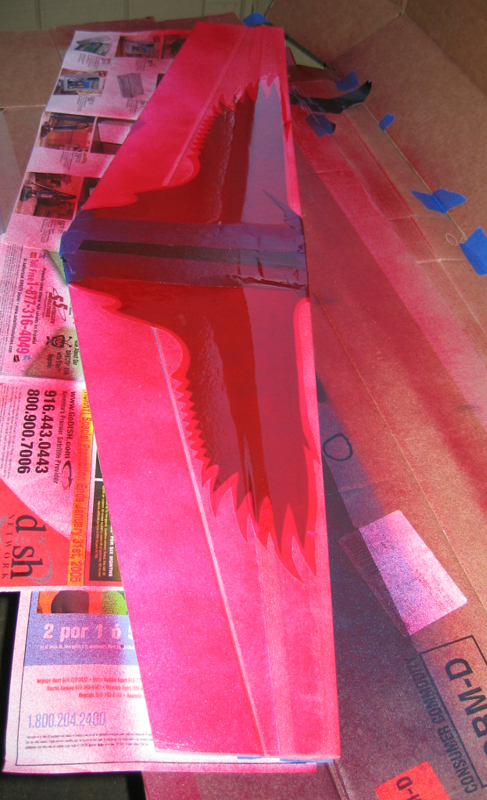 Here is the first coat. Here it is a little easier to see where the stencil mask is as it reacts to the paint differently than the foam does. 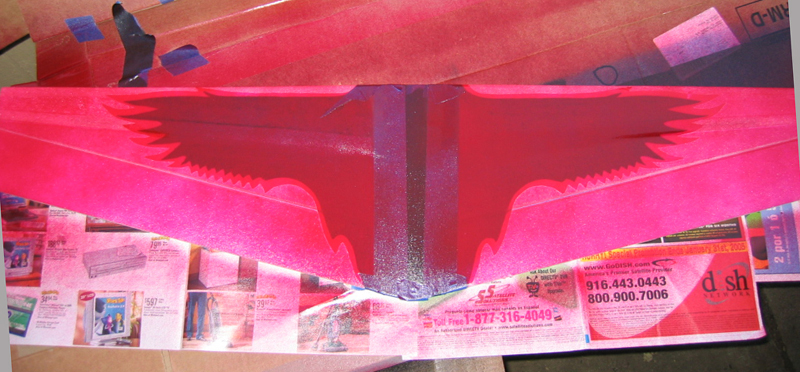 Another view.Since it looks like this Con-Tact Paper works and since I used the yard of it that I bought I need to head out to ACE again before doing the fuselage! |
|
|
|
|
 Logged
|
S!
TX-EcoDragon
Black 1
|
|
|
|
TX-Deck
|
|
« Reply #16 on: February 08, 2005, 08:18:18 am » |
|
Are you back yet? I'm eager to see what happens next... ;)TX-Deck out.
|
|
|
|
« Last Edit: February 08, 2005, 08:19:22 am by TX-Deck »
|
Logged
|
TX-Deck out.
|
|
|
|
TX-EcoDragon
|
|
« Reply #17 on: February 08, 2005, 03:31:38 pm » |
|
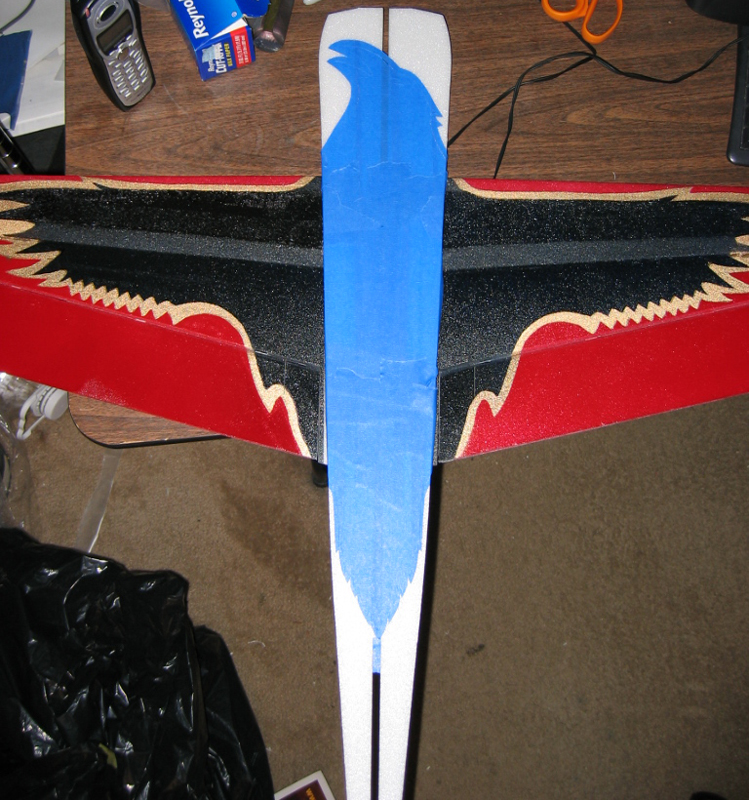
 Well, after drying overnight I peeled the contact paper off. It did take a little of the black paint with it, but nothing too bad. Perhaps leaving it in the sun for a few minutes, or simply not letting it sit overnight might have helped. From now on I will place a sheet of wax paper under the center parts of the contact paper to keep it from lifting much of the paint. Note that the center section of the wing, in between the skins and ailerons is masked off so it is still bare foam, it's just covered in masking tape! I also added all the control surfaces to the wings/stabs using CA hinges. I found the foam flexed a bit at teh point where the control horns meet the aileron so I might suggest that one hinge be placed just inboard of the control horn mounting location to keep the surface from getting tweaked under load.  I also did the horizontal stab and elevator halves which you can see here, as well as the Apogee 830s that I just added Dean's Micro connectors to.. Next will come the gold layer. . . other than that I am waiting on my AXI motor mount to arrive to continue. I may just have to get one made. . . |
|
|
|
|
Logged
|
S!
TX-EcoDragon
Black 1
|
|
|
|
TX-EcoDragon
|
|
« Reply #18 on: February 09, 2005, 12:07:58 am » |
|
 I decided to cut out some wax paper to place in the center portions of the contact paper so i could minimize the paint removing that it did on the previous runs. I just drew a rough little line with a sharpie and then cut it out. This is to protect the black of the raven graphic. 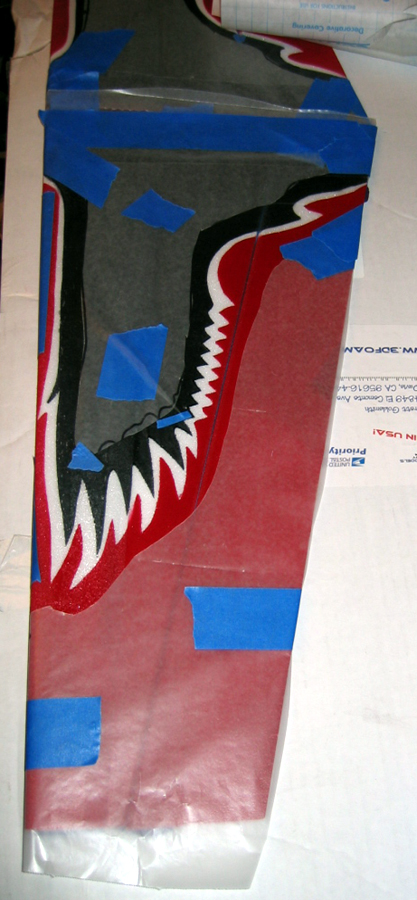 This section will protect the red of the wing. 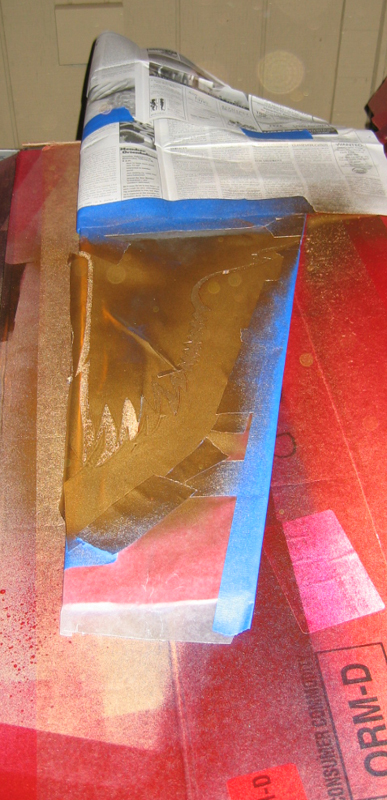 I placed the stencil over the wax paper, and then added the gold paint. The Leading edge was a real pain becasue the contact paper wouldnt stick to the curved area. . .I just sprayed the paint on an angle so that it was less prone to overspray under the mask. 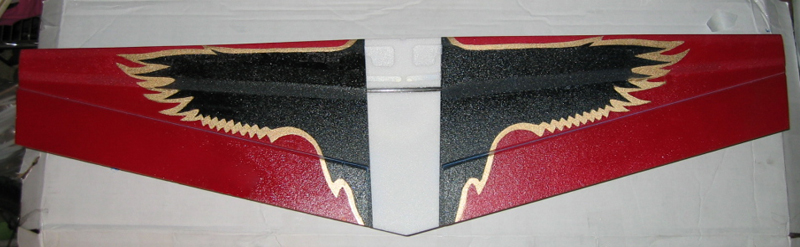 Here is the finished wing after touching it up a bit. Looks pretty good if I do say so myself!! |
|
|
|
|
Logged
|
S!
TX-EcoDragon
Black 1
|
|
|
|
TX-EcoDragon
|
|
« Reply #19 on: February 11, 2005, 02:32:41 am » |
|
 I have moved on from the Contact paper technique. . now it's masking tape laid out in sheets on wax paper. . . a little more conventional, and it sticks better on countours and hopefully wont pull as much paint off. Above you see the masking tape as cut for top of the fuse, this mask is for the red, there is an outer trim cut here which I will leave in the next painting session, and just peel the center section out to do the black next, while masking off everything that is red. As before I have the outlines of the wax paper masks that will fit like a puzzle piece over the red paint. . .hopefully it wont remove any paint when I peel it back off. 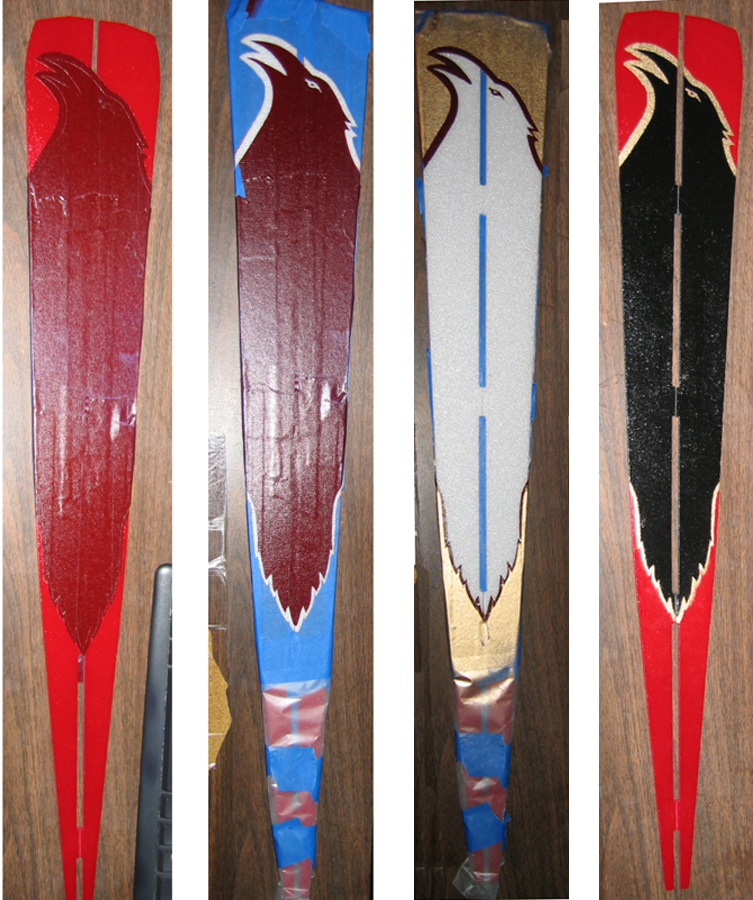 fuse tops 1,2,3,4(note that the angle I shot these at makes the fuse sides not look symmetrical . but they are.)Pic 1) This pic shows the fuse after applying the red coat.Pic 2) After the red paint dried I added the red mask (here seen in blue), and then peeled the gold trim mask out from between the two masks in prep to paint the gold layer.Pic 3) This is the fuse top after applying the gold coat. I removed the innermost section of the mask leaving the area that will be painted black exposed, and reapplied the thin masking layer where the gold was painted (after it fully dried). Now it's ready for the black!!Pic 4) Here is the finished paint on the fuse side tops. The masking tape does bleed more than the contact paper did, but part of that is that I had to reuse the tape stencils once and the removal and reapplication was a little tricky so the tape was not as sticky and crisp as it could have been, I used a hobby knife to etch the black bleed through areas off of the gold as the black paint had not fully dried when I removed the masks. Overall I am pretty happy with this! This is gonna be one sweet looking foamy. . . I just hope it's not 20 oz.!!Next I have to paint the side of the fuselage, and then there is not much left other than landing gear, radio and engine isntallation. . and I am still waiting on a motor mount. . . I bought some carbon tube that works in place of the elevator joiner, I attempted to hand cut (w/Xacto!) a firewall type motor mount, but it ended up being pretty much a waste of time and balsa. I am hoping the motor mount shows up tomorrow. . . it's high time I fly this thing!! |
|
|
|
|
Logged
|
S!
TX-EcoDragon
Black 1
|
|
|
|
TX-EcoDragon
|
|
« Reply #20 on: February 11, 2005, 07:04:04 pm » |
|
In preparation of making the side fuse stencil I did some side view shots and figured I would grab a top down view also for this post. 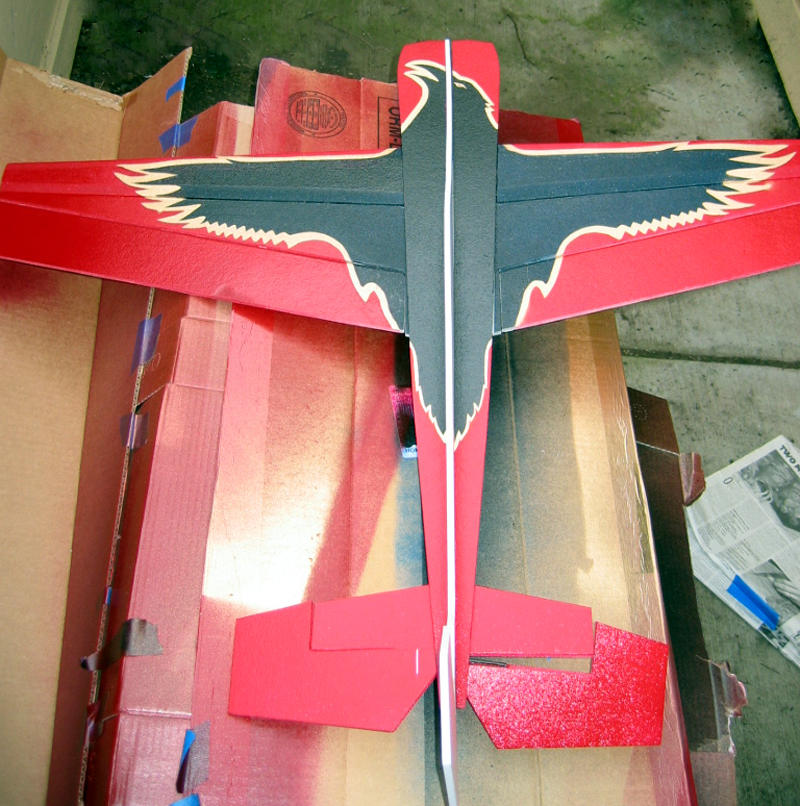 Here is the complete airframe (though the parts aren't glued togther yet, and the elevators aren't hinged obviously) This shows how the top down paint will look with exception of the vertical portion of the fuse which will be painted once I get the motor mount. 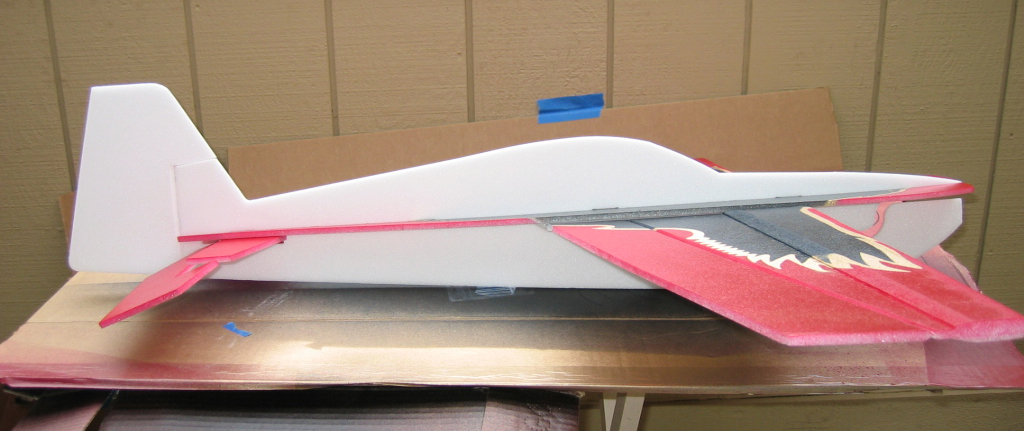 Here is the side view.  Another |
|
|
|
|
Logged
|
S!
TX-EcoDragon
Black 1
|
|
|
|
TX-FlightRisk
|
|
« Reply #21 on: February 12, 2005, 08:22:28 pm » |
|
Su Weet........S~TX-FlightRisk "If my plane is smoking it can mean one thing...I have been hit in one of my ass cheeks and I am cauterizing my wound....."
|
|
|
|
|
Logged
|
S~
TX-FlightRisk
"If my plane is smoking it can mean one thing...
Damn gremlins must be stowed away smoking CRACK again....."
|
|
|
|
TX-Deck
|
|
« Reply #22 on: February 13, 2005, 09:39:43 am » |
|
I dunno Eco, after looking at the size of that rudder, I think the plans may need to be revised to INCREASE the surface area....(that was sarcasm, in case it was lost in text)Can't wait for the video!TX-Deck out.
|
|
|
|
|
Logged
|
TX-Deck out.
|
|
|
|
TX-EcoDragon
|
|
« Reply #23 on: February 13, 2005, 07:58:16 pm » |
|
 Here is the full scale 3 view. . . it's still got plenty of rudder, and other surfaces but not quite what the foamy has . that's for sure!! |
|
|
|
|
Logged
|
S!
TX-EcoDragon
Black 1
|
|
|
|
TX-EcoDragon
|
|
« Reply #24 on: February 13, 2005, 08:29:45 pm » |
|
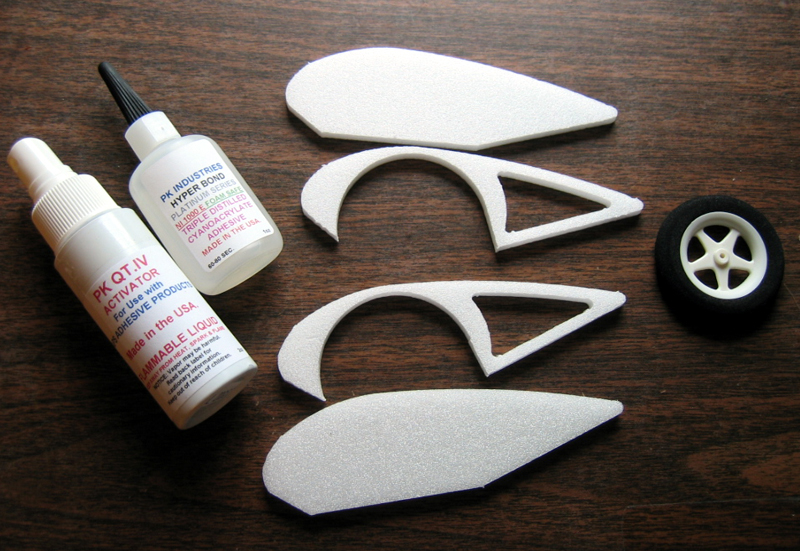 Here are the wheel pant components ready to build up on one of the pants. What you see here is the two solid side portions of the wheel pants, as well as the two spacers that you sandwhich between them to accomodate the wheel. There are two spacers provided, you can use one if the wheels are thin enough, in my case I used two to give some room for the wheels. The wheels are not included in the kit so you have a choice of which type you like to use. I opted for the MPI 2.0" as seen here. 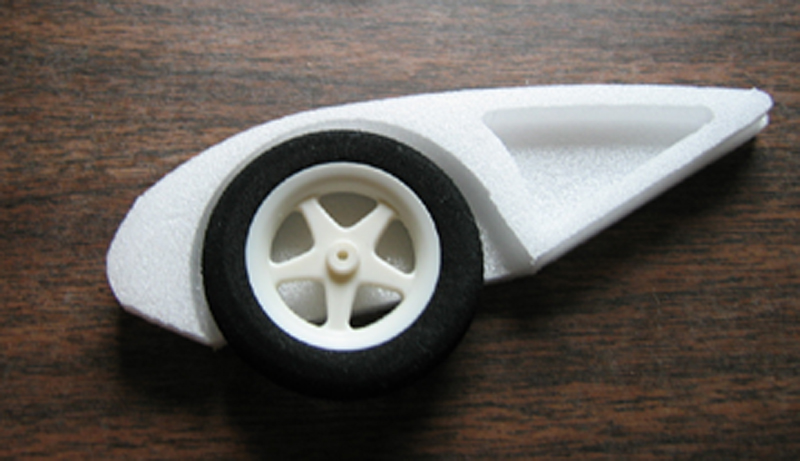 Here is how it looks assembled in cross section.  Here is the whole pant assembled. I didn't end up using the accelerator, the glue seemed tacky enough and I didn't plan on sanding them round just yet. I just tossed some weight on them and let them cure. Next I will once again break out the contour sander and round these, then its time to paint them! 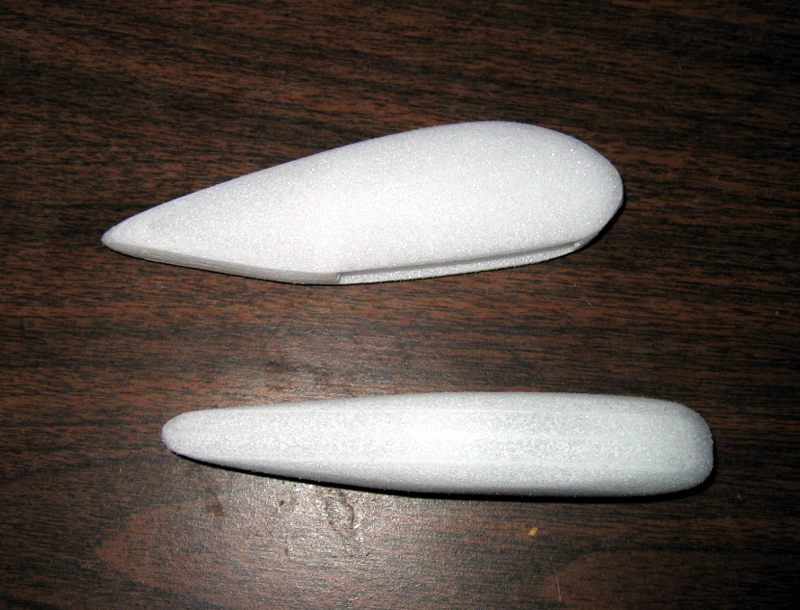 I am in the process of sanding the wheelpants to a more rounded and tapered shape. Here they are nearly completed. |
|
|
|
|
Logged
|
S!
TX-EcoDragon
Black 1
|
|
|
|
TX-EcoDragon
|
|
« Reply #25 on: February 14, 2005, 07:08:05 pm » |
|
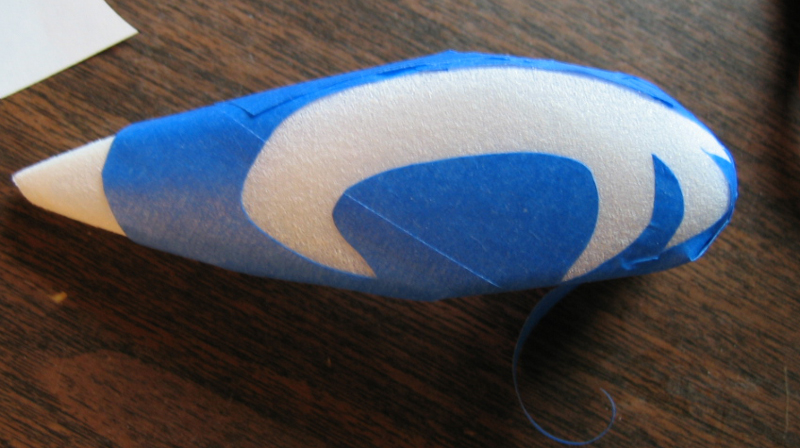 Here is the mask for the white paint around the Raven's claws. 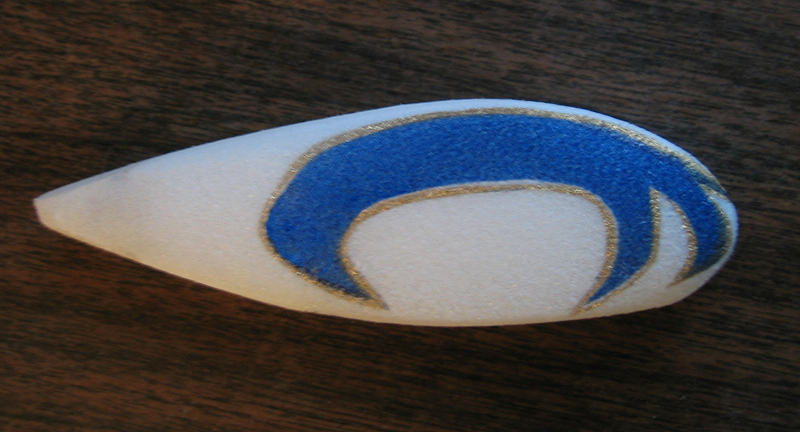 I had figured the wheel pants would be quick, but I opted to do the gold trim too, which is a very thin line of masking tape over lots of contours, and it ended up being a bit of a pain, and it still didn't look very good in the end. Not to mention that the dark blue I bought isnt all that dark when painted over white foam, but anyway, here is the first one I did. I figure it will look fine from 5 feet away anyhow . . . and im 6'2 so as long as I take off and land on the ground I should have nothing to worry about! ;-P |
|
|
|
|
Logged
|
S!
TX-EcoDragon
Black 1
|
|
|
|
TX-EcoDragon
|
|
« Reply #26 on: February 17, 2005, 09:33:07 pm » |
|
 I recieved another package today from 3D Foamy and it contained a complete Raven replacement kit, as well as a the non-pro Turbo Raven to boot! The AXI motor mounts were also included.  Here are the AXI motor mounts, there are two plywoods pieces in each package that must be epoxied together (EDIT: note that I didn't realize this when I built mine, and there were dire consequences as you will see later in this thread), the star shaped ones are for the turbo Raven/Giles kits, the cross shaped ones are for the Raven.  Here is the mount ready to be installed or painted next to the motor.  Trial fit of the "torqued" motor mount assembly. 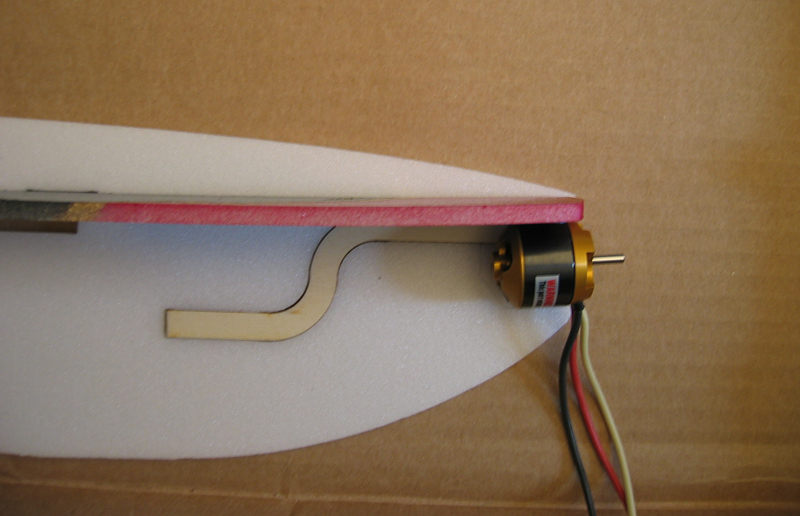 Now I am outlining the motor in preparation for cutting out the foam and triming the torqued mount.  Here is how it looks for my AXI installation. |
|
|
|
|
Logged
|
S!
TX-EcoDragon
Black 1
|
|
|
|
TX-EcoDragon
|
|
« Reply #27 on: February 18, 2005, 02:52:44 am » |
|
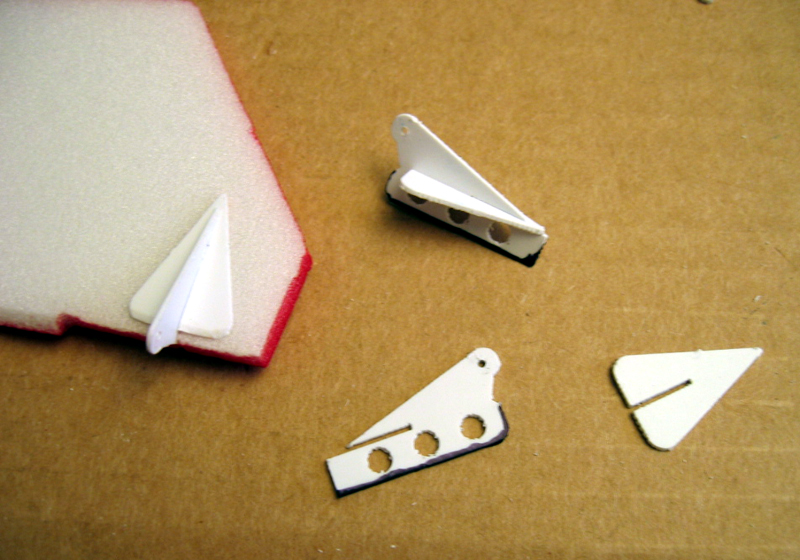 Here are the included control horns in various stages of assembly and installation, I just used a Sharpie marker to help blend the control horns in with their respective surfaces. 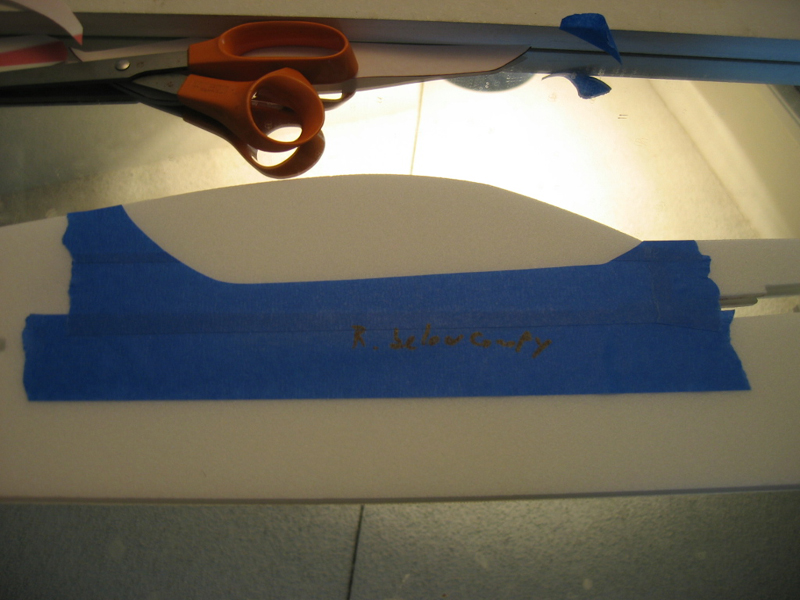 Here is the canopy area masked off for painting, I haven't really figured out what would look best, I didn't simply want the canopy to be black along with the Raven graphic, i was toying with silver or the blue that I already have. 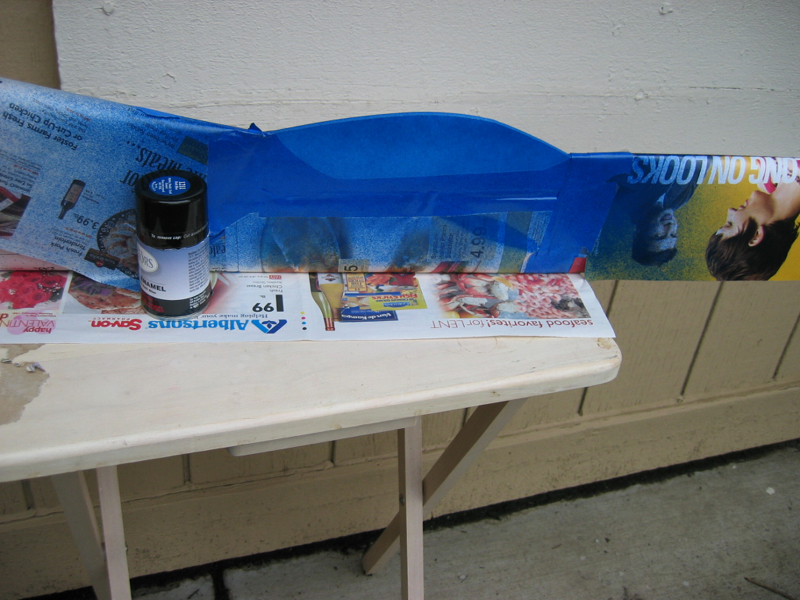 Well, I decided I would try the blue for the canopy.  I don't really like the blue, but it would probably look good in the air. . . though I am thinking silver might have been a better way to emulate the canopy. . . a thin coat of silver over this might be just the ticket, but I will decide once it's all built up and flown. I have also started building my second Raven, it will be fully built without much paint as this is gonna be my basher. . . it should be done tomorrow along with this one. |
|
|
|
|
Logged
|
S!
TX-EcoDragon
Black 1
|
|
|
|
TX-Rahman
|
|
« Reply #28 on: February 18, 2005, 09:05:41 am » |
|
Eco...looks great!! For the canopy...maybe mask the canopy off again and kinda overspray the silver lightly over the blue so the blue still kinda shows through?  So you have three planes now?!?Regards,TX-Rahman"BLACK 4" |
|
|
|
|
Logged
|
Regards,
TX-Rahman
"BLACK 4"
|
|
|
|
TX-EcoDragon
|
|
« Reply #29 on: February 18, 2005, 03:27:45 pm » |
|
Yep, I have three of them! One will be a gift though! Of course I don't have any gear for another plane so it will be a backup for now.
|
|
|
|
|
Logged
|
S!
TX-EcoDragon
Black 1
|
|
|
|
