|
TX-FlightRisk
|
 |
« Reply #45 on: February 24, 2005, 02:16:39 am » |
|
Fine and outstanding job. What did that kit cost? I want one now.......S~TX-FlightRisk "If my plane is smoking it can mean one thing...I have been hit in one of my ass cheeks and I am cauterizing my wound....."
|
|
|
|
|
 Logged
|
S~
TX-FlightRisk
"If my plane is smoking it can mean one thing...
Damn gremlins must be stowed away smoking CRACK again....."
|
|
|
|
TX-EcoDragon
|
|
« Reply #46 on: February 24, 2005, 04:32:02 am » |
|
I go into it pretty extensively earlier in this thread. . .on page one I think. . . Let me prepare you first off that they really aren't any cheaper than much more substantial glow/gas powered models, but they have some big perks that over time help to offset the cost, such as no expensive fuel needed, no fuel cleanup needed after flying, no need to drive to the flying field if you have a park nearby, you can fly everyday even if you only have a little bit of time, they are quiet, they are easy to fix if you hurt them (well, within reason) the fragile airframe is the cheapest part of the aircraft. . . fly on soft grass and you proabbly wont hurt anything too bad. . . judt use great caution when using Lithium-Polymer batteries as they must be charged, disscharged, and handled correctly, if they are involved in a crash they can short internally and caude some serious damage. . . short of that (no pun intended) these are fun and affordable to operate after the initial purchase.
|
|
|
|
|
Logged
|
S!
TX-EcoDragon
Black 1
|
|
|
|
TX-EcoDragon
|
|
« Reply #47 on: March 02, 2005, 01:38:02 pm » |
|
2/23/2005 7:25:42 PMI just got back from 5 more flights. . . even with the wheel pants installed my CG is still needing to go forward for neutral trim upright and inverted, it is now at about 3.25 inches aft of the LE and it still climbs when trimmed for upright flight when it is rolled inverted. The roll rate is nice and fast now with the added aileron, but can still be precise when you stop it. This is a VERY nice flying plane other than the inverted climbing issue which is specific to my forward horizontal stab and elevators. You can tell it's a bit heavier than the Shocky types though, and right under the stall AoA the ailerons do seem to become rather unresponsive unless you blast a little power over them. . . I am not sure that more throw is the real solution, I think throttle managment is the first, best response, as if you are working the power a bit you won't notice this, but if you just gradually fly slower and slower you will hit a spot at the stall where the ailerons sorta fade out. . .go slower than this and you must increase power (you are behind the the power curve) and this makes them come alive quite well once again. I haven't weighed mine yet, but It does hover at 50% power with the AXI 2212/34. In reply to question about forward CG ruining the 3D flying characteristics: As far as the CG issue is concerned, the first flight with the aft CG it practically torque-rolled hands free. . . my flights on it yesterday with a more forward CG (set just aft of neutral trim upright and inverted) were with winds gusting to 13 knots so it wasn't hands free, but it was actually quite comfortable hovering and torque-rolling keep in mind I don't have expo and I fly it most of the time on high rates, and with the CG at 3.5 inches it is pitch stable enough to draw nice lines provided the wind isn't turbulent. I don't think this thing is in any danger of poor torque-rolls at any flight worthy CG to be honest, but I will slide the battery up to the front end of the range today, on this windless day and report back a more accurate appraisal. There is some rock in the harriers to counter, and they do lessen in magnitude as the CG moves aft, that said, there is ample control response in the harrier to fly out the rocking. Keep in mind that the rocking is also made worse by higher wingloadings, and while I haven't weighed mine yet I'm sure its heavier than mose 3DF planes will be with all the paint and glue I used.
|
|
|
|
|
Logged
|
S!
TX-EcoDragon
Black 1
|
|
|
|
TX-EcoDragon
|
|
« Reply #48 on: March 02, 2005, 01:39:08 pm » |
|
Last night I worked up the courage to get out the Xacto saw and excise my horizontal stab/elevator assembly from the fuse so that I can move the surfaces back towards the rear of the fuse cutout where they should have been glued in the first place. I have had some issues with neutral pitch trim when rolling from upright to inverted such that when trimmed for level upright flight (at speed) a half roll to inverted requires aft stick to maintain level inverted flight, moving CG forward had less effect on this dynamic than usual so I think the tail position may be a factor. I will let you all know. This is actually sort of handy when in the low speed high alpha 3D realm as things like rolling harriers and such require a little less stick movement on the elevator, but for easier IMAC style flying I'd like the inverted qualities changed some. It will be fun to see if this has any effect, or rather, how much of an effect it has.
|
|
|
|
|
Logged
|
S!
TX-EcoDragon
Black 1
|
|
|
|
TX-EcoDragon
|
|
« Reply #49 on: March 02, 2005, 11:53:40 pm » |
|
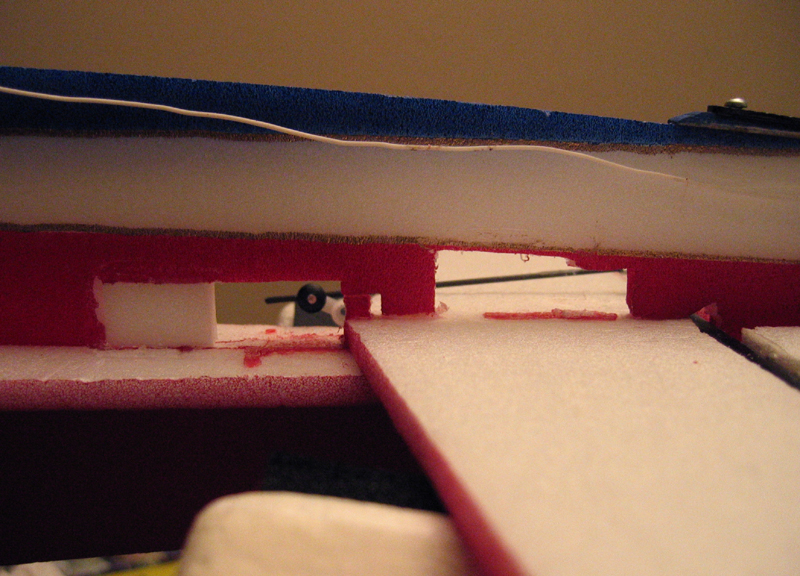
The glue is just about cured, I need to patch the hole from my previous servo mounting location and then re-install the servos. My JR 9303 arrived today so I will swap a new crystal into the Berg and my Funtana and try out some expo tomorrow!! Whoo hoo! 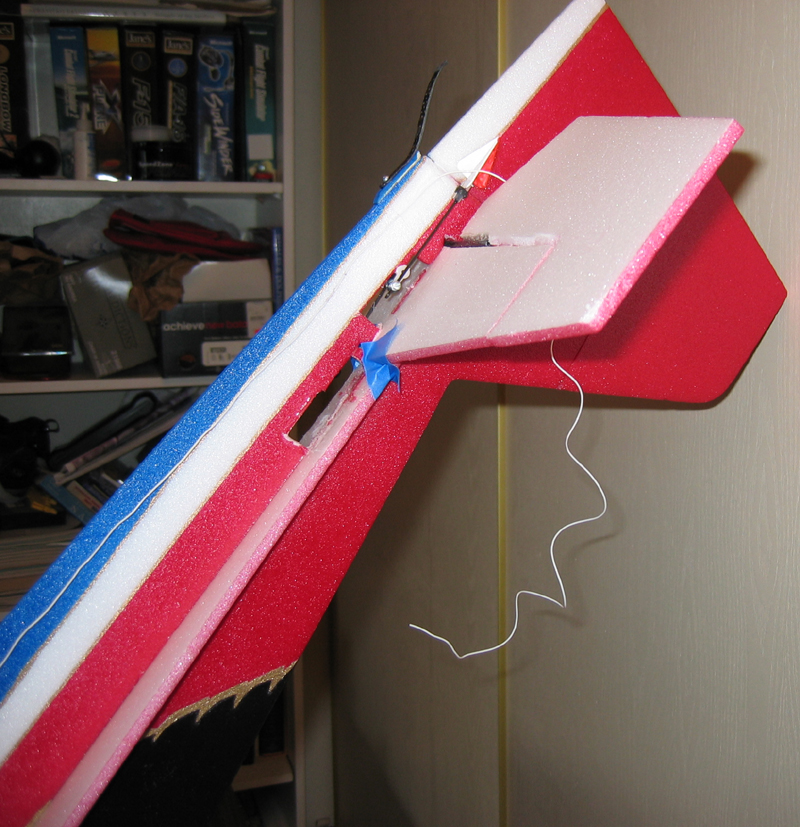 Here is the hack job I did to the Raven, I will patch this up and it should be as good as new. . .if not a bit heavier. |
|
|
|
|
Logged
|
S!
TX-EcoDragon
Black 1
|
|
|
|
TX-EcoDragon
|
|
« Reply #50 on: March 03, 2005, 02:59:26 am » |
|
 In this shot you see the patch job in progress as I test fit one of the foam inserts. I saved the extra foam from my kits so that was handy. You also see the red area that was once the joint between the stab and the fuse, I used an Xacto to clean up the glue and such from the area after this shot. 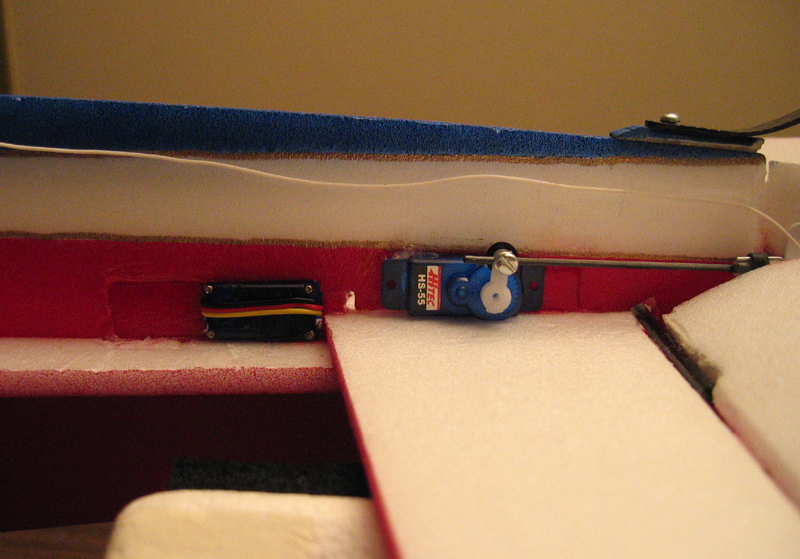 Here I have re-installed the servos for the elevator and rudder and the patches have been painted and installed |
|
|
|
|
Logged
|
S!
TX-EcoDragon
Black 1
|
|
|
|
TX-Rahman
|
|
« Reply #51 on: March 03, 2005, 08:29:58 am » |
|
Looks good as new....nice job there Hackford!  Regards,TX-Rahman"BLACK 4" |
|
|
|
|
Logged
|
Regards,
TX-Rahman
"BLACK 4"
|
|
|
|
TX-Deck
|
|
« Reply #52 on: March 03, 2005, 08:36:54 am » |
|
I agree with Rah... nice repair work there! I'm sure you'll be glad you took the time to make it happen.NEED MORE VIDEO!TX-Deck out.
|
|
|
|
|
Logged
|
TX-Deck out.
|
|
|
|
TX-EcoDragon
|
|
« Reply #53 on: March 03, 2005, 11:25:55 pm » |
|
Yeah, Every time I get out to fly it Ben brings one of his planes and get's distracted with that so my camera guy is in the doghouse right now. I have sold my two older tansmitters and some radio gear and transfered those funds to a lovelly new JR 9303 9 Channel computer radio, I got the Raven programmed in, so one of these days I will need to fly it! I am really curious how the moved tail will affect the flying characteristics. In addition the weather's been bad, when it's clear it's really windy. I have been REALLY busy, tonight I am helping the girlfriend's mom pack up the moving truck, and then I get to drive it 6 hours tomorrow and unload it. . whooo hoooo!!This sunday I am going to try to get back in time to go to the SWAN Aerobatic Safety Seminar. . . so it won't be until monday at the soonest. . . I am thinking of taking it to Metz. . . maybe a little video of it doing a nice knife edge pass then the Full scale Raven doing one in the background. . . that'd be cool!! I'll talk to Wayne!:-D
|
|
|
|
|
Logged
|
S!
TX-EcoDragon
Black 1
|
|
|
|
TX-EcoDragon
|
|
« Reply #54 on: March 09, 2005, 10:00:03 pm » |
|
yesterday I had two flights, and today I had three on the new tail and transmitter. I had to remove most of the exponential I dialed in as I am simply not yet used to it, 21 years of high rates and no expo has given my thumbs a reluctancy to move large amounts on the sticks, setting it at no more than 20% was OK, but I still flew better with none. I had my first motor mount fail, not at the fuse joint, the plywood itself split in half, causing damage only to my motor and ESC wires, but the fuse was fine. I replaced it with a second AXI mount of Levi's the day before yesterday. I flew it lightly yesterday on the new mount, but it was a bit too windy to really report on anything. Today was still a little bit windy, but I flew at a park with the cover of trees and buildings to lessen the windspeed a bit. Today I could see that the tail moved back did improve the pitch tracking and stability by a noticable amount. My 3 flights today each had the CG in different spots and the model was most well behaved all around at about 3.25 inches aft of the LE. It would still climb a little when inverted at speed, but at lower speeds it was neutral, and near 3D speeds it required a forward push on the stick for level flight. The pitch tracking was better too as it was easier to draw good lines. There is still a deadspot in the aileron response, it's right at the speed between flying and 3D'ing though in the harrier it has a nice roll response, and of course when flying on the wing it has more than enough. Rolling harriers were easier than on the shocky, mostly because the models stores more rotational energy in the roll so it presents better, being more stable and consistant as it rolls, this also makes it a little easier to fly through the figures as it simply feels more solid, even with wind. I noticed a little more pitch coupling in the Knife Edges today, buty nothing unusual, and once the KE coupling is dialed out it is content to fly around KE as long as you are. It was starting to really come together at this point! I did some snap roll and spin attempts on the third flight which had the CG at around 3.75 inch aft of the wing LE which were strange, the snaps would not snap the aircraft would pitch through the snap into very high alpha flight or even do the worlds smallest immelman. I went up high and went for an upright spin, it didn't really turn into a spin it more or less spiralled down very slowly and gently ina harrier with healthy pitch oscillation where it appeared to fly in and out of the stall. I tried this one with no aileron (a full scale style spin) and intended for the next spin to use aileron which I expected would give me a better spin. I didn't have the chance to though. . . as I exited the spiral harrier and turned back to head away from me I heard a rather loud pop and saw foam fly, then the engine and speed control could be seen dangling from below the aircraft I had some roll control but couldnt turn and decided to just glide it straight ahead and did a greaser harrier landing into the grass. The fuse forward of the wings was not in good shape though. [&:]There really was nothing on this flight that was what I would call hard aerobatics other than that I attempted three snap rolls, and did one outside tumble on a upline into a torque roll. . . nothing out of the ordinary through so you can imagine my dismay when I saw my nose explode. . . in level, 1/3rd throttle, 1 g flight no less. In any case I am a bit bummed.  Needless to say my next plane will not use the front firewall mount.I got video yesterday and today which I will upload.Here are some pics:Top Down view of the fuse 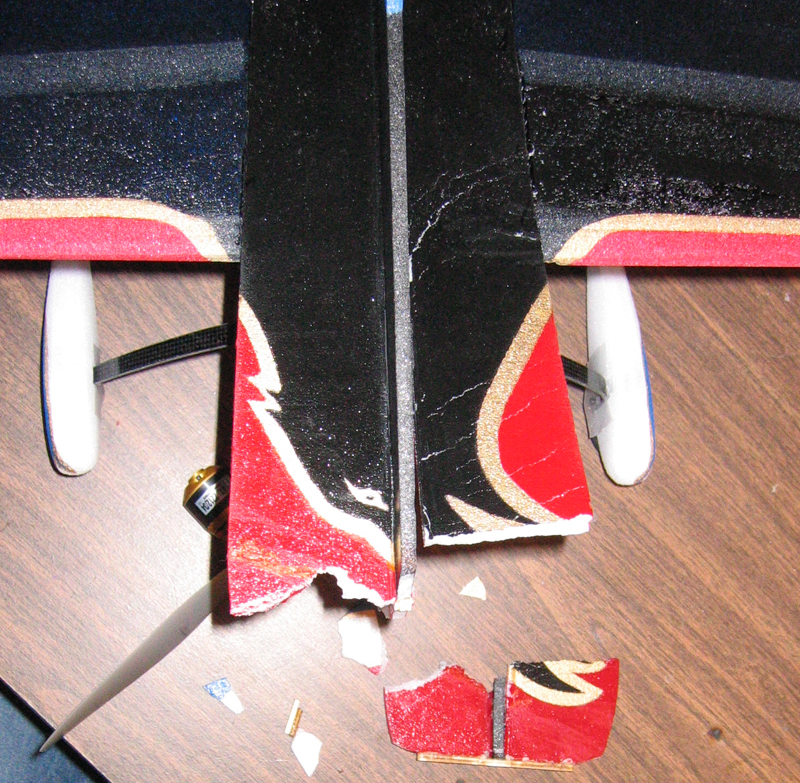 :-( 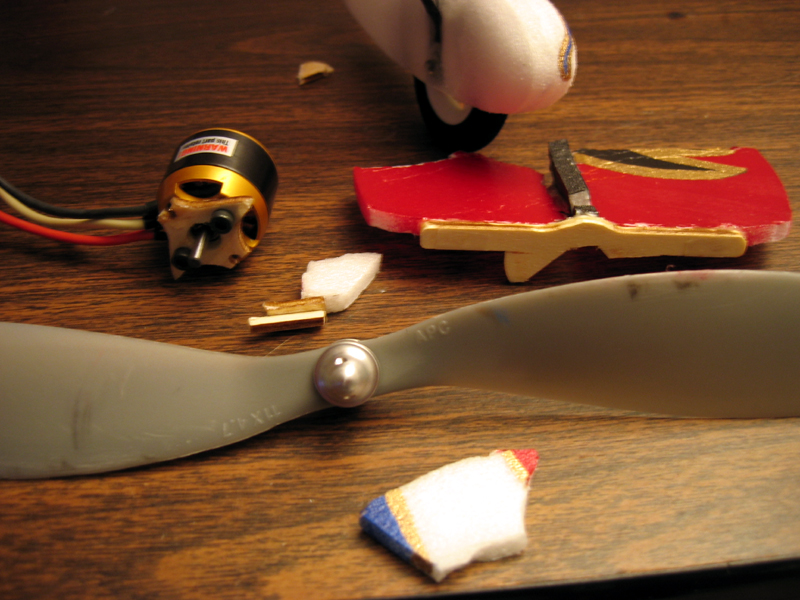 I found all the parts except the carbon fiber crossbeam. Here you can see how the motor mount failed, this is much like the first ones failure, at the bottom screw hole, as well as at the top of the cooling holes in the mount. Note that the bottom portion of the mount broke at the screw hole despite the patch of ply that I epoxied over it!  Here you can see that the prop disc actually rotated downwards and cut clear through the fuse foam below and behind the motor mount. . . note the paint on the leading edge of the prop and how it lines up with the foam placed next to it. There is also a nice slice out of the left wing LE where the prop must have hit it when teh engine was flying around on the end of it's wires. 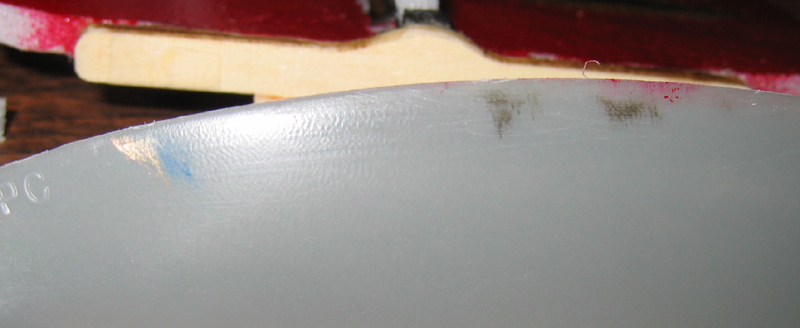 Here is a close up of the paint marks on the prop. 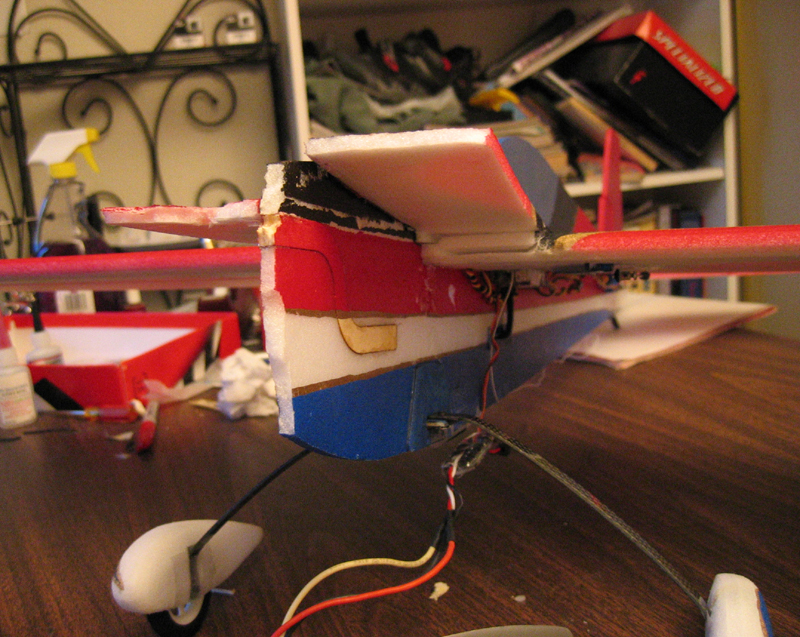  The damage to the left side was pretty bad, here you see the fuse side rail damaged all the way back, as well as the split in the wing. 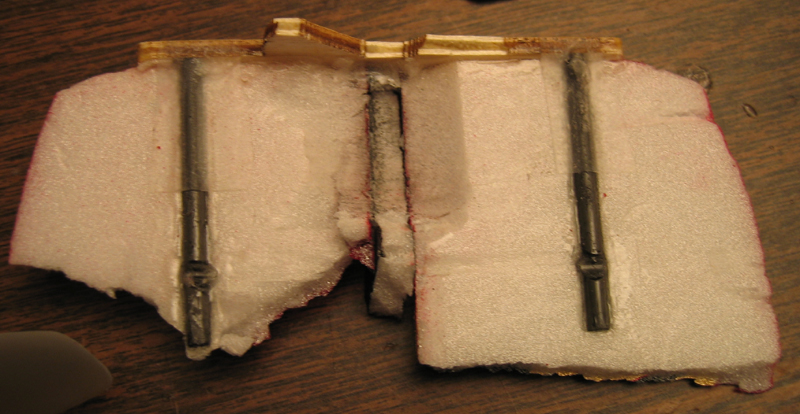 Here is the bottom of the fuse nose, and the carbon CF rods. . . these at least add lots of rigidity to the mount assembly, but the plywood itself is too flexy at the lower mounting screw for the motor to be secure. You may notice that the at all places where the mount glues to the fuse foam the joints are instact. The Break started at the bottom of the motor can, the prop hit the fuse lower portion, and then all heck broke loose. I guess it's time to fly the sim and full scale for a while till I get in a better mood.S!TX-EcoDragonBlack 1TX-Squadron XO |
|
|
|
|
Logged
|
S!
TX-EcoDragon
Black 1
|
|
|
|
TX-Deck
|
|
« Reply #55 on: March 09, 2005, 10:15:13 pm » |
|
Man! I don't really know what to say other than I'm terribly sorry that it happened! At least the damage to the electronics was minimal, and foam is cheap. From my point of view, it appears you had a good time building everything from the kit level, so look back on that and be proud of the fine job you did with the construction. I never really realized how sharp a foamie could turn out until I saw your work on this one.Hang in there, revise, and rebuild. I'm positive it will fly again and be better than the original design. Might be a good chance to provide some feedback to the kit designer, or at least research a little bit and see what others have done if this is indeed a common issue. Good luck, if I can help with the rebuild mods, let me know!TX-Deck out.
|
|
|
|
|
Logged
|
TX-Deck out.
|
|
|
|
TX-EcoDragon
|
|
« Reply #56 on: March 09, 2005, 11:33:27 pm » |
|
After analysis of the point of failure on the two mounts this is a proposed modification to the mount to beef up the week points of the current mount. .jpg) This will eliminate the weak points from the half moon cooling cut-outs, as well as the real problem, the screw hole at the six o clock position.Too bad I had to figure this out the hard way.Photoshop work done by TX-DeckS!TX-EcoDragonBlack 1TX-Squadron XO |
|
|
|
|
Logged
|
S!
TX-EcoDragon
Black 1
|
|
|
|
TX-EcoDragon
|
|
« Reply #57 on: March 11, 2005, 02:56:39 am » |
|
I just found out that the AXI mount is supposed to be built twice as thick. I had two kits and got a bag with two mounts in it, and with no instructions assumed that the mounts where 1 for each kit, turns out that I should have laminated the two together before mounting in the aircraft. Too bad I didn't find that out before trashing my month's worth of work on this one and damging my ESC and motor. :-/I had fun though, even if for only 10 flights. . . If I build another it will probably use the backplate mount, but at least now I see what the trouble was. S!TX-EcoDragonBlack 1TX-Squadron XO
|
|
|
|
|
Logged
|
S!
TX-EcoDragon
Black 1
|
|
|
|
TX-EcoDragon
|
|
« Reply #58 on: March 25, 2005, 06:00:42 pm » |
|
Here are some of the AXI stick mounts available. These will work with Levi's "Torqued" motor beams.I haven't used these, but will probably try one for my next plane: wood built up mountshttp://www.cl-i-max.com/axi-mounts.shtmlaluminum mountshttp://www.topcreationsrc.com/catalog/accessories/motor_mounts/index.htmI like this one. . but 12.50!! Sheesh. . .  S!TX-EcoDragonBlack 1TX-Squadron XO |
|
|
|
|
Logged
|
S!
TX-EcoDragon
Black 1
|
|
|
|
TX-EcoDragon
|
|
« Reply #59 on: April 21, 2005, 04:56:35 pm » |
|
I managed to rebuild my Raven (thought it's a bit ugly) and use the new stick mounted AXI. The weight of the aircraft with the fixes is a bit higher than it must have been before, but I jsut weighed it fully ready to fly witht eh 830 3 cell pack and it was just 12.9 oz! I did an uneventful and very soft touch and go on the baseball diamond today, and then on the landing the gear dug into some loamy soil and folded aft breaking clean out of the fuse! The surface wasn't as smooth as a ruwnay of course, but I had oeprated there with the shockflyer without issues. This plane is a full fledged beater now I guess! In any case I will use this to test a new gear mounting setup. In other 3DFoamy news. . .   Levi has recently released a new product line starting with the "Super"Extra and the SuperCap 232. These are 45 inch wing span hollow core composite foam aircraft. All surfaces are laminate layers of depron foam instead of single sheets, much like the leading edge of the "Pro" wing on the older kits. This allows the structures to be more or less hollow, and the laminate contstruction boost the rigidity of the foam quite a lot. . . the result is a stronger, more rigid, and lighter structure that also looks a little more scale. The model is also scaled up in size from 40 inch span, to a 45 inch span. See the Flight Video here: http://www.3dfoamy.com/Videos/SuperXtraPromo.wmvLevi also incorporated changes to the new design some of which were suggested in this build thread. The new kits have aileron cutouts that are now placed perpendicular (and closer) to the aileron hinge line which gives better pushrod and surface geometry of the ailerons. The horizontal stab has a ply tab and notch that makes correct placement easy. The size, and weight of this Foamy are higher than most, and for me that's a good thing, this has the effect of making the aircraft fly more precise and scale when you want that, as well as increasing it's ability to handle wind. My only gripe is that the landing gear mounting system is the same one, and IMHO this needs to be redone such that the mounting plates are flexible and large enough to distribute loads into the foam from the fore/aft and torsional forces that some landings (or landings on anything that isn't a smooth firm surface). I am currently fabricating a new mounting system that I will test and if it works as planned I will send the specs to Levi for his review and perhaps incorporation into the kits.S!TX-EcoDragonBlack 1TX-Squadron XO |
|
|
|
|
Logged
|
S!
TX-EcoDragon
Black 1
|
|
|
|
